Creating an iOS 5 iPhone Multiview Application using the Tab Bar
| Previous | Table of Contents | Next |
| iOS 5 iPhone Rotation, View Resizing and Layout Handling | Creating a Simple iOS 5 iPhone Table View Application |
Learn SwiftUI and take your iOS Development to the Next Level |
So far in this book we have worked exclusively with applications that present a single view to the user. In practice, it is more likely that an application will need to display a variety of different content depending on the actions of the user. This is typically achieved by creating multiple views (often referred to as content views) and then providing a mechanism for the user to switch from one view to another. One of a number of mechanisms for achieving this involves the use of either the UINavigationBar or UITabBar components. In this chapter we will begin by implementing a multiview application using a Tab Bar.
An Overview of the Tab Bar
The UITabBar component is typically located at the bottom of the screen and presents an array of tabs containing text and an optional icon that may be selected by the user to display a different content view. Typical examples of the tab bar in action include the iPhone’s built-in Music and Phone applications. The Music application, for example, presents a tab bar with options to display playlists, artists, songs and videos. Depending on the selection made from the tab bar, a different content view is displayed to the user.
Understanding View Controllers in a Multiview Application
In preceding chapters we have talked about the model-view-controller concept in relation to each view having its own view controller (for additional information on this read the chapter entitled An Overview of the iPhone iOS 5 Application Development Architecture). In a multiview application, each content view will still have a view controller associated with it to handle user interaction and display updates. Multiview applications, however, require an additional controller.
Multiview applications need a visual control that will be used by the user to switch from one content view to another, and this often takes the form of a tab or navigation bar. Both of these components are also views and as such also need to have a view controller. In the context of a multiview application, this is known as the root controller and is responsible for controlling which content view is currently displayed to the user. As an app developer you are free to create your own root controller by subclassing from the UIViewController class, but in practice it usually makes more sense to use an instance of either the UIKit UITabBarController or UINavigationController classes.
Regardless of the origins of your chosen root controller, it is the first controller that is loaded by the application when it launches. Once loaded, it is responsible for displaying the first content view to the user and then switching the various content views in and out as required based on the user’s subsequent interaction with the application.
Since this chapter is dedicated to the creation of a tab bar based application we will be using an instance of the UITabBarController as our root controller.
Setting up the Tab Bar Example Application
The first step in creating our example application is to create a new Xcode project. To do so, launch Xcode and select the option to create a new Xcode project.
Whilst it is possible to implement tab bar functionality completely from an empty application template, it is also possible to leave much of the preparatory work to Xcode by selecting the Tabbed Application template option. The next step, therefore, is to select this option and click Next to proceed.
On the next screen enter TabBar as the product name and class prefix, make sure that Device Family is set to iPhone and that the Use Storyboard and Unit Test options are turned off. Proceed to the final screen and browse to a suitable location for the project files before clicking Create.
Locating the Root Controller
Before adapting the application to our requirements it is important to gain an appreciation of the way that Xcode has structured the project to accommodate the tab bar functionality.
As previously discussed, the key to a multiview application is the root controller, and in the case of Tab Bar based applications this takes the form of an instance of the UITabBarController class. In acknowledgement of this requirement, Xcode has implemented a root controller in the application delegate. Begin, therefore, by selecting the TabBarAppDelegate.h file in the project navigator pane:
#import <UIKit/UIKit.h>

@interface TabBarAppDelegate : UIResponder <UIApplicationDelegate, UITabBarControllerDelegate>
@property (strong, nonatomic) UIWindow *window;
@property (strong, nonatomic) UITabBarController *tabBarController;
@end
As can be seen from the above interface file, Xcode has declared a UITabBarController reference to act as the root controller. Later in this section we will look at how the app delegate has also been primed to initialize this object.
Reviewing the Content View Controllers
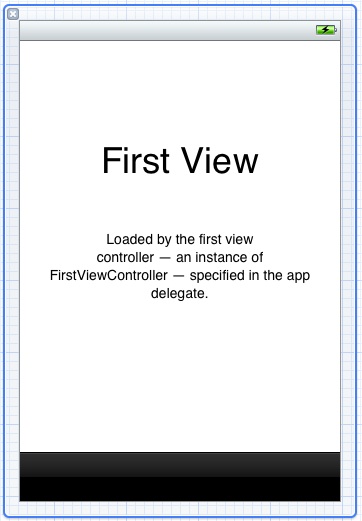
Looking at the project navigator it is also evident that Xcode has added two view controllers to present some content views to the user. These are named FirstViewController and SecondViewController and consist of view controller .m and .h source files and a corresponding NIB file for each view. Selecting the FirstViewController.xib file, for example, shows the user interface for the first view as created on our behalf by Xcode:

Figure 15-1
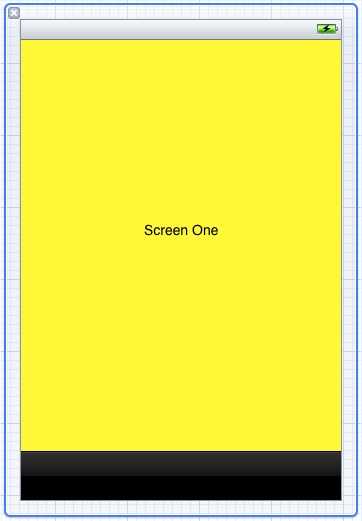
Currently the view includes two informational labels intended to provide some guidance to the developer. This view may be modified within the Interface Builder environment to meet the requirements of the application. For the purposes of this example delete the two labels currently contained within the view. Display the Attribute Inspector (View -> Utilities -> Show Attribute Inspector), select the view canvas and change the background color to yellow. Drag and drop a new label object onto the center of the view canvas. Double click on the label and change the text to Screen One:
Figure 15-2
Select the SecondViewController.xib file and repeat the same steps, this time changing the background color to light blue and setting the text on the label to Screen Two.
Also included with the view controllers are two image files named first.png and second.png containing icons to appear on the tab bar items.
Next, select the FirstViewController.m file and locate the initWithNibName: method:
- (id)initWithNibName:(NSString *)nibNameOrNil
bundle:(NSBundle *)nibBundleOrNil
{
    self = [super initWithNibName:nibNameOrNil
       bundle:nibBundleOrNil];
    if (self) {
        self.title = NSLocalizedString(@"First", @"First");
        self.tabBarItem.image = [UIImage imageNamed:@"first"];
    }
    return self;
}
The purpose of the code in this method is to identify the tab bar item object (the tab bar item is the area of the tab bar that selects the view when touched by the user) associated with this view and configure it to display the title “First” and the image contained in the first.png file.
Edit the title line to change the text to Screen One:
self.title = NSLocalizedString(@"Screen One", @"Screen One");
Select SecondViewController.m and note that the method changes the corresponding tab bar item to display “Second” and the second.png image file. Once again modify the title line, this time setting the text to Screen Two.
Initializing the Root Controller
The code to initialize the root controller has been implemented by Xcode in the didFinishLaunchingWithOptions: method of the application delegate. Select TabBarAppDelegate.m from the project navigator and review the code in this method:
- (BOOL)application:(UIApplication *)application didFinishLaunchingWithOptions:(NSDictionary *)launchOptions
{
    self.window = [[UIWindow alloc]
        initWithFrame:[[UIScreen mainScreen] bounds]];
    // Override point for customization after application launch.
    UIViewController *viewController1 =
        [[FirstViewController alloc]
        initWithNibName:@"FirstViewController" bundle:nil];
    UIViewController *viewController2 =
        [[SecondViewController alloc]
        initWithNibName:@"SecondViewController" bundle:nil];
    self.tabBarController = [[UITabBarController alloc] init];
    self.tabBarController.viewControllers = [NSArray
     arrayWithObjects:viewController1, viewController2, nil];
    self.window.rootViewController = self.tabBarController;
    [self.window makeKeyAndVisible];
    return YES;
}
The code in this method performs a number of tasks in order to initialize the tab bar behavior for the application.
First, the method allocates and initializes the window for the application (a standard procedure typically performed in this method):
self.window = [[UIWindow alloc]
        initWithFrame:[[UIScreen mainScreen] bounds]];
Next, the method initializes instances of the two content view controller classes and associates each controller with the corresponding .xib file:
UIViewController *viewController1 =
    [[FirstViewController alloc]
    initWithNibName:@"FirstViewController" bundle:nil];
UIViewController *viewController2 =
    [[SecondViewController alloc]
    initWithNibName:@"SecondViewController" bundle:nil];
Having initialized the content view controller, the root controller in the form of a UITabBarController instance is allocated, initialized and assigned to the tabBarController variable (as declared in the TabBarAppDelegate.h interface file):
self.tabBarController = [[UITabBarController alloc] init];
At this point in the code both the root controller and the two content view controller objects exist but are not associated in any way with each other. To address this, the code creates an NSArray object containing the two content view controller objects and assigns that array to the viewControllers property of the tabBarController object:
self.tabBarController.viewControllers = [NSArray
     arrayWithObjects:viewController1, viewController2, nil];
The next step involves the declaration of the tabBarController object as the root controller so that it is the first view controller loaded by the application at launch time. This is achieved by assigning the object to the rootViewController property of the window object:
self.window.rootViewController = self.tabBarController;
Finally, the window is made visible to the user and the method returns:
[self.window makeKeyAndVisible];
return YES;
Building and Running the Application
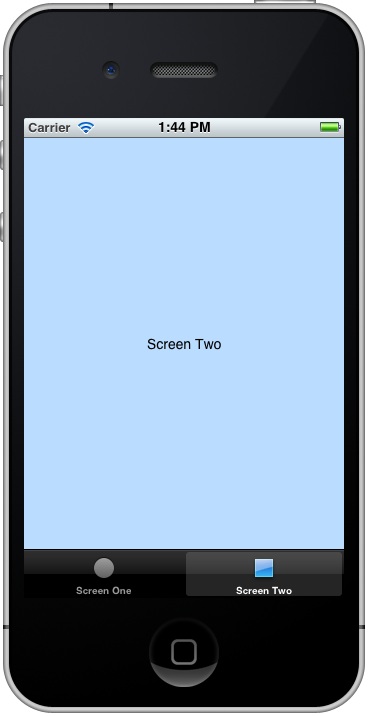
Having modified the user interfaces of the two content views and reviewed the application logic implemented by Xcode for the Tab Bar, click on the Run button located in the Xcode toolbar to compile and execute the application within the iOS Simulator environment. Initially, screen one should appear together with a tab bar along the bottom of the screen with items displayed to switch between views. Selecting the Screen Two item will switch the currently visible view to the second view controller:
Figure 15-3
Adding an Additional Content View
Having provided an outline of how tab bar controller behavior is implemented the final phase of this example involves adding an additional view to the example application. The first step is to create an additional view controller. Select the Xcode File -> New File… menu option and select the icon for a UIViewController subclass template before clicking Next. On the options panel, make sure that the Subclass of menu is set to UIViewContoller and that the With XIB for user interface option is selected (and the iPad option is off). Enter the name ThirdViewController before creating the new class.
Select the ThirdViewController.xib NIB file in the project navigator panel, change the background color of the view to light green and add a label with the text Screen Three.
Select the ThirdViewController.m file and modify the initWithNibName: method to set the title on the tab bar item and to re-use the first.png image file:
- (id)initWithNibName:(NSString *)nibNameOrNil
bundle:(NSBundle *)nibBundleOrNil
{
    self = [super initWithNibName:nibNameOrNil
         bundle:nibBundleOrNil];
    if (self) {
        self.title = NSLocalizedString(@"Screen Three", @"Screen Three");
        self.tabBarItem.image = [UIImage imageNamed:@"first"];
    }
    return self;
}
At this point the third view controller is now complete. The final task is to modify the app delegate’s didFinishLaunchingWithOptions: method to initialize the third view controller with the correct NIB file and to add it to the array of view controllers handled by the root controller. Select the TabBarAppDelegate.m file and modify the method so that it now reads as follows (note also the requirement to import the ThirdViewController.h file):
#import "TabBarAppDelegate.h"
#import "FirstViewController.h"
#import "SecondViewController.h"
#import "ThirdViewController.h"

@implementation TabBarAppDelegate
@synthesize window = _window;
@synthesize tabBarController = _tabBarController;

- (BOOL)application:(UIApplication *)application didFinishLaunchingWithOptions:(NSDictionary *)launchOptions
{
    self.window = [[UIWindow alloc]
       initWithFrame:[[UIScreen mainScreen] bounds]];
    // Override point for customization after application launch.
    UIViewController *viewController1 =
      [[FirstViewController alloc]
      initWithNibName:@"FirstViewController" bundle:nil];
    UIViewController *viewController2 =
      [[SecondViewController alloc]
      initWithNibName:@"SecondViewController" bundle:nil];
    UIViewController *viewController3 =
      [[ThirdViewController alloc]
      initWithNibName:@"ThirdViewController" bundle:nil];
    self.tabBarController = [[UITabBarController alloc] init];
    self.tabBarController.viewControllers =
      [NSArray arrayWithObjects:viewController1,
         viewController2, viewController3, nil];
    self.window.rootViewController = self.tabBarController;
    [self.window makeKeyAndVisible];
    return YES;
}
Once again, compile and run the application, this time noting the presence of three tab bar items providing access to three content views.
Learn SwiftUI and take your iOS Development to the Next Level |
| Previous | Table of Contents | Next |
| iOS 5 iPhone Rotation, View Resizing and Layout Handling | Creating a Simple iOS 5 iPhone Table View Application |


