Creating a Simple iOS 5 iPhone Table View Application
| Previous | Table of Contents | Next |
| Creating an iOS 5 iPhone Multiview Application using the Tab Bar | Creating a Navigation based iOS 5 iPhone Application using TableViews |
Learn SwiftUI and take your iOS Development to the Next Level |
Although Xcode 4.2 introduced the concept of Storyboards, there is nothing that stipulates that storyboards must always be used when developing applications. In the case of Table Views, for example, there will often be instances where it is just as appropriate to use a code based approach to Table View implementation.
In the interests of providing a full understanding of the different options available to the developer, in this and the next chapter we will look at the steps involved in implementing table views without recourse to the storyboarding features of Xcode.
Setting up the Project
For the purposes of this chapter we will be creating a very simple iOS 5 iPhone application containing a single Table View. Begin by launching Xcode and selecting the option to Create a new Xcode Project and select the Single View Application template. Click Next, make sure that the Device Family selection is set to iPhone and name the project and class prefix TableExample. Finally, uncheck the Use Storyboard and unit test toggles, click Next and select a suitable location for the project files before clicking the Create button.
Adding the Table View Component
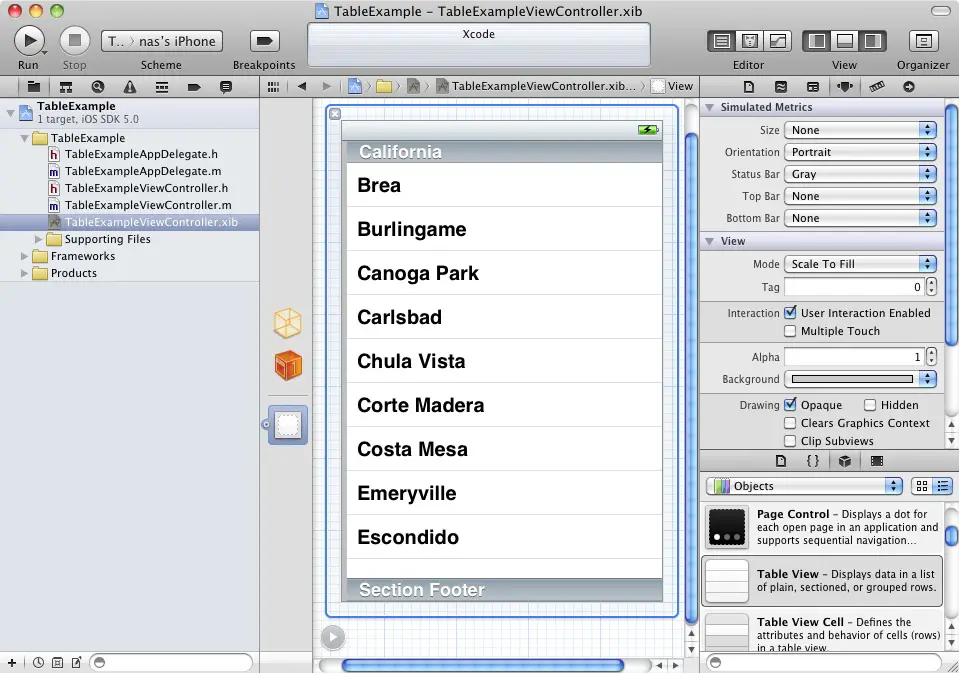
Not surprisingly, the application we are creating is going to require an instance of the Table View component. Select the TableExampleViewController.xib file from the project navigator panel to load it into the Interface Builder tool. Display the Object library panel (View -> Utilities -> Show Object Library) and drag a Table View object from the library onto the view in the editing panel:
Figure 16-3
Making the Delegate and dataSource Connections
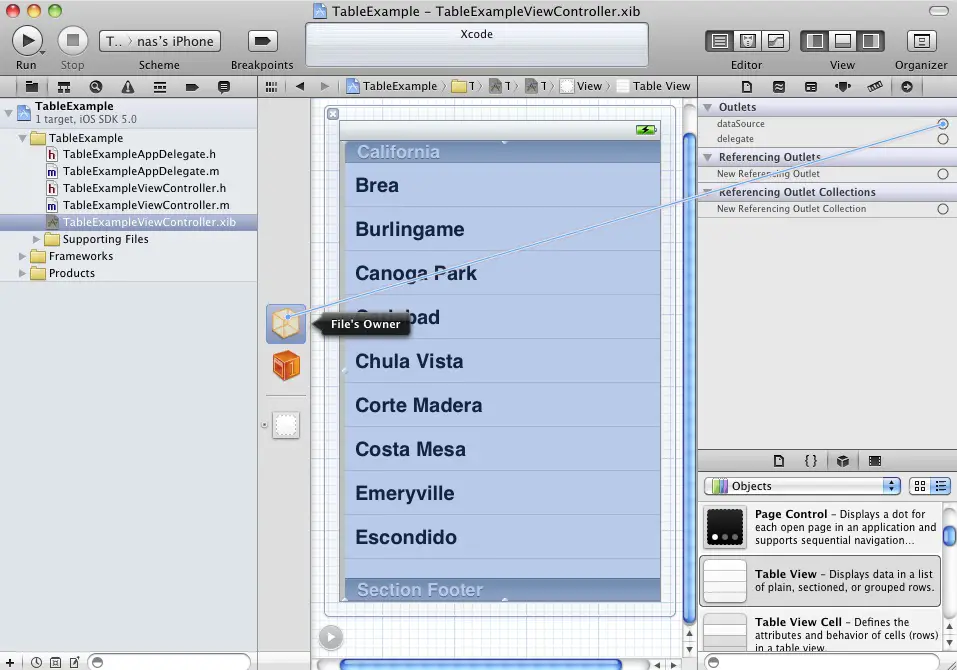
For the sake of simplicity, we are going to use our view controller class as both the dataSource and delegate for our application. This means that in our view controller we are going to need to implement the numberofRowsInSection and cellForRowAtIndexPath methods of the UITableViewDataSource protocol. Before doing so, however, we need to connect the dataSource and delegate outlets of the Table View component to the view controller. To achieve this, make sure that the Table View component is selected in the Interface Builder panel and open the Connections Inspector (View -> Utilities -> Connections Inspector). In the Connections Inspector window, click in the small circle to the right of the dataSource outlet and drag the blue line to the File’s Owner icon:
Figure 16-4
Once the connection is established, repeat this task to connect the delegate outlet to the File’s Owner.
Implementing the dataSource
In order to bring our table view application to life we need to implement two dataSource methods in our view controller. Before doing so, however, we need to create the data itself. In this example, we are going to create an NSArray object and initialize it with some strings. In the main Xcode project navigator panel, select the TableExampleViewController.h file and modify it in the editing pane to declare the array:
#import <UIKit/UIKit.h>

@interface TableExampleViewController : UIViewController
	<UITableViewDelegate, UITableViewDataSource>
{
        NSArray *colorNames;
}
@property (strong, nonatomic) NSArray *colorNames;
@end
Note the references to UITableViewDelegate and UITableViewDataSource in the above code. These are included to notify the Objective-C compiler that the class implements these two protocols. Consequently, if we fail to implement the mandatory methods required by these protocols the compiler will notify us with a warning. If this line is omitted from the class declaration the code will still compile, but we will not be warned if we have failed to implement any methods. The only indication we will get will be the application crashing at run time. For this reason, including these declarations is generally considered to be good programming practice.
Next, edit the TableExampleViewController.m class implementation file to synthesize access to the array:
#import "TableExampleViewController.h"

@implementation TableExampleViewController
@synthesize colorNames;
.
.
.
@end
Now that we have declared our array we need to initialize it with some data when the view is loaded. In order to achieve this we will override the viewDidLoad method. Scroll down the TableExampleViewController.m file until you find the template method and modify the method as follows:
- (void)viewDidLoad {
    [super viewDidLoad];
    self.colorNames = [[NSArray alloc]
          initWithObjects:@"Red", @"Green",
          @"Blue", @"Indigo", @"Violet", nil];
}
Having allocated memory to our array and initialized it, the next task is to make sure the memory gets released when the array is no longer required. To do so it is necessary to add code to the viewDidUnload method:
- (void)viewDidUnload {
    // Release any retained subviews of the main view.
    // e.g. self.myOutlet = nil;
    self.colorNames = nil;
}
With our data constructed all we need to do now is implement the numberOfRowsInSection and cellForRowAtIndexPath methods in order to conform to the minimum requirements of the UITableViewDataSource protocol. We will begin by implementing the numberOfRowsInSection method which is called by the Table View to identify how many rows are to be displayed. Since our data is held in an array we can simply return the number of array elements to satisfy this requirement, so add the following method to your TableExampleViewController.m file:
// Customize the number of rows in the table view.
- (NSInteger)tableView:(UITableView *)tableView
numberOfRowsInSection:(NSInteger)section {
   return [self.colorNames count];
}
Next, the cellForRowAtIndexPath method needs to be implemented:
// Customize the appearance of table view cells.
- (UITableViewCell *)tableView:(UITableView *)tableView
cellForRowAtIndexPath:(NSIndexPath *)indexPath {

   static NSString *CellIdentifier = @"Cell";

    UITableViewCell *cell = [tableView
      dequeueReusableCellWithIdentifier:CellIdentifier];
    if (cell == nil) {
        cell = [[UITableViewCell alloc]
           initWithStyle:UITableViewCellStyleDefault
           reuseIdentifier:CellIdentifier];
    }

    // Configure the cell.
    cell.textLabel.text = [self.colorNames
       objectAtIndex: [indexPath row]];
    return cell;
}
In the above method everything, with the exception of the following line, is standard boilerplate code that you can reuse every time you need to implement this particular method:
cell.textLabel.text = [self.colorNames objectAtIndex: [indexPath row]];
The method begins by creating a cell identifier. Next, an attempt is made to reuse an existing cell that may have scrolled off the screen and is therefore available for use as the currently requested cell. If no previous cell is available for use then a new one is created using the UITableViewCellStyleDefault style. The cellForRowAtIndexPath method is passed as an argument an object of type NSIndexPath from which we are able to extract the row number for which the cell is being requested by the table view. This row number is used, in turn, to extract the corresponding element from our colorNames array and assign it to the textLabel property of the cell object.
Building and Running the Application
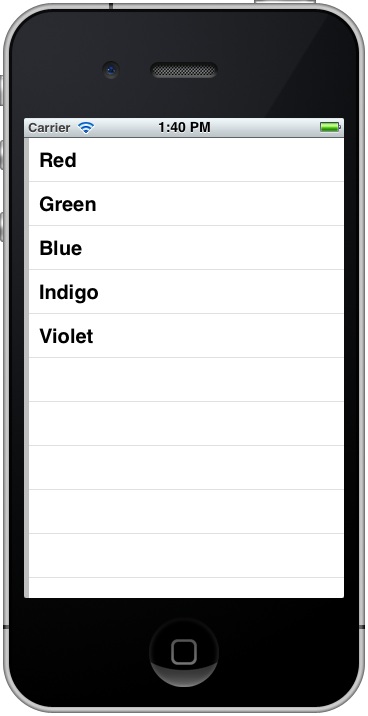
Once the code has been implemented for the application, build and run it by clicking on the Run button located in the toolbar of the Xcode main project window. Once compiled the application should run in the simulator and appear as illustrated in Figure 16-5:

Figure 16-5
Adding Table View Images and Changing Cell Styles
Now that we have created a simple table view example, we can look at extending our code to change the cell style. In so doing we will make use of the image and detailed text properties of the cell object to add images and subtitles to each row of the view.
The first step is to add an image to the resources of our project. If you already have an image file that is suitable for this purpose feel free to use it in this example. Alternatively, we can pick up an image from the Mac OS X system on which Xcode is running (for example, a search for apple.png in a Finder window will provide a good example file). To add an image file to the application resources, locate the image file in a Finder window and then drag and drop it onto the Supporting Files item in the Xcode project navigator panel. In the resulting configuration window accept the default settings.
Now that the image is included in the project resources it is time to add some code to the cellForRowAtIndexPath method in the TableExampleViewCrontoller.m file. All we need to do in this file is add some code to create a UIImage object from the image file and assign it to the imageView property of the cell object. With these changes made, the method should read as follows:
// Customize the appearance of table view cells.
- (UITableViewCell *)tableView:(UITableView *)tableView
cellForRowAtIndexPath:(NSIndexPath *)indexPath
{
    static NSString *CellIdentifier = @"Cell";
    UITableViewCell *cell = [tableView
     dequeueReusableCellWithIdentifier:CellIdentifier];
    if (cell == nil) {
        cell = [[UITableViewCell alloc]
            initWithStyle:UITableViewCellStyleSubtitle
            reuseIdentifier:CellIdentifier];
    }
    // Configure the cell.
    UIImage *cellImage = [UIImage imageNamed:@"apple.png"];
    cell.imageView.image = cellImage;
    cell.textLabel.text = [self.colorNames
       objectAtIndex: [indexPath row]];
    return cell;
}
Next, we want to add a subtitle to the text of each cell. This is achieved by assigning a string to the cell object’s detailTextLabel text property. Note also that the code currently selects the UITableViewCellStyleDefault cell style which does not display the detailText. It will also be necessary, therefore to change the cell style to UITableViewCellStyleSubtitle. With all of these changes implemented, the method now reads as follows:
- (UITableViewCell *)tableView:(UITableView *)tableView
cellForRowAtIndexPath:(NSIndexPath *)indexPath
{
    static NSString *CellIdentifier = @"Cell";

    UITableViewCell *cell = [tableView
       dequeueReusableCellWithIdentifier:CellIdentifier];
    if (cell == nil) {
        cell = [[UITableViewCell alloc]
           initWithStyle:UITableViewCellStyleSubtitle
           reuseIdentifier:CellIdentifier];
    }

        // Configure the cell.
    UIImage *cellImage = [UIImage imageNamed:@"apple.png"];
    cell.imageView.image = cellImage;
    NSString *colorString = [self.colorNames
      objectAtIndex: [indexPath row]];

    cell.textLabel.text = colorString;
    NSString *subtitle = [NSString stringWithString:
      @"All about the color "];
    subtitle = [subtitle stringByAppendingString:colorString];
    cell.detailTextLabel.text = subtitle;
    return cell;
}
Once the changes have been made to the code, save the code file and build and run the application. When the simulator starts up the table view should appear with images and subtitles as shown in Figure 16-6:
Figure 16-6
Summary
The iOS table view class provides a useful mechanism for displaying information to the user in a list format. The class may be configured to display a combination of text and images and also, as will be covered in the next chapter, provides the cornerstone of screen based navigation.
Learn SwiftUI and take your iOS Development to the Next Level |
| Previous | Table of Contents | Next |
| Creating an iOS 5 iPhone Multiview Application using the Tab Bar | Creating a Navigation based iOS 5 iPhone Application using TableViews |


