An iOS 5 iPad UIPickerView Example
| Previous | Table of Contents | Next |
| Using the UIPickerView and UIDatePicker Components in iOS 5 iPad Applications | Working with Directories on iOS 5 |
Learn SwiftUI and take your iOS Development to the Next Level |
Unlike the UIDatePicker class, which is pre-configured by Apple specifically for date and time selection, the UIPickerView class can be configured to meet the specific requirements of the iPad application developer. Having provided a basic overview of pickers and an example of the use of the DatePicker, the objective of this chapter is to provide a worked example of the UIPickerView class in action.
Creating the iPad PickerView Project
The example application in this chapter is a very basic product selection application (in this case the various models of iPad available) designed to demonstrate the implementation of a UIPickerView object configured with two components. As selections are made from the Picker’s components, information about the selections will appear on UILabel objects located beneath the UIPickerView object in the user interface.
Begin by creating a new iOS iPad project using the Single View Application template with the product name and class prefix set to pickerView.
UIPickerView Delegate and DataSource
Before starting on the project it is worth taking some time to talk about the delegate and datasource of the UIPickerView class. In order to obtain the options to be displayed to the user, the PickerView needs a data source. This data source takes the form of a protocol that defines the methods that must be implemented in order to provide the Picker with data information. At the minimum the class designated as the data source must implement the following methods:
- numberOfComponentsInPickerView: - Called by the PickerView to identify the number of components (i.e. selection wheels) that are to be displayed to the user.
- numberOfRowsInComponent: - Informs the PickerView of the number of rows (in other words the selection options) that are present in a specified component.
- titleForRow: - Called by the PickerView to identify the string that is to be displayed for a specified row in a specific component.
In addition to a data source, the PickerView also needs a mechanism for notifying the application code when a selection has been made by the user. It achieves this by calling the didSelectRow method of the class declared as the PickerView’s delegate.
In order to fully implement a PickerView, therefore, it is necessary for the object to be assigned a data source and delegate. Typically the view controller responsible for the PickerView instance is the best place to implement these two protocols.
The pickerViewController.h File
The first step is to implement the declarations in the pickerViewController.h file. Since we plan on making our view controller both the delegate and data source for the UIPickerView instance the view controller must be declared as implementing both the UIPickerViewDelegate and UIPickerViewDataSource protocols.
Our application also needs outlets to the UIPickerView and the two label objects that will be placed into the user interface. In addition, two arrays are needed to store the values for the product model and memory configurations respectively:
#import <UIKit/UIKit.h>

@interface pickerViewController : UIViewController
    <UIPickerViewDelegate, UIPickerViewDataSource>

@property (nonatomic, strong) IBOutlet UIPickerView *modelPicker;
@property (nonatomic, strong) NSArray *modelArray;
@property (nonatomic, strong) NSArray *memoryArray;
@property (nonatomic, strong) IBOutlet UILabel *modelLabel;
@property (nonatomic, strong) IBOutlet UILabel *memoryLabel;
@end
Designing the User Interface
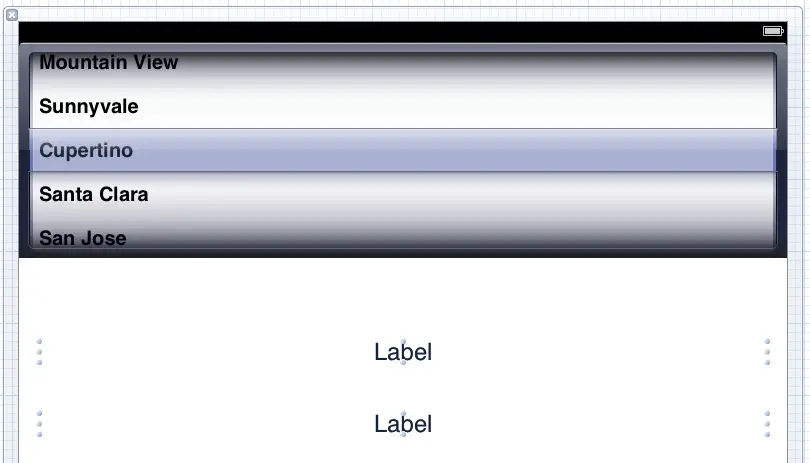
Select the pickerViewController.xib file to load it into Interface Builder. Drag and drop a UIPickerView from the Object library (View -> Utilities -> Object Library) onto the view and position it at the top of the view. Also add two labels and position them beneath the PickerView object. Stretch the right and left hand edges of the labels until the dotted blue margin line appears. Using the Attribute Inspector (View -> Utilities -> Attribute Inspector), configure centered alignment on the labels and increase the font size to 24pt.
Once completed, the view should appear as illustrated in the following figure:
Figure 28-1
Next, Ctrl-click on the File’s Owner icon and drag the resulting line to the PickerView component in the view. After releasing the line, select the modelPicker outlet from the menu. Repeat these steps to connect the modelLabel and memoryLabel outlets to the label objects.
Next, select the PickerView component in the View window and display the Connections Inspector (View -> Utilities -> Connections Inspector). Click in the round circle to the right of the dataSource outlet in the inspector window and drag the line to the File’s Owner object. Repeat this task for the delegate outlet.
The user interface is now designed and the outlets connected.
Initializing the Arrays
The data that will be used in our application is stored in two arrays, one for the iPad model and the other for the corresponding memory configuration. These arrays need to be initialized when the application loads, so the necessary code should be added to the viewDidLoad method of the pickerViewController.m file. Now is also a good time to add the appropriate @synthesize directives:
#import "pickerViewController.h"

@interface pickerViewController ()

@end

@implementation pickerViewController
@synthesize modelPicker, memoryArray, modelArray;
@synthesize memoryLabel, modelLabel;
.
.
- (void)viewDidLoad
{
    [super viewDidLoad];
    self.modelArray = [[NSArray alloc] initWithObjects:
                       @"iPad WiFi", @"iPad WiFi+3G (AT&T)",
                       @"iPad WiFi+3G (Verizon)", nil];

    self.memoryArray = [[NSArray alloc] initWithObjects:
                       @"16GB", @"32GB", @"64GB", nil];
}
.
.
@end
Implementing the DataSource Protocol
The next step is to implement the methods that comprise the UIPickerViewDataSource protocol. Since we have declared the pickerViewController class as the data source we need to implement the methods in the pickerViewController.m file:
#pragma mark -
#pragma mark PickerView DataSource

- (NSInteger)numberOfComponentsInPickerView:(UIPickerView *)pickerView {

    return 2;
}

- (NSInteger)pickerView:(UIPickerView *)pickerView numberOfRowsInComponent:(NSInteger)component {

    if (component == 0) {
        return [modelArray count];
    }
    return [memoryArray count];
}

- (NSString *)pickerView:(UIPickerView *)pickerView
             titleForRow:(NSInteger)row
            forComponent:(NSInteger)component
{
    if (component == 0) {
        return [modelArray objectAtIndex:row];
    }
    return [memoryArray objectAtIndex:row];
}
The first method simply returns 2 since our picker has two components. The second method returns the number of rows in each component by counting the number of elements in the corresponding array, using the component argument passed through to the method to identify the component for which the information is being requested. Finally, the titleForRow method returns the corresponding model name or memory for the requested component and row using component and row arguments as references.
Implementing the Delegate
For the purposes of this example the only delegate method we need to implement is the one that gets called when the user makes a selection from the PickerView component. The code for this method also belongs in the pickerViewController.m file and should be implemented as follows:
#pragma mark -
#pragma mark PickerView Delegate

-(void)pickerView:(UIPickerView *)pickerView didSelectRow:(NSInteger)row
      inComponent:(NSInteger)component
{
    if (component == 0)
    {
        NSString *resultString = [[NSString alloc] initWithFormat:
             @"Model: %@",
             [modelArray objectAtIndex:row]];
        self.modelLabel.text = resultString;
    } else {
        NSString *resultString = [[NSString alloc] initWithFormat:
             @"Memory: %@",
             [memoryArray objectAtIndex:row]];
        self.memoryLabel.text = resultString;
    }
}
This method uses the component argument to identify whether the model or memory component was changed by the user. The row argument is then used to extract the value from the corresponding array. This is used to construct a string which is then displayed on the appropriate label and, finally, the string object released.
Updating viewDidUnload
The final step before testing the application is to modify the viewDidUnload method as follows:
- (void)viewDidUnload
{
    [super viewDidUnload];
    // Release any retained subviews of the main view.
    // e.g. self.myOutlet = nil;
    self.memoryArray = nil;
    self.modelArray = nil;
    self.modelLabel = nil;
    self.memoryLabel = nil;
}
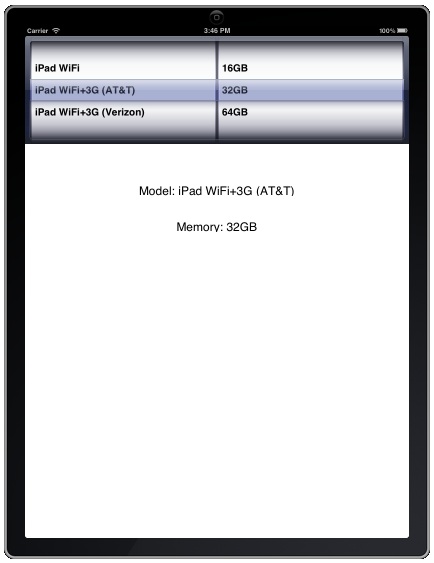
Testing the Application
Figure 28-2
Learn SwiftUI and take your iOS Development to the Next Level |
| Previous | Table of Contents | Next |
| Using the UIPickerView and UIDatePicker Components in iOS 5 iPad Applications | Working with Directories on iOS 5 |


