Difference between revisions of "An iOS 9 3D Touch Quick Actions Tutorial"
(→Adding a Static Quick Action to the Project) |
|||
| Line 39: | Line 39: | ||
<htmlet>ios10</htmlet> | <htmlet>ios10</htmlet> | ||
== Adding a Static Quick Action to the Project == | == Adding a Static Quick Action to the Project == | ||
| − | + | <htmlet>adsdaqbox_flow</htmlet> | |
In this step of the tutorial the key value pairs outline above will be added to the Info.plist file to add a quick action to the app. Begin by selecting the Info.plist file and selecting the last entry in the property list. When selected, a + button will appear in that row which, when clicked, will add a new row to the list. In the Key column of the new property list row, enter the UIApplicationShortcutItems key and change the Type menu to Array: | In this step of the tutorial the key value pairs outline above will be added to the Info.plist file to add a quick action to the app. Begin by selecting the Info.plist file and selecting the last entry in the property list. When selected, a + button will appear in that row which, when clicked, will add a new row to the list. In the Key column of the new property list row, enter the UIApplicationShortcutItems key and change the Type menu to Array: | ||
Latest revision as of 04:33, 10 November 2016
| Previous | Table of Contents | Next |
| An iOS 10 3D Touch Force Handling Tutorial | An iOS 10 3D Touch Peek and Pop Tutorial |
Learn SwiftUI and take your iOS Development to the Next Level |
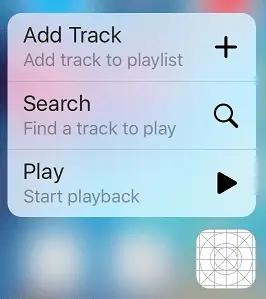
Quick actions (also referred to as application shortcuts) appear when a deep press is performed on the home screen icon of an app on iOS devices supporting 3D Touch. The actions appear in a menu format and, when selected, call delegate methods within the corresponding app allowing the app to perform tasks before being presented to the user. Quick actions are categorized as static and dynamic. Static quick actions are stored in the Info.plist file of the application bundle while dynamic quick actions are created within the code of the application at runtime.
In this chapter an example project will be created that is intended to outline the steps that need to be taken to add 3D Touch quick actions to an iOS 10 app.
Creating the Quick Actions Example Project
Begin by invoking Xcode and creating a new iOS Single View Application project named QuickActions using Swift as the programming language and with the devices menu set to Universal.
Static Quick Action Keys
As with all Info.plist entries, static quick actions are stored as key-value pairs which can be summarized as follows:
- UIApplicationShortcutItems – This key is paired with an array containing a dictionary entry for each of the static quick action items.
- UIApplicationShortcutItemIconType – The value assigned to this key designates the icon that is to be displayed next to the title of the quick action. A wide range of icon options are available for use when creating quick actions.
- UIApplicationShortcutItemTitle – The string assigned to this key represents the title that will appear for the action in the menu.
- UIApplicationShortcutItemSubtitle - The string assigned to this key represents the subtitle that will appear beneath the title for the action in the menu.
- UIApplicationShortcutItemType – The value assigned to this key will be passed to the application at launch time and used to identify the quick action selected by the user. This can be set to any string value that uniquely identifies the action within the context of the app.
- UIApplicationShortcutItemUserInfo – The value assigned to this key takes the form of a dictionary that can be used to pass additional data through to the app when the corresponding action is selected.
Learn SwiftUI and take your iOS Development to the Next Level |
Adding a Static Quick Action to the Project
Figure 58-1 Click on the arrow to the left of the new key so that it is pointing downward, click on the + button to add the first array item (Item 0 in Figure 58 2) and change the Type column to Dictionary:
Figure 58-2
Click on the arrow to the left of the Item 0 key so that it is pointing downward and click on the + button to add the first entry into the dictionary. Enter UIApplicationShortcutItemIconType into the Key column and UIApplicationShortcutItemTypePlay into the value column as shown in Figure 58-3:
Figure 58-3
Repeat this step to add entries for the remaining keys so that the entries in the Info.plist file resemble those shown in Figure 58 4 keeping in mind that the UIApplicationShortcutItemUserInfo entry needs to be declared as a dictionary:
Figure 58-4
To see the entries in XML format, Ctrl-click on the Info.plist file in the Project Navigator panel and select the Open As -> Source Code menu item. The section of the file relating to the quick action should read as follows:
Learn SwiftUI and take your iOS Development to the Next Level |
<key>UIApplicationShortcutItems</key>
<array>
    <dict>
        <key>UIApplicationShortcutItemIconType</key>
        <string>UIApplicationShortcutIconTypePlay</string>
        <key>UIApplicationShortcutItemTitle</key>
        <string>Play</string>
        <key>UIApplicationShortcutItemSubtitle</key>
        <string>Start playback</string>
        <key>UIApplicationShortcutItemType</key>
        <string>PlayMusic</string>
        <key>UIApplicationShortcutItemUserInfo</key>
        <dict>
            <key>firstShortcutKey1</key>
            <string>firstShortcutKeyValue1</string>
        </dict>
    </dict>
</array>
Switch back to Property Editor mode by Ctrl-clicking on the Info.plist file once more, this time selecting the Open As -> Property List menu option.
Adding a Dynamic Quick Action
The next step is to add some code to the application delegate class to add a dynamic quick action to the app. In code, quick actions are represented by the UIApplicationShortcutItem class on which the same properties must be set as those defined for a static quick action. Due to the fact that instances of the UIApplicationShortcutItem class are immutable, new quick action items are created using the UIMutableApplicationShortcutItem class. Once quick action items have been created and configured they are added to the app by placing them in an array and assigning that array to the shortcutItems property of the application context.
To add dynamic quick actions to the app, select the AppDelegate.swift file and modify the didFinishLaunchingWithOptions method to create and add the dynamic actions:
func application(_ application: UIApplication, didFinishLaunchingWithOptions launchOptions: [UIApplicationLaunchOptionsKey: Any]?) -> Bool {
    let shortcut2 = UIMutableApplicationShortcutItem(type: "SearchMusic",
            localizedTitle: "Search",
            localizedSubtitle: "Find a track to play",
            icon: UIApplicationShortcutIcon(type: .search),
            userInfo: nil
    )

    let shortcut3 = UIMutableApplicationShortcutItem(type: "AddMusic",
            localizedTitle: "Add Track",
            localizedSubtitle: "Add track to playlist",
            icon: UIApplicationShortcutIcon(type: .add),
            userInfo: nil
    )

    application.shortcutItems = [shortcut2, shortcut3]

    return true
}
Learn SwiftUI and take your iOS Development to the Next Level |
Figure 58-5
Adding, Removing and Changing Dynamic Quick Actions
Once a dynamic quick action has been added it will remain in effect until the app is deleted or the code takes steps to remove or modify it. All of the currently configured dynamic quick action items can be removed simply by assigning an empty array to the application’s shortCutItems property. For example:
application.shortcutItems = []
It is also possible to access the array of current dynamic quick action items and modify one or more of them before re-assigning the array. The following code, for example, gets the current array of dynamic action items and replaces the first item in the array with a different action:
var shortcuts = application.shortcutItems

let shortcut4 = UIMutableApplicationShortcutItem(type: "PauseMusic",
            localizedTitle: "Pause",
            localizedSubtitle: "Pause playback",
            icon: UIApplicationShortcutIcon(type: .pause),
            userInfo: nil
        )

shortcuts![0] = shortcut4
application.shortcutItems = shortcuts
Learn SwiftUI and take your iOS Development to the Next Level |
Responding to a Quick Action Selection
When a quick action item is selected from the menu the performActionFor shortcutItem: method of the application delegate is called and passed the UIApplicationShortcutItem object for the selected action. The properties of the object can then be accessed and used to determine the action that was selected and react accordingly. As the next step in this tutorial, add the following implementation of the performActionFor shortcutItem: method to the AppDelegate.swift file:
func application(_ application: UIApplication, performActionFor shortcutItem: UIApplicationShortcutItem, completionHandler: @escaping (Bool) -> Void) {
    case "PlayMusic" :
        notifyUser(message: shortcutItem.localizedTitle)
    case "PauseMusic" :
        notifyUser(message: shortcutItem.localizedTitle)
    case "SearchMusic" :
        notifyUser(message: shortcutItem.localizedTitle)
    case "AddMusic" :
        notifyUser(message: shortcutItem.localizedTitle)
    default:
        break
    }
    completionHandler(true)
}
The method performs a switch operation on the UIApplicationShortcutItemType property of the action item object and calls a method named notifyUser, passing through the title from the action item before calling the completion handler. All that remains is to implement the notifyUser method in the AppDelegate.swift file which simply displays an alert dialog containing the title string:
func notifyUser(message: String) {

    let alertController = UIAlertController(title: "Quick Action",
                    message: message,
                    preferredStyle: .alert)
    let okAction = UIAlertAction(title: "OK",
                    style: .default,
                    handler: nil)

    alertController.addAction(okAction)

    window!.rootViewController?.present(alertController,
            animated: true, completion: nil)
}
Learn SwiftUI and take your iOS Development to the Next Level |
Testing the Quick Action App
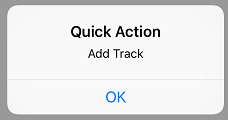
Compile and run the app again, press the device home screen to place it in the background and test the quick action items. When each is selected the app should launch and display an appropriately configured alert dialog:
Figure 58-6
Summary
Quick actions allow users to make choices before an app is launched by deep pressing on the home screen icon of the app and making a selection from a menu. Once selected the action item is passed to the app delegate of the app via the performActionFor shortcutItem: method where it can be identified and handled.
Quick action items can be static or dynamic. Static action items are declared in the Info.plist file and cannot be changed at runtime. Dynamic action items are configured in code using the UIMutableApplicationShortcutItem class and assigned in array format to the application’s shortcutItems property. Unlike static action items, dynamic items can be added, removed and replaced during runtime.
Learn SwiftUI and take your iOS Development to the Next Level |
| Previous | Table of Contents | Next |
| An iOS 10 3D Touch Force Handling Tutorial | An iOS 10 3D Touch Peek and Pop Tutorial |


