Using an Xcode 5 Storyboard to Create a Static Table View
| Previous | Table of Contents | Next |
| Implementing iOS 7 TableView Navigation using Storyboards in Xcode 5 | An iPad iOS 7 Split View and Popover Example |
Learn SwiftUI and take your iOS Development to the Next Level |
The preceding chapters have covered in detail the steps involved in using a storyboard to implement dynamic table views in iOS 7 applications. As outlined in the chapter entitled An Overview of iOS 7 Table Views and Xcode 5 Storyboards, Xcode also provides the option to create static table views.
Static table views are ideal in situations where a pre-determined number of items need to be displayed to the user. The fact that static table views do not need a data source makes them fast and easy to implement.
The goal of this chapter is to work through the creation of a simple application designed to demonstrate the use of an Xcode storyboard to implement a static table view.
Contents | ||
An Overview of the Static Table Project
The preceding chapters worked through the implementation of an application designed to present the user with a list of cars. A dynamic table was used for this list since the number of table cells to be displayed was dependent upon the number of cars present in a data model. Selecting a car from the list triggered a segue to a second screen displaying details about the selected car. Regardless of the car selected, the detail screen always displays three items (the car’s make and model together with a photograph). Whilst the previous example used a generic view controller and UIView for this purpose, clearly this is an ideal candidate for a static table view.
The remainder of this chapter will work through the implementation of a simple, stand alone application designed to demonstrate the implementation of a static table view using a storyboard. The finished application will essentially implement the car detail view from the previous chapter as a static table view.
Creating the Project
As with the previous project we will take advantage of the template provided by the Single View Application without actually using the single view provided by Xcode. Begin, therefore, by launching Xcode and creating a new single view application for iPhone named StaticTable with a matching class prefix.
As we will not be needing the provided view controller, select and delete the StaticTableViewController.h and StaticTableViewController.m files from the navigation panel. Also select the Main.storyboard file and within the storyboard editor, select the Static Table View Controller item before pressing the keyboard delete key to remove the scene.
Adding a Table View Controller
The example application is going to consist of a single table view controller. Adding this controller is a two step process involving the addition of both a new scene to the storyboard and also the files for a new subclass of UITableViewController.
With the storyboard editor still visible, drag and drop a Table View Controller object from the Object Library panel onto the storyboard canvas. With the scene added, select the File -> New -> File… menu option and select the option to add an Objective-C class. Click Next and on the options screen, name the new class StaticTableViewController and set the Subclass of menu to UITableViewController. Make sure that both the Targeted for iPad and With XIB for user interface options are disabled before clicking on Next to proceed with the creation process. Select a location for the new files before clicking on Create.
Once again, select the Main.storyboard file and select the Table View Controller scene so that it is highlighted in blue. Display the Identity Inspector panel (View -> Utilities -> Show Identity Inspector) and use the Class drop down menu to change the class from UITableViewController to StaticTableViewController.
Changing the Table View Content Type
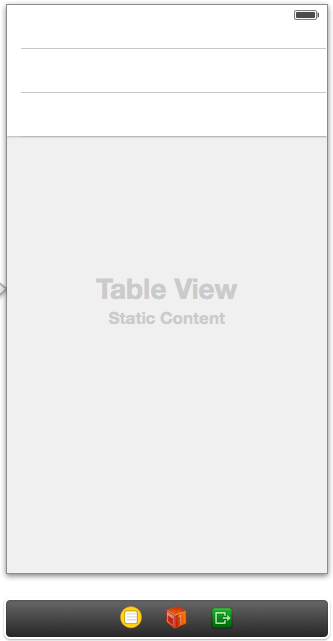
By default, Xcode makes the assumption that the table view is to be dynamic. The most obvious indications of this are the presence of a Prototype Cell within the table view and the words “Prototype Content” in the view. Click within the grey area of the table view and display the Attributes Inspector panel. The Content attribute will currently be set to Dynamic Prototypes so use the menu to change the attribute to Static Cells. At this point the table view within the storyboard will change to display a static table containing three rows as illustrated in Figure 25-1:
Figure 25-1
Designing the Static Table
With a static table view added to the project, the full power of Interface Builder is available to us to design the layout and content of the table and cells. The first step is to change the table view style. With the table view selected in the storyboard and the Attributes Panel displayed, change the Style attribute to Grouped and the Sections attribute to 2. The table view should now consist of two group sections with three rows per section. For the purposes of this example we only need two rows in the top section so click on the third row to highlight it and press the delete key on the keyboard. Note that additional rows may be added if required by selecting the corresponding table view section and changing the Rows property.
In the case of the bottom section, only one row is required so Command-click on the bottom two rows and delete them from the view.
Select the top section by clicking on the shaded area immediately below the cells (note that sections may also be selected by clicking on the Table View Section item in the toolbar strip located across the top of the storyboard editor and also from the hierarchy list located in the Document Outline panel of the Xcode window). Within the Attributes Inspector change the Header property to Car Details. Repeat this step on the lower section to change the header to Car Photo.
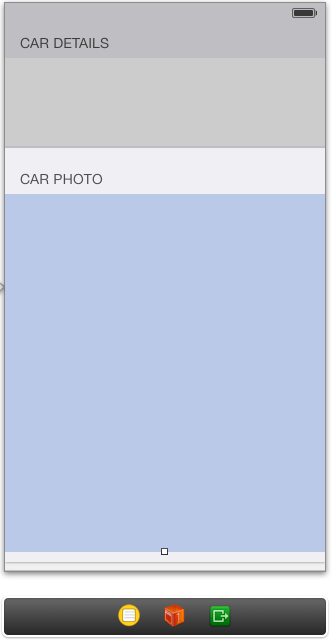
Next, stretch the height of the single cell in the bottom section so that it fills the remainder of the table view such that the table view appears as illustrated in the following figure:
Figure 25-2
Learn SwiftUI and take your iOS Development to the Next Level |
Adding Items to the Table Cells
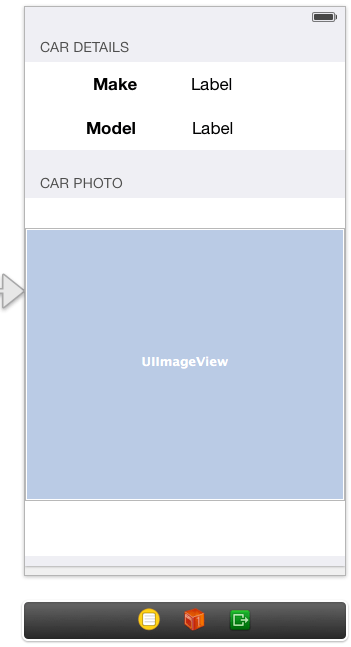
Using the Object Library panel, drag and drop an Image View object into the cell in the bottom section and resize it to fill most of the available space. Also drag and drop labels into the two cells in the top section and set appropriate text properties so that the layout resembles that of Figure 25 3, stretching the right-hand labels until the margin guideline appears on the right hand edge of the view.
Figure 25-3
The user interface design of the table view is now complete so the next step is to create outlets to the labels and the image view. These, of course, need to be declared in the StaticTableViewController subclass.
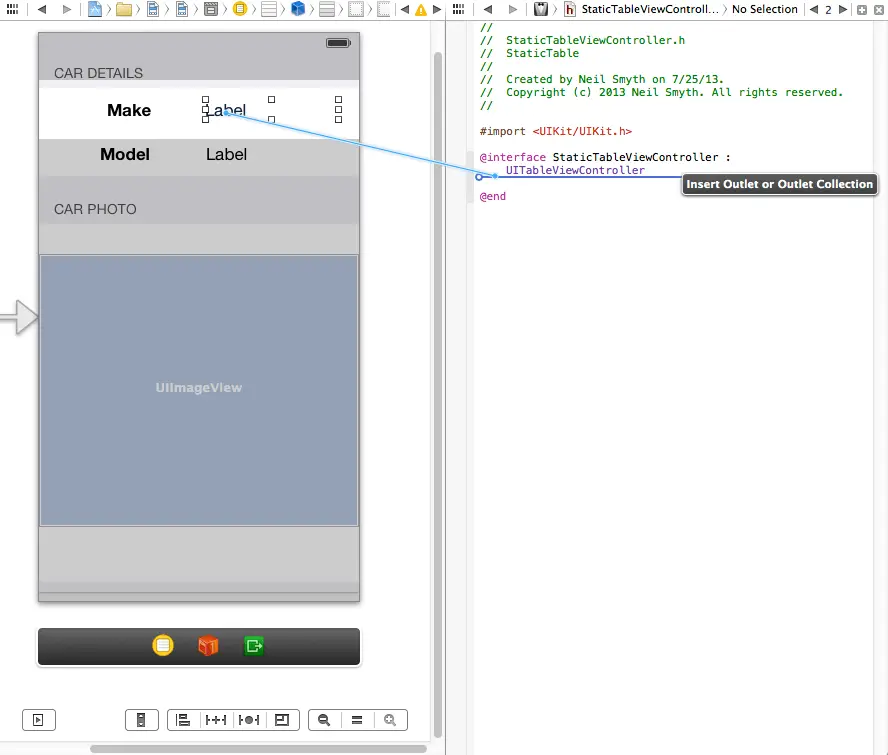
Display the Assistant Editor either from the View -> Assistant Editor -> Show Assistant Editor menu option, or by selecting the middle button in the Editor cluster of buttons in the Xcode toolbar (the button displaying the bow tie and tuxedo image). Make sure that the editor is displaying the StaticTableViewController.h file, then click on the label located to the right of the “Make” label to select it, and then Ctrl-click and drag the resulting line to the body of the @interface section in the assistant editor panel as illustrated in Figure 25-4:
Figure 25-4
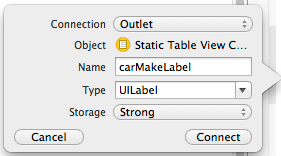
Upon releasing the line a dialog (Figure 25 5) will appear where information about the outlet needs to be declared. The default settings do not need to be changed so simply enter carMakeLabel into the Name field before clicking on the Connect button.
Figure 25-5
Repeat the above steps to establish connections between the second label and the image view, naming the outlets carModelLabel and carImageView respectively. Once the outlets are created and connected close the assistant window before proceeding.
Modifying the StaticTableViewController Class
When the StaticTableViewController class was created earlier in the chapter it was declared as being a subclass of UITableViewController. As a result of this selection, Xcode added a number of template methods intended to provide the basis for a data source for the table view. As previously discussed, however, static table views do not use a data source so these methods need to be removed.
Select the StaticTableViewController.m file and scroll down to the line that reads:
#pragma mark - Table view data source
To remove the data source from the class, delete the methods after this marker until you reach the @end marker.
All that remains to be implemented is the code to set the label and image outlets. Since this only needs to be performed once, the code may simply be added to the viewDidLoad method of the class:
- (void)viewDidLoad
{
    [super viewDidLoad];

    _carMakeLabel.text = @"Volvo";
    _carModelLabel.text = @"S60";
    _carImageView.image = [UIImage imageNamed:@"volvo_s60.jpg"];
}
Finally, use a Finder window to locate the volvo_s60.jpg file downloaded in the previous chapter and drag and drop it onto the Supported Files section of the project navigator.
Building and Running the Application
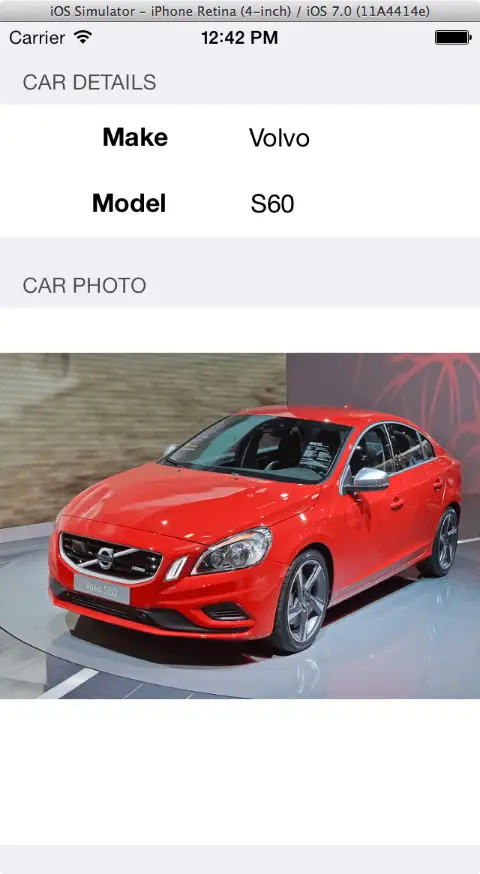
The application is now complete and ready to run. Click on the Run button in the Xcode toolbar and wait for the application to load into the iOS Simulator. Once loaded the static table should appear:
Figure 25-6
As an exercise to provide further re-enforcement of the concept of storyboards and table views, replace the standard view controller based car detail scene in the TableViewStory application from the previous chapter with a static table view similar to that outlined in this chapter.
Summary
Whilst dynamic, or prototype content, based table views are ideal for displaying data from a data source that will have a variable number of elements, static table views provide an ideal alternative when a known number of items need to be displayed. In this chapter we have worked through a simple example that demonstrates the use of storyboards to create a static table view.
Learn SwiftUI and take your iOS Development to the Next Level |
| Previous | Table of Contents | Next |
| Implementing iOS 7 TableView Navigation using Storyboards in Xcode 5 | An iPad iOS 7 Split View and Popover Example |


