Managing Windows Server 2008 R2 Print Services
| Previous | Table of Contents | |
| Setting Up a Windows Server 2008 R2 Print Server |
<google>BUY_WINSERV_2008R2</google>
The previous chapter of Windows Server 2008 R2 Essentials covered the configuration of the print services role on Windows Server 2008 R2 and subsequent installation of shared printers on the server. This chapter is all about the day to day management of print services.
Managing Remote Print Servers
In the previous chapter it was stated that the Print Management tool provides a central location from which the print services for an entire network may be managed. So far we have only looked and managing the print server running on the local computer. In this section we will look at adding remote servers to the local Print Management configuration. For the purposes of this example a theoretical configuration consisting of two Windows Server 2008 R2 systems named winserver-1 and winserver-2 is assumed. Both systems have the print services role installed and Print Management on winserver-1 will be configured to also manage print services on winserver-2. This is achieved by first launching Print Management on the local winserver-1 system (Start -> Administration Tools -> Print Management), right clicking on the Print Servers node of the tree hierarchy in the left hand pane and selecting the Add/Remove Servers option.
From the resulting menu, select the Add/Remove Servers option. The resulting dialog box displays the currently configured print servers under the management of local Print Management. If no remote print servers have been added previously the only server listed will be the local system. To add additional print servers either enter a comma separated list of server names, or use the Browse button to locate servers on the network. When one or more servers have been selected, click on the Add to list button to add the servers to the list. The following figure illustrates the Add/Remove Servers dialog box configured with both the local and remote servers:
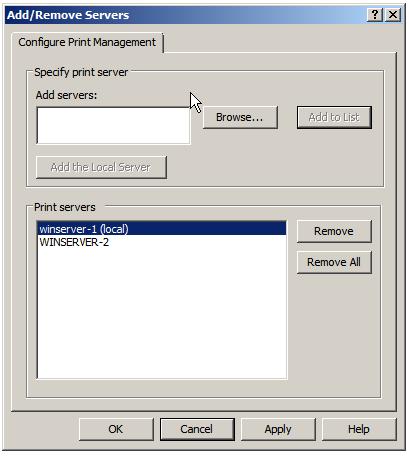
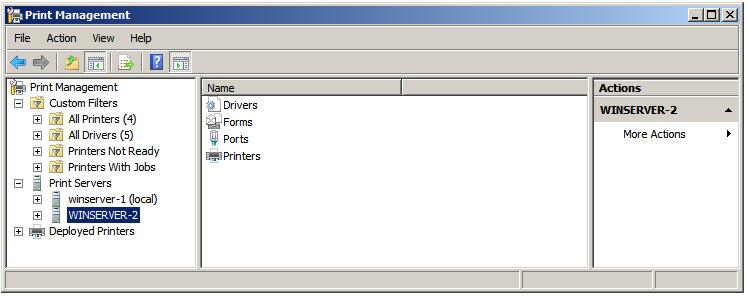
Once all the required remote print servers have been added to the list, click on Apply then close the dialog to return to the main Print Management window. The new print servers will now appear alongside the local server under Print Servers in the left hand pane of the Print Management screen as illustrated below:
Migrating Printers and Queues Between Servers
<google>WIN28BOX</google> Windows Server 2008 R2 also provides the ability to migrate both printers and print queues from one print server to another. This makes it easy, for example, to take a print server off-line for maintenance or to permanently re-assign a printer from one print server to another. The steps outlined below assume that print Management has been configured to manage both the source and target print servers as outlined in the preceding section of this chapter. If this is not the case, the printer export file will need to be copied onto the destination server or made available via file sharing and imported using Print Management on that server.
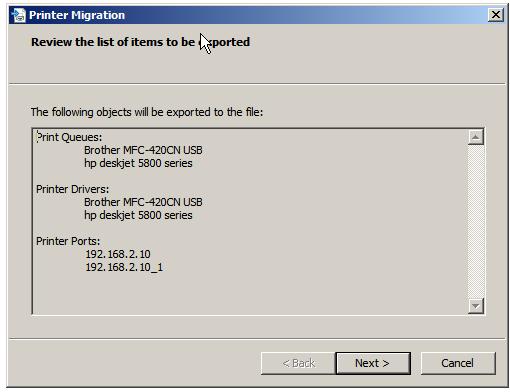
This form of migration is performed using the Printer Migration Wizard which, along with most other tasks, is accessed from the Print Management interface. Once Print Management is up and running, right click on the server in the left pane from which the printer is to be migrated (the source server) and select Export Printers To a File from the menu. Print Management will subsequently display a dialog listing the printer drivers, port and queues currently configured on the selected print server as illustrated below:
After reviewing the listed information click Next and select a suitable location to save the printer export file and click Next once again to perform the export process. Depending on the number of printers being exported and the size of the drivers the export process may take a few minutes to complete. If the export was successful a message will appear beneath the progress bar stating this fact. If the export was unsuccessful, click on the Open Event Viewer button provided to learn more about the cause of the problem so that remedial action may be taken. Assuming a successful export click Finish to dismiss the Printer Migration dialog.
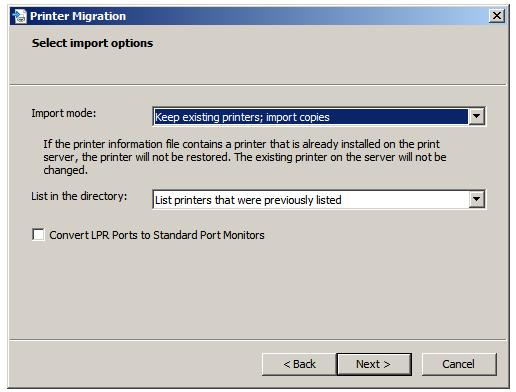
The next step is to import the printers into the target server. Begin by right clicking on the destination server in the Print Management window and selecting Import printers from a file.... In the resulting dialog, use the browse button to navigate to the export file, select it and click on Next to proceed. Once the file has been read a screen will appear identical to the one displayed prior to exporting the printer objects in the preceding step. Review this information and click Next to display the Select import options screen as illustrated in the following figure:
These options require a little explanation:
- Keep existing printers; import copies - It is possible that a printer being imported is already also installed on the destination server. With this option selected, the original printer on the destination server will be left unchanged and the new printer imported as a copy.
- Overwrite existing printers - If the printer being imported is already installed on the target server it is overwritten by the imported copy when this option is selected.
- List printers that were previously listed - When selected, only printers that were already listed in Active Directory will still be listed after the import process is completed.
- List all printers - All printers are listed in Active Directory
- Don't list any printers - No printers are listed in Active Directory
Once the required settings are configured, click Next to initiate the printer import process. The printer configurations, drivers and queues will be subsequently be imported onto the target print server. If errors are reported click on the Open Event Viewer button to obtain additional information. In particular, be mindful of printers that were physically connected to the source print server. Since they are not physically connected to the target server an error will likely occur during the migration. Even if the printer was physically moved to the target system prior to migration it is also possible that it is connected to a different physical port to that used on the source server. Such problems can be resolved by right clicking on the imported printer in Print Management, selecting Properties and making the necessary configuration changes.
Configuring Printer Permissions
Access to printers is controlled through the configuration of printer permissions. By default, a printer is accessible to all users on the local system, and if shared, all users elsewhere on the network. Printer permissions are divided into two categories, special permissions and standard permissions. Before describing how to change the permissions on a printer it is first important to understand the meaning of each permission option.
The standard printer permissions are outlined in the following table:
| Permission | Description |
|---|---|
| Allows users and groups to send documents to the printer and to manage their own print jobs. Also includes the Read special permission allowing viewing, but not alteration, of printer permissions | |
| Manage Printers | Allows full management of the printer, including changing shared status, changing of permissions and properties, taking ownership of printers and print jobs and starting and stopping print jobs. Includes the Read, Change and Take Ownership special permissions. |
| Manage Documents | Allows user and groups to manage print jobs but does not provide the ability to print. Permissions consist of pausing, restarting, resuming and reordering and canceling print jobs. Includes the Read, Change and Take Ownership special permissions |
The special permissions are as follows:
| Permission | Description |
|---|---|
| Read Permissions | User or Group may view the permissions on the printer. |
| Change Permissions | User or Group may change the permissions of a printer. |
| Take Ownership | User or Group may take ownership of printer and/or print jobs. |
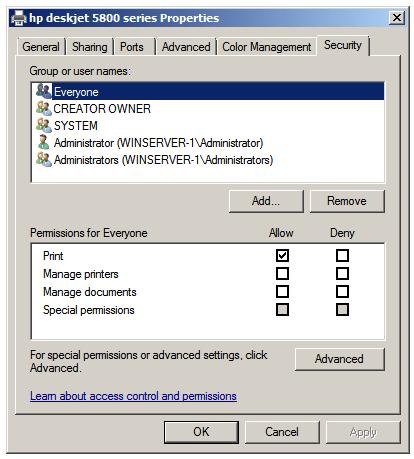
The current permissions for a printer may be viewed and changed by right clicking on that printer in the Print Management tool (Start -> Administrative Tools -> Print Management), selecting Properties and clicking on the Security tab:
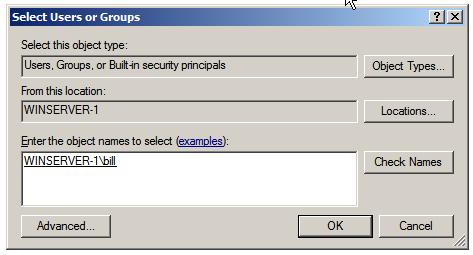
To change the permissions for a currently listed user or group, select the user or group and change the Allow and Deny permissions to the required settings. When the settings are configured, click on apply to commit the changes. If the user or group is not currently listed in the properties dialog, click on the Add... button to invoke the Select Users or Groups dialog. Change the Location setting if necessary and then enter the names of the users or groups, separated by semi-colons into the bottom text box. Click the Check Names button to verify the selected users or groups exist within the current location scope:
Assuming the names are correct click on OK to return to the properties dialog where the selected users and/or groups will now be included in the Group or user names list. To configure permissions, select a user or group and set the permissions in the Permissions for section of the dialog. Click Apply to commit the changes and repeat the task for any other users or groups added to the list.
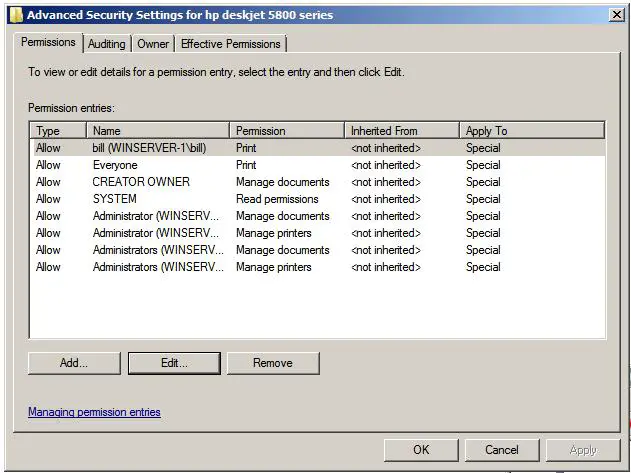
To configure the special permissions click on the Advanced button in the Security page of the properties panel to display the Advanced Security Settings dialog as illustrated below:
To modify the permissions for a user or group select that object from the list and click Edit... to display the Permission Entry for dialog. In this dialog both the standard and special permissions for the selected user or group are displayed and may be changed as required. As noted previously, certain special permissions are implicit in standard permission settings. For example, setting the Manage Printers standard permission also enables the Read, Change and Take Ownership special permissions. Once the desired permission changes have been made click on OK to dismiss the Permission Entry for dialog, followed by Apply, then OK in the Advanced Security Settings dialog. Finally, click on OK to dismiss the properties dialog and return to Print Management.
Changing Printer Ownership
After a printer has been installed the owner, by default, is SYSTEM. Ownership may be taken either by an administrator or by a user or group which has been assigned Take ownership permission for the printer.
To assign ownership to another user or group, open the properties dialog for the printer, select the Security tab and then click on Advanced. In the advanced settings screen, select the Owner tab. This screen will list the current owner, together with a list of users and group to which ownership may be changed. If the intended new owner is not listed in the Change owner to: list, click on the Other users or groups... button to access the Select User or Group dialog box. Enter the name of a user or group and click on the Check Names button. With the correct name selected, click on OK to return to the list of owners. Select the desired owner from the list and click on Apply to commit the change of ownership.
Printer Pooling Configuration
Printer Pooling refers to the process of allocating multiple physical print devices to a single logical printer. In such a configuration print jobs to the logical printer are assigned by the print server to the first available physical printer in the pool. A key requirement is that the physical printers that make up a pool must all use the same print driver and have the same amount of memory.
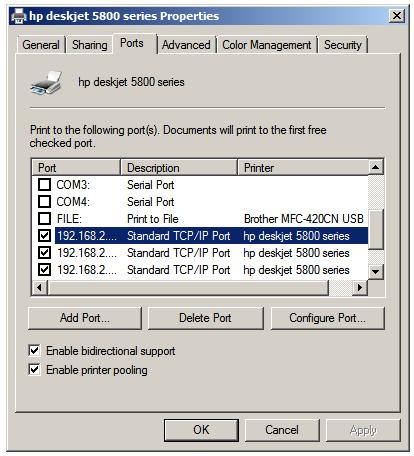
To configure printer pooling, install a printer such that it uses a particular port (such as a local port or IP address). Attach the other printers that are to make up the pool, but do not install them via Print Management. Once the first printer is installed, open the properties dialog for that printer by right clicking on it in Print Management and select the Ports tab. In the Ports page select the Enable printer pooling option. If the ports to which the additional printers are connected are listed make sure they are all selected. Note that a pool can be made up of printers connected in any combination of ways (network, serial, parallel, USB etc). In the case of network printers, click on Add Port... and enter the IP address of the additional printer, click New Port... and allow the wizard to create the new port. Once all the new ports are added and selected, click Apply to create the printer pool. The following figure illustrates a printer pool comprising three HP Deskjet network printers:
Configuring Printer Availability and Priority
Rather than working with the actual physical printers, users are in fact working with logical printers which map onto a physical print device. Windows allows a single physical print device to be assigned to multiple logical printers. This approach brings considerable flexibility in terms of controlling the availability of a printer to different groups of users and the priority of their print jobs.
This concept is best described by example. Suppose that a printer is to be made available to members of an engineering group only during the office hours. That same printer, however, is to always be available to the management group. Similarly, any print jobs belonging to the management group must be given a higher priority than those of the engineering group. To achieve this objective, two logical printers assigned to the same physical print device will be created, one for engineering and one for management. The availability of the engineering logical printer will be restricted to office hours and given a low priority. The management logical printer will always be available and will be given a high priority. Permissions on the logical printers will then be configured such that the engineering team is denied access to the management printer.
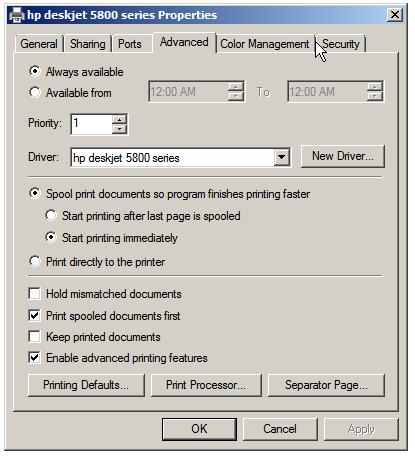
Availability and priority is configured from the printer property panel. To access these settings, launch Print Management and navigate to the required printer in the left pane. Right click on the printer, select Properties and then choose the Advanced tab. Once selected, the property panel will appear as follows:
For the management logical printer the Always available option will be selected and a high priority assigned (for example 95). Once these values are set, click on the Security tab of the properties dialog and deny access to the printer for the engineering group. Repeat these steps for the engineering logical printer, this time selecting the Available from option and specifying the hours that the printer is available.
<google>BUY_WINSERV_2008R2_BOTTOM</google>
