Establishing Outlets and Actions using the Xcode Assistant Editor
| Previous | Table of Contents | Next |
| Writing iOS 5 Code to Hide the iPad Keyboard | Understanding iPad iOS 5 Views, Windows and the View Hierarchy |
Learn SwiftUI and take your iOS Development to the Next Level |
In the preceding few chapters we have looked at the concepts of actions and outlets and subsequently worked through a simple example application intended to put this theory into practice. Within the example project outlined in the chapter entitled Creating an Interactive iOS 5 iPad App, we manually entered the declarations for both the outlets and actions contained within the application code. In practice, however, Xcode provides a second mechanism for implementing actions and outlets via a feature of Xcode known as the Assistant Editor.
The goal of this chapter is to outline how the Xcode Assistant Editor can be used to implement actions and outlets within an application project.
Having covered this topic, the remainder of the book (a few reminders notwithstanding) will simply list actions and outlets in code examples where necessary. In the interests of avoiding repetition, the choice of whether to create those actions and outlets manually or using the Assistant Editor will be left to the discretion and preference of the individual reader.
Displaying the Assistant Editor
The Assistant Editor is not displayed by default when Xcode is initially started. It may, however, be displayed on demand by selecting the View -> Assistant Editor -> Show Assistant Editor menu option. Alternatively, it may also be displayed by selecting the center button (the one containing an image of a bow tie and tuxedo) of the row of Editor toolbar buttons in the top right hand corner of the main Xcode window as illustrated in the following figure:
Figure 14-1
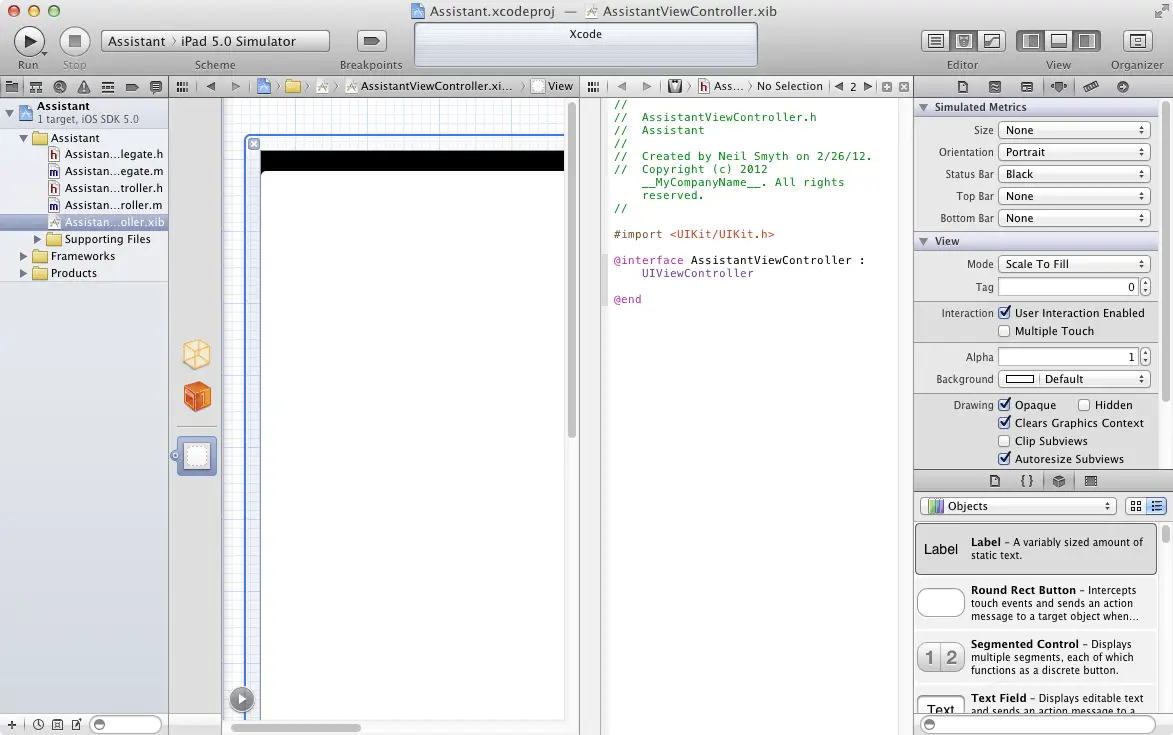
In the event that multiple Assistant Editor panels are required, additional tiles may be added using the View -> Assistant Editor -> Add Assistant Editor menu option or by clicking on the + button in the top right hand corner of an existing Assistant panel. By default, the editor panel will appear to the right of the main editing panel in the Xcode window. For example, in Figure 14-2 the panel to the immediate right of the Interface Builder panel is the Assistant Editor:
Figure 14-2
By default, the Assistant will automatically make an assumption about the source file that is to be displayed. In order to change to another file relating to the same class, simply click on the file name in the jump bar located across the top of the Assistant editor panel and select the required file from the resulting menu. To switch between automatic and manual file selection, click on the Automatic entry in the jump bar and select the Manual menu option. The Manual sub menus may then be used to navigate to the required file including selections from outside of the current class.
Using the Assistant Editor
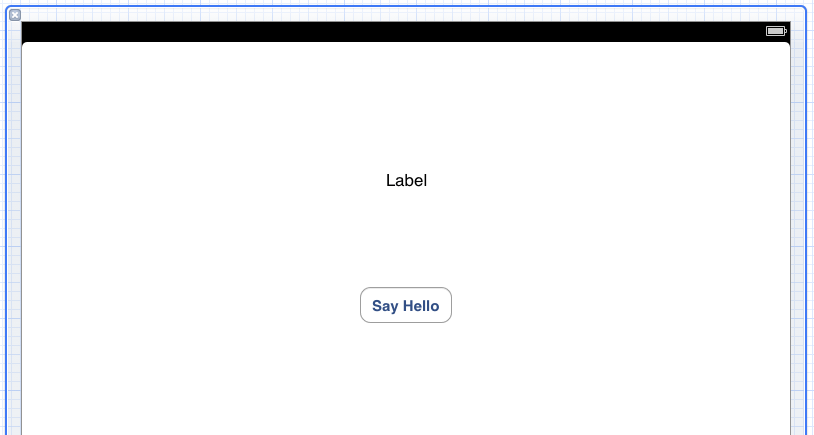
In the remainder of this chapter we will create a simple project and use it to demonstrate the ease with which outlets and actions may be declared using the Assistant Editor. For the purposes of this example, create a new Xcode iPad project named Assistant using the Single View Application template. Once the project has been created, select the AssistantViewController.xib file so that the Interface Builder panel appears, and then drag and drop a button and label onto the view canvas:
Figure 14-3
The ultimate goal of the application is to display a message on the label when the button is touched. In order to achieve this it will be necessary to implement an action method for the button to call and an outlet to provide access to the text property of the label. As outlined in the chapter entitled Creating an Interactive iOS 5 iPad App, this can be achieved by manually adding the appropriate declarations to the interface and implementation files of the view controller. This time, however, the Assistant Editor is going to do the work for us.
Adding an Outlet using the Assistant Editor
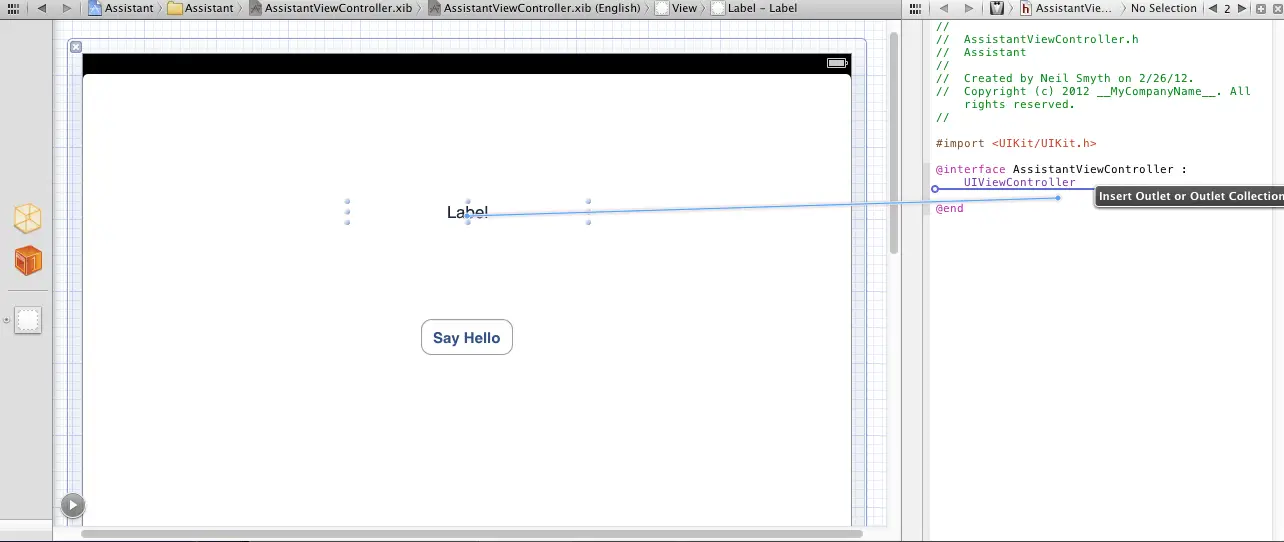
Assuming that the Interface Builder panel is still visible, display the Assistant Editor panel as outlined earlier in the chapter and make sure that the assistant has selected the AssistantViewController.h file. In order to establish an outlet for the label object, simply Ctrl-click on the label object in the view and drag the resulting line to the area immediately beneath the @interface directive in the Assistant Editor panel as illustrated in Figure 14-4:
Figure 14-4
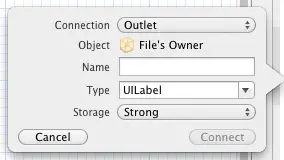
Upon releasing the line, the configuration panel illustrated in Figure 14-5 will appear requesting details about the outlet to be defined.
Figure 14-5
Since this is an outlet the Connection menu should be left as Outlet. The type and storage values are also correct for this type of outlet. The only task that remains is to enter a name for the outlet, so in the Name field enter statusLabel before clicking on the Connect button.
Once the connection has been established, select the AssistantViewController.h file from the project navigator panel and note that the outlet property has been declared for us by the assistant:
#import <UIKit/UIKit.h>

@interface AssistantViewController : UIViewController
@property (strong, nonatomic) IBOutlet UILabel *statusLabel;

@end
An inspection of the AssistantViewController.m file should reveal that the assistant has also added the corresponding synthesize directive for the new outlet property:
#import "AssistantViewController.h"

@implementation AssistantViewController
@synthesize statusLabel;
.
.
@end
Clearly, this saves a considerable amount of effort when declaring outlets. The same is also true of actions.
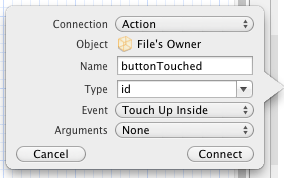
Adding an Action using the Assistant Editor
Figure 14-6
Click on the Connect button to create the action.
Select the AssistantViewController.h file from the project navigator panel and note that the action has now been declared for us by the assistant:
#import <UIKit/UIKit.h>

@interface AssistantViewController : UIViewController
- (IBAction)buttonTouched;
@property (strong, nonatomic) IBOutlet UILabel *statusLabel;

@end
Next, select the AssistantViewController.m file and note that a template method for the action has also been added automatically:
- (IBAction)buttonTouched {
}
All that remains, therefore, is to implement the code in the action method to display some text on the label via the statusLabel outlet:
- (IBAction)buttonTouched {
    self.statusLabel.text = @”Hello";
}
Compile and run the application and touch the button to display the “Hello” text on the label.
Summary
The task of implementing actions and outlets can be significantly eased by making use of the Xcode Assistant Editor. This chapter has worked through the use of the Assistant Editor to establish both outlet and action connections. Since both this method and hand coding are valid options for implementing actions and outlets, feel free to use the mechanism with which you are most comfortable in the remainder of this book.
Learn SwiftUI and take your iOS Development to the Next Level |
| Previous | Table of Contents | Next |
| Writing iOS 5 Code to Hide the iPad Keyboard | Understanding iPad iOS 5 Views, Windows and the View Hierarchy |


