Creating and Managing GPT Disk Partitions on Windows Server 2008 R2 Basic Disks
| Previous | Table of Contents | Next |
| Creating and Managing MBR Disk Partitions on Windows Server 2008 R2 Basic Disks | Extending and Shrinking Windows Server 2008 R2 Partitions and Volumes |
<google>BUY_WINSERV_2008R2</google>
In this chapter we will cover the steps involved in creating partitions and assigning drive letters and mount points on a basic disk initialized with the GPT partition style and also provide an overview of the different GPT partition types. For details on performing these tasks on an MBR basic disk, read the Creating and Managing MBR Disk Partitions on Windows Server 2008 R2 Basic Disks.
An Overview of GPT Partition Types
A disk initialized with the GPT partition style supports a number of different partition types. A brief summary of each type of partition is as follows:
- MBR - This is a reserved partition which appears in the first sector of the disk. It contains a 'dummy' Master Boot Record (MBR) containing a partition table indicating that the disk contains a single primary partition occupying the entire disk. This MBR is provided for the benefit of MBR disk utilities that would otherwise be unable to recognize a GPT based disk.
- ESP - The ESP is a FAT partition that is used to contain the files necessary to boot the operating system on Itanium based systems. When Windows Server 2008 R2 is installed on an Itanium system the setup process creates this partition automatically. The ESP is only required on disks from which the system is required to boot and is not usually present on disks intended solely for the storage of data. The ESP is visible when using tools such as diskpart but cannot be assigned a drive letter or mount point, nor can the contents of the partition be accessed or modified in any way other than through the system firmware.
- MSR - The Microsoft Reserved (MSR) partition is required on all GPT disks on Itanium systems and is used to store metadata when a basic disk is converted to a dynamic disk. This partition is created automatically by Windows Server 2008 R2, does not have a drive letter or mount point and is not visible from within Disk Management.
- LDM - The LDM Metadata and LDM Data partitions are automatically created by Windows Server 2008 R2 when a basic GPT disk is converted to a dynamic GPT disk. The LDM Metadata partition contains the partitioning information and the LDM Data partition contains the actual dynamic volumes.
- Primary - The primary partitions are used to store data. A single GPT disk can support 128 partitions including the required and optional partitions listed above.
Creating Primary Partitions on a GPT Basic Disk
New volumes are created using the Disk Management interface or the diskpart command line tool. Disk Management can be accessed either from the Server Manager or Computer Management tools. To launch the Server Manager open the Start menu and click on the Server Manager option, or click on the Server Manager icon in the task bar. Alternatively launch Computer Management from Start -> All Programs -> Administration Tools -> Computer Management or by running compmgmt.msc.
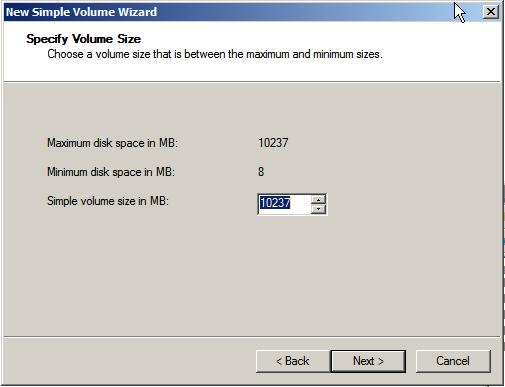
To begin the partitioning process right click on the Unallocated or Free Space area of the appropriate drive in the graphical section of Drive Management screen and select New Simple Volume.... This will launch the New Simple Volume Wizard. Click Next on the initial screen to proceed to the Specify Volume Size screen as illustrated below:
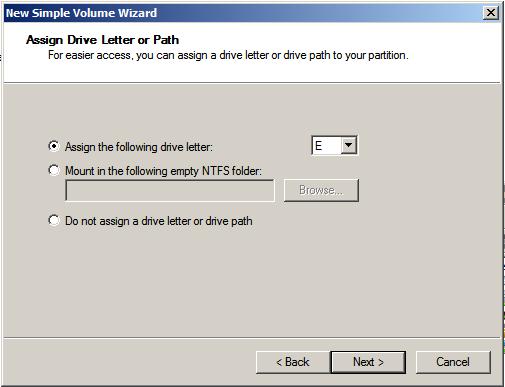
On this screen enter the size of the volume to be created. The screen shows the maximum and minimum allowed sizes. If you only need one partition use the maximum value provided. Once the size has been defined, click Next to configure the drive letter or mount point. The wizard will allocate the next available drive letter to the new volume. If this is not acceptable, select another drive letter from the drop down list. Alternatively, to have the volume mounted in an empty folder use the Browse button to locate, or create a suitable empty folder in the file system via which the new volume will be accessible. The wizard also provides the option to leave the new volume unassigned at this point. Note that these settings may be changed at any time by right clicking on the volume in graphical view and selecting Change Drive Letter and Paths from the popup menu. The Assign and Drive Letter or Path screen is shown below:
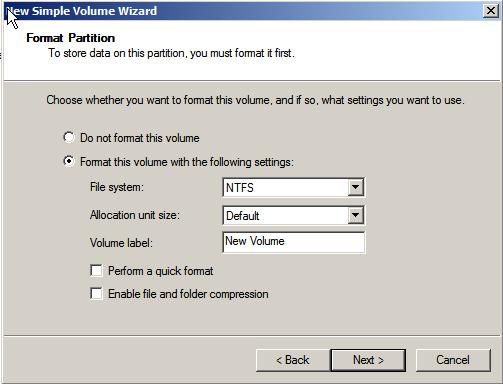
Click the Next button to proceed to the Format Partition screen. On this screen a number of choices are available in terms of the type of file system to be created on the new volume.
<google>WIN28BOX</google>
The Allocation unit size value specifies the file system cluster size. In general the default setting for this value is the preferable choice, although a smaller value may be useful in situations where the volume is intended to store large quantities of small files. In the Volume label field, enter a suitable volume name for this new partition.
If selected, the Quick Format option will cause the format to be performed without any error checking. The Enable file and folder compression option dictates whether the data stored in the volume is to be compressed to maximize use of space. While there are some advantages to maximizing the space on a disk through compression there are inherent performance costs in doing so. Click on the Next button to proceed to the summary screen. Assuming the settings are satisfactory, click on Finish to begin the formatting process. The wizard will close and the disk in the graphical display will show the new volume as a primary volume and show the progress of the formatting process.
Once the process is completed the disk will be ready for use. To create additional volumes, simply repeat the above steps until the required number of partitions have been created, the maximum allowed number of partitions is reached or all the disk space is allocated.
Formatting a Volume using Disk Management
During the volume creation process outlined in the preceding sections of this chapter it was mentioned that a new partition on a disk drive may be created without formatting it for a particular file system. This is known as a raw partition and will be listed in the disk manager as having a RAW file system type.
Before the RAW volume can be used it must be formatted. This can be achieved using either the Disk Management interface or from the command line using the diskpart tool. To perform the format from Disk Management simply select the desired volume from the graphical display, right click and select Format.... The format dialog will appear requesting the file system type, volume name, allocation unit size and volume label. Options to perform a quick format (which does not perform an error check) and enable disk compression (for NTFS file systems only) are also provided.
Once the desired settings are selected initiate the format simply by clicking on OK and then respond affirmatively to the warning dialog.
Formatting a Volume from the Command Line
Windows Server 2008 R2 provides the ability to format volumes from the command line using the diskpart tool. This can be invoked by entering diskpart either at the command prompt or in a Run dialog. Once started, diskpart presents a DISKPART> prompt at which commands can be entered.
The first step is to identify the disks on the system. This information is obtained using the list disk command:
DISKPART> list disk
  Disk ###  Status      Size     Free     Dyn  Gpt
  --------  ----------  -------  -------  ---  ---
  Disk 0    Online        30 GB      0 B
  Disk 1    Online         9 GB      0 B
For the purposes of this tutorial we will be working on a partition on disk 1. To select the required disk use the select disk command:
DISKPART> select disk 1
Disk 1 is now the selected disk.
Having selected the disk, the next step is to select the partition which is to be formatted. To obtain a list of partitions on the selected disk the list partition command is used:
DISKPART> list partition
  Partition ###  Type              Size     Offset
  -------------  ----------------  -------  -------
  Partition 1    Reserved            32 MB    17 KB
  Partition 2    Primary           1000 MB    33 MB
In the above example, the first partition is reserved and is most likely the protective MBR partition described earlier in the chapter. This leaves us with partition 2 which is a primary partition. Select this partition using the select partition command:
DISKPART> select partition 2
Partition 2 is now the selected partition.
Having made the appropriate selections we are now ready to format the chosen partition. As with formatting through the Disk Management interface a number of options are available. In the first instance the type of file system required must be specified using the fs= directive. Acceptable options include FAT and NTFS. Alternatively, simply use recommended to format using the recommended file system. The label= directive allows a volume label to be specified. When using this directive, the label name should be encapsulated in double quotes (").
In addition, the quick directive may be used to perform a quick format where the disk is not checked for errors and compress may be used with an NTFS format to enable file and folder compression.
The following example performs a quick format of the currently selected partition as NTFS with a volume label of "My Volume":
DISKPART> format fs=ntfs label="My Volume" quick
  100 percent completed
DiskPart successfully formatted the volume.
Assigning and Changing Drive Letters and Mount Points
As with the choice to perform a format during the partition creation, the Disk Management snap-in also provides the option to assign drive letters or mount point paths at a later time. If you chose to defer these settings they can be assigned at any time after the creation of the partition.
To assign or change a drive letter or mount point simply open the Disk Management interface, right click on the required volume in the graphical view and select Change Drive Letter and Paths... from the popup menu. In the resulting dialog configure the drive letter or mount point accordingly.
Assigning and Changing Drive Letters and Mount Points from the Command Line
In order to assign or change drive letter or mount point for a partition using the command line begin by invoking diskpart from the command prompt or Run dialog.
The first step is to identify the disks on the system. This information is obtained using the list disk command:
DISKPART> list disk
  Disk ###  Status      Size     Free     Dyn  Gpt
  --------  ----------  -------  -------  ---  ---
  Disk 0    Online        30 GB      0 B
  Disk 1    Online         9 GB      0 B
To select the required disk use the select disk command:
DISKPART> select disk 1
Disk 1 is now the selected disk.
Having selected the disk the next step is to select the partition to which a drive letter or mount point is to be assigned. To obtain a list of partitions on the selected disk, use the list partition command as follows:
DISKPART> list partition
  Partition ###  Type              Size     Offset
  -------------  ----------------  -------  -------
  Partition 1    Reserved            32 MB    17 KB
  Partition 2    Primary           1000 MB    33 MB
For this example we are going to work with partition 2 so we need to select this partition using the select partition command:
DISKPART> select partition 2
Partition 2 is now the selected partition.
Finally the drive letter or mount point can be assigned. To assign a drive letter to the currently selected partition:
DISKPART> assign letter L:
DiskPart successfully assigned the drive letter or mount point.
Similarly, assign a mount point as follows (note that the designated mount folder must already exist and be empty):
DISKPART> assign mount=\bigvol
DiskPart successfully assigned the drive letter or mount point.
<google>BUY_WINSERV_2008R2_BOTTOM</google>


