Configuring RHEL 6 GNOME Screen Resolution and Multiple Monitors
| Previous | Table of Contents | Next |
| Logging into the RHEL 6 GNOME Desktop | A Guided Tour of the RHEL 6 GNOME Desktop |
|
You are reading a sample chapter from the RHEL 6 Edition book. Purchase the fully updated Red Hat Enterprise Linux 8 (RHEL 8) Edition of this publication in eBook ($9.99) or Print ($36.99) format Red Hat Enterprise Linux 8 Essentials Print and eBook (ePub/PDF/Kindle) editions contain 31 chapters and over 250 pages |
After Red Hat Enterprise Linux 6 installs and boots for the first time you may find that the desktop is not using the entire screen space available, leaving a black border around the desktop, or using a lower resolution than is supported by the monitor and display adapter. In addition, you may have more than one monitor connected to the system and would like the RHEL 6 desktop to be accessible from both. In this chapter of RHEL 6 Essentials we will cover the steps necessary to adjust the display resolution and orientation of the RHEL 6 GNOME desktop and configure multiple monitors.
Configuring the RHEL Display Resolution
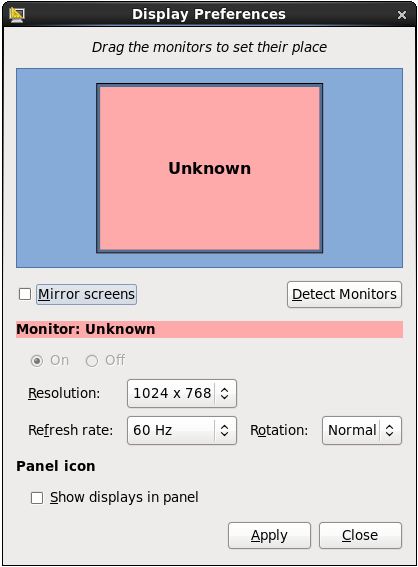
The first step in configuring monitors involves setting the optimal screen resolution for both the monitor and the user. RHEL 6 will generally do a good job of configuring these settings during installation, but it can sometimes be necessary to modify these settings to obtain optimal results. If RHEL has correctly identified your display and graphics cards then it should be possible to increase the resolution to any value up to the maximum supported by the hardware using the Display Preferences screen, accessed via the System -> Preferences -> Display menu option:
Using the Resolution menu, select the desired screen resolution up to the maximum support by the hardware and click on the Apply button to commit the change.
Changing Display Orientation
<google>RHEL6BOX</google> The Display Preferences dialog also provides the option to change the orientation of the desktop to match the orientation of the monitor. This is achieved using the Rotation control. This setting can be used to orient the desktop such that it will appear the right way up if the monitor is physically upside down or on its left or right side. If you are feeling brave, try changing the setting to upside down mode while your monitor is still the right way up. Once the desktop is upside down, revert to the Normal setting, keeping in mind that the mouse will move up when you move it down, left when you move it right and so on.
Configuring Multiple Monitors
RHEL 6 supports multiple monitors connected to a single system allowing the desktop environment to be spread over more than one screen. Multiple monitors are configured, once again, using the Display Settings tool which may be accessed from the Desktop System -> Administration -> Display menu option.
If the system fails to detect an additional monitor, click on the Detect Monitors button to probe for the display hardware. Once detected, the monitors should be displayed in the graphical representation within the dialog. If the graphical view does not represent the physical positioning of the monitors on the desk, drag and drop the monitors to the correct left to right orientation. Note that when a monitor is detected and the Display Preferences tool is running, a label will appear in the top left hand corner of each monitor enabling you to identify which physical monitor corresponds to the graphical representation in the preferences tool.
If you would like each monitor to display the same image make sure the Mirror Screens option is selected.
|
You are reading a sample chapter from the RHEL 6 Edition book. Purchase the fully updated Red Hat Enterprise Linux 8 (RHEL 8) Edition of this publication in eBook ($9.99) or Print ($36.99) format Red Hat Enterprise Linux 8 Essentials Print and eBook (ePub/PDF/Kindle) editions contain 31 chapters and over 250 pages |
| Previous | Table of Contents | Next |
| Logging into the RHEL 6 GNOME Desktop | A Guided Tour of the RHEL 6 GNOME Desktop |


