An iOS 10 Today Extension Widget Tutorial
| Previous | Table of Contents | Next |
| An Introduction to Extensions in iOS 10 | Creating an iOS 10 Photo Editing Extension |
Learn SwiftUI and take your iOS Development to the Next Level |
With the basic concepts of extensions covered in the previous chapter, this chapter will work step-by-step through the creation of an example iOS 10 extension widget that will appear within the Today view of the Notifications panel. In the process of creating the example app, key areas of the Today extension implementation process will be covered in detail.
About the Example Extension Widget
The purpose of the extension created in this tutorial is to display the longitude and latitude of the user’s current location within the Today view of the iOS Notification panel. The steps to achieve this will involve the addition of an extension target to an existing container app, the design of the widget user interface and the implementation of the code to obtain, display and update the appropriate location data.
As previously outlined, Apple states that the container app for a Today extension must itself perform some useful function in addition to serving as the delivery vehicle for an extension. In recognition of this requirement, the tutorial is intended to be implemented as an extension to the Location application created in the chapter of this book entitled An Example iOS 10 Location Application. The steps outlined in the chapter may still be followed, however, regardless of whether or not you have completed the location based chapter.
Creating the Example Project
If you previously completed the Location tutorial as outlined in the An Example iOS 10 Location Application chapter of this book, locate the project and load it into Xcode. If, on the other hand, you have yet to complete this tutorial, download the sample code for the examples in this book from the following URL, and locate and load the completed Location example project into Xcode:
http://www.ebookfrenzy.com/web/ios10/
Adding the Extension to the Project
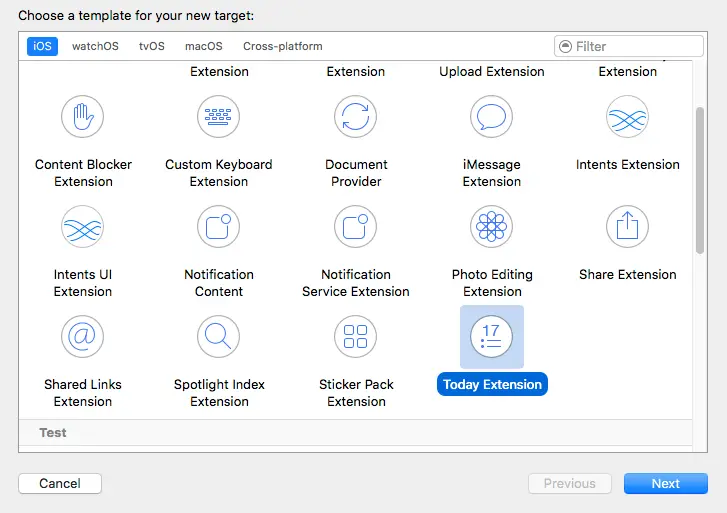
With the Location project loaded into Xcode, the next step is to add an extension target to the project using one of the extension templates provided by Xcode. From the Xcode menu, select the File -> New -> Target… menu option. In the resulting panel, select the Application Extension category listed under iOS in the left-hand panel, and the Today Extension template from the main panel as shown in Figure 84-1:
Figure 84-1
Click on the Next button and, on the options panel, enter MyLocation into the Product Name field, leaving the remaining settings unchanged from the default values provided by Xcode. Click on Finish to create the new extension target.
As soon as the target has been created, a new panel will appear requesting permission to activate the new scheme for the extension target. Every target within an Xcode project has associated with it a scheme which defines how that target is to be built. When an extension target is added to a project, Xcode automatically creates a corresponding scheme so that the extension can be built and run. Activate this scheme now by clicking on the Activate button in the request panel.
The Today extension can be tested using the default template settings simply by setting the extension scheme (MyLocation) as the active scheme from the Xcode toolbar as shown in Figure 84-2, selecting a suitable device or simulator target and clicking on the run button.
Figure 84-2
When an extension is launched it must do so within the context of a host app. Xcode will, therefore, automatically launch the Today app with the My Location extension loaded.
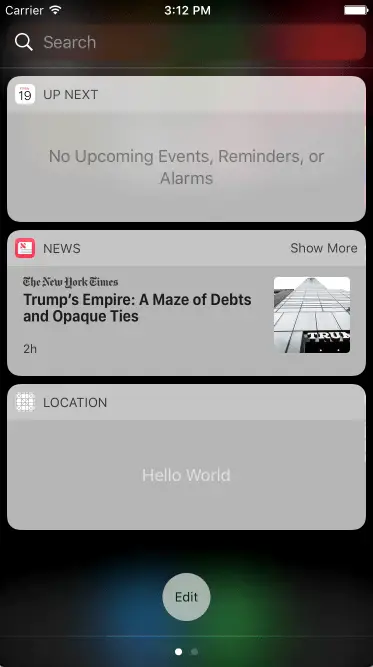
The default user interface for the Today template consists of a single label displaying text which reads “Hello World”. Assuming a successful launch of the extension, the Today view will appear in the Notification panel with the widget displayed as illustrated in Figure 84-3:
Figure 84-3
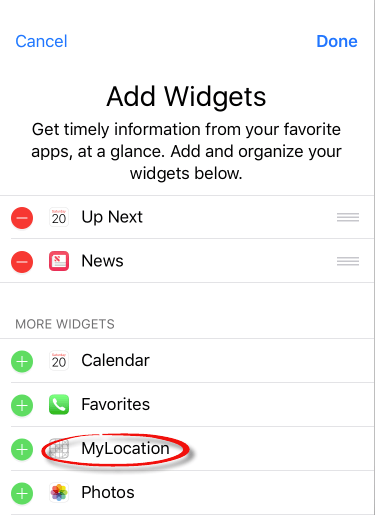
If the widget does not appear in the view, it may need to be enabled. Scroll down the Today view and select the Edit button when it comes into view. On the edit screen, locate the MyLocation widget and tap the green + button located next to it to add it to the view before selecting Done. If the extension is not listed, this can be resolved by stopping and relaunching it from within Xcode.
Figure 84-4
Reviewing the Extension Files
Figure 84-5
The files that make up a Today extension are as follows:
• TodayViewController.swift - Contains the source code for the View Controller representing the widget in the Today view.
• MainInterface.storyboard – The storyboard file containing the user interface of the widget as it will appear within the Today view.
• Info.plist – The information property list for the extension.
Designing the Widget User Interface
The Today extension template provided the project with a simple storyboard layout containing a single label view. For the purposes of this tutorial, two labels will be required to display both the longitude and latitude of the user’s current location. Within the Xcode project navigator panel, locate and select the MyLocation -> MainInterface.storyboard file to load it into the Interface Builder environment.
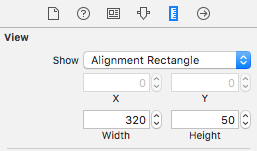
Begin by selecting and deleting the “Hello World” label from the view leaving a clean canvas on which to work (the label uses a very light shade of gray color so may not be visible within the view). By default, the template has configured the widget view with a height suitable to accommodate a single label. In order to fit two labels onto the widget this height property will need to be increased. Click on the background of the widget to select the view and display the Size Inspector. Within the inspector panel, change the Height property from 37 to 50 as shown in Figure 84-6:
Figure 84-6
With the height increased, drag and drop two Label views from the object palette onto the view canvas so that the layout resembles that of Figure 84-7. Using the Attributes Inspector panel, change the color property of both of the labels to Light Text Color:
Figure 84-7
If the extension were to be launched on a device or simulator at this point, the labels would not be visible. The reason for this is that the Today view relies on Auto Layout settings within the widget layout, or specific preferred content size settings in the view controller code to decide on the size at which the widget should appear. Since no Auto Layout constraints have been configured, and no code has been added to set the preferred content size, the widget content would appear at zero height.
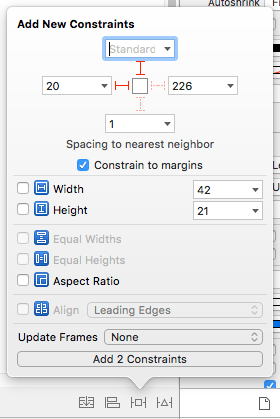
Select the uppermost Label and display the Auto Layout Add New Constraints menu (Figure 84-8). Enable the Spacing to nearest neighbor constraint on the top edge of the label by enabling the red constraint bar. Click on the down arrow next to the current spacing value for the top constraint and select Use standard value from the drop down menu. Enable the nearest neighbor constraint on the left-hand edge of the label, leaving the current value unchanged. Turn off the Constrain to margins option, and click on the Add 2 Constraints button:
Figure 84-8
Select the bottom Label view and repeat the above steps, this time setting spacing constraints on the left and top edges of the view using the current spacing values for both constraints and once again with the Constrain to margins option disabled. Before adding the constraints, change the Update Frames menu to All Frames in Container.
Run the extension and verify that the widget layout appears correctly within the Today view, returning to the storyboard file if necessary to make adjustments to the layout.
Once the layout work is complete, display the Assistant Editor panel and make sure that it is showing the source code contained in the TodayViewController.swift file. Ctrl-click on the upper Label view and drag the resulting line to a position beneath the class declaration line in the Assistant Editor panel. Release the line and, in the resulting connection dialog, establish an outlet connection named latitudeLabel. Repeat this sequence of steps for the bottom label, this time creating an outlet named longitudeLabel.
Setting the Preferred Content Size in Code
Although not necessary in this particular instance (since Auto Layout is being used to influence the height of the widget), it is worth noting that the height of a widget can be set in code using the setPreferredContentSize method of the extension view controller instance. For example, the following code changes the height of the widget to 200 before it is displayed to the user:
override func viewWillAppear(_ animated: Bool)
{
    var currentSize: CGSize = self.preferredContentSize
    currentSize.height = 200.0
    self.preferredContentSize = currentSize
}
This technique is particularly useful when it is necessary to dynamically change the size of a widget at runtime. A widget might, for example, display some initial information to the user and provide a “More” button to display more detailed information. In this scenario the “More” button would simply change the preferred content size to make additional views visible.
Modifying the Widget View Controller
The view controller class for the Today extension widget now needs to be implemented such that it obtains the user’s current location and updates the labels in the widget accordingly. Select and edit the TodayViewController.swift file to import the CoreLocation Framework, declare an optional variable in which to store the current location and to create and initialize a location manager instance. Note also that the TodayViewController class declaration has been modified to indicate that it now implements the CLLocationManagerDelegate protocol:
import UIKit
import NotificationCenter
import CoreLocation

class TodayViewController: UIViewController, NCWidgetProviding, CLLocationManagerDelegate {

    @IBOutlet weak var latitudeLabel: UILabel!
    @IBOutlet weak var longitudeLabel: UILabel!

    var locationManager: CLLocationManager = CLLocationManager()
    var currentLocation: CLLocation?

    override func viewDidLoad() {
        super.viewDidLoad()
        locationManager.desiredAccuracy = kCLLocationAccuracyBest
        locationManager.delegate = self
        locationManager.requestLocation()
    }
.
.
.
}
To meet the conformance requirements of the CLLocationManagerDelegate protocol, and in order to be able to receive location update notifications, the location manager’s didUpdateLocations delegate method now needs to be implemented along with the didFailWithError delegate method. The code within this method will extract the latest location information and assign it to the previously declared currentLocation optional variable:
func locationManager(_ manager: CLLocationManager, didUpdateLocations locations: [CLLocation]) {
    currentLocation = locations[0]
}

func locationManager(_ manager: CLLocationManager, didFailWithError error: Error) {
    print(error.localizedDescription)
}
Next, a convenience function needs to be written to update the labels with the latest location data:
func updateWidget()
{
     if currentLocation != nil {
         let latitudeText = String(format: "Lat: %.4f",
                        currentLocation!.coordinate.latitude)

         let longitudeText = String(format: "Lon: %.4f",
                        currentLocation!.coordinate.longitude)

         latitudeLabel.text = latitudeText
         longitudeLabel.text = longitudeText
      }
}
This function verifies that the currentLocation optional variable contains a value and, if so, constructs String objects containing the current longitude and latitude values before displaying them on the corresponding widget labels.
The last modification to the widget view controller is to ensure that the updateWidget function is called at the appropriate times so that the user sees the latest location information each time the widget is displayed in the Today view. To make sure the function is called prior to the widget being displayed, the viewWillAppear method of the view controller needs to be overridden as follows:
override func viewWillAppear(_ animated: Bool) {
        updateWidget()
}
From time to time, the system will take snapshots of the widget so that information can be presented quickly to the user when the Today view is displayed. To make sure that the latest information is displayed when the system takes snapshots of the widget, it is also necessary to update the widget within the widgetPerformUpdate(completionHandler:) method, a template of which has been provided by Xcode in the TodayViewController.swift file. All that needs to be added to this method is a call to our updateWidget method:
func widgetPerformUpdate(completionHandler: ((NCUpdateResult) -> Void)) {
        updateWidget()
        completionHandler(NCUpdateResult.NewData)
}
Testing the Extension
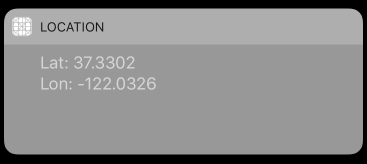
Compile and run the extension using the extension’s scheme and select the Today view as the host app when prompted. Once the Today view is visible, use the Edit button to enable the widget (if it is not already displayed), at which point it should appear as shown in Figure 84-9:
Figure 84-9
Opening the Containing App from the Extension
When developing extensions it may be useful to provide the user with the ability to open the containing application from within the extension. The MyLocation Today widget, for example, only displays a subset of the data available within the containing Location app.
Every extension has associated with it an extension context object, a reference to which can be accessed via the extensionContext property of the extension’s view controller instance. Among the methods available to be called on the extension context object is the openURL method which can be used to launch other, suitably configured applications.
In order for an application to be launchable using the openURL method, the Info.plist file for that application must define a custom URL scheme. This essentially declares the URL name by which the application is identified (represented by the CFBundleURLName key and typically set using a reverse domain name identifier such as com.ebookfrenzy.location) and the schemes it supports (via an array of string values assigned to the CFBundleURLSchemes key).
For the purposes of this example, the Info.plist file for the Location application will be modified to specify a CFBundleURLName value of com.ebookfrenzy.location and a URL scheme named location. While this can be achieved using the Xcode property list editor, it is actually quicker in this instance to directly edit the XML source of the Info.plist file.
Within the project navigator panel Ctrl-click on the Location -> Info.plist file and select the Open As -> Source Code menu option. Once the file has loaded into the editor, modify it to add the URL scheme entries as follows:
<?xml version="1.0" encoding="UTF-8"?>
<!DOCTYPE plist PUBLIC "-//Apple//DTD PLIST 1.0//EN" "http://www.apple.com/DTDs/PropertyList-1.0.dtd">
<plist version="1.0">
<dict>
        <key>CFBundleURLTypes</key>
        <array>
                <dict>
                        <key>CFBundleURLName</key>
                        <string>com.ebookfrenzy.location</string>
                        <key>CFBundleURLSchemes</key>
                        <array>
                                <string>location</string>
                        </array>
                </dict>
        </array>
        <key>CFBundleDisplayName</key>
        <string></string>
        <key>NSLocationUsageDescription</key>
        <string>The application uses this to display your location in the Today view</string>
.
.
.
</dict>
</plist>
The user interface layout for the MyLocation widget now needs to be modified to include a Button view which, when selected, will open the Location application. Select the MainInterface.storyboard file to load it into Interface Builder and add a Button which reads “Open” positioned as shown in Figure 84 10:
Figure 84-10
Display the Assistant Editor and verify that it is listing the source code for the TodayViewController.swift file. Ctrl-click and drag from the newly added Button view to the location within the Swift file where you would like the action method to be placed and release the line. In the resulting panel, change the connection type to Action and name the action openApp before clicking on the Connect button.
Edit the openApp method to construct the URL (which is referenced by the CFBundleURLSchemes location string) and to call the openURL method of the extension context:
@IBAction func openApp(_ sender: AnyObject) {

    let url: URL? = URL(string: "location:")!

    if let appurl = url {
        self.extensionContext!.open(appurl,
            completionHandler: nil)
    }
}
In order to test this new functionality it will be necessary to build and re-install both the Location containing app and the MyLocation extension. Begin by selecting the Location scheme from the Xcode toolbar and build and run the application on the target device or simulator. Next, change the scheme to MyLocation and build and run the extension using the Today view as the host app.
Once the extension is visible in the Today view, touch the Open button to launch the Location container app.
Summary
The Today extension allows widgets to appear within the Today view of the iOS Notification panel. Today widgets are essentially view controllers with the user interface of the widget contained within a storyboard file. It is important when designing a widget to make sure that it is small and lightweight and that either Auto Layout constraints or preferred content size method calls are made to ensure that the widget is sized correctly within the Today view. The system will call the widgetPerformUpdate(completionHandler:) delegate method of the extension view controller at regular intervals in an effort to ensure that recent data is available to be displayed next time the view appears. A widget may provide the option to launch another app from within the Today view using the openURL method of the extension context instance.
Learn SwiftUI and take your iOS Development to the Next Level |
| Previous | Table of Contents | Next |
| An Introduction to Extensions in iOS 8 | Creating an iOS 8 Photo Editing Extension |


