An iOS 4 iPhone UIPickerView Example
| Previous | Table of Contents | Next |
| Using the UIPickerView and UIDatePicker Components in iOS 4 iPhone Applications | Working with Directories on iOS 4 (iPhone) |
Learn SwiftUI and take your iOS Development to the Next Level |
Unlike the UIDatePicker class, which is pre-configured by Apple specifically for date and time selection, the UIPickerView class can be configured to meet the specific requirements of the iPhone application developer. Having provided a basic overview of pickers and an example of the use of the DatePicker in Using the UIPickerView and UIDatePicker Components in iOS 4 iPhone Applications, the objective of this chapter is to provide a worked example of the UIPickerView class in action.
Creating the iOS 4 PickerView Project
The example application in this chapter is a very rudimentary currency conversion tool. The user will enter a US Dollar amount into a text field and then make a currency selection from a PickerView component at which point the equivalent amount in the chosen currency will be displayed on a label.
Begin by creating a new iOS iPhone project named picker using the View-based Application template.
UIPickerView Delegate and DataSource
<google>IOSBOX</google> Before starting on the project it is worth taking some time to talk about the delegate and datasource of the UIPickerView class. In order to obtain the options to be displayed to the user, the PickerView needs a data source. This data source takes the form of a protocol that defines the methods that must be implemented in order to provide the Picker with data information. At the minimum the class designated as the data source must implement the following methods:
- numberOfComponentsInPickerView: - Called by the PickerView to identify the number of components (i.e. selection wheels) that are to be displayed to the user.
- numberOfRowsInComponent: - Informs the PickerView of the number of rows (in other words the selection options) that are present in a specified component.
- titleForRow: - Called by the PickerView to identify the string that is to be displayed for a specified row in a specific component.
In addition to a data source, the PickerView also needs a mechanism for notifying the application code when a selection has been made by the user. It achieves this by calling the didSelectRow method of the class declared as the PickerView’s delegate. In order to fully implement a PickerView, therefore, it is necessary for the object to be assigned a data source and delegate. Typically the view controller responsible for the PickerView is the best place to implement these two protocols.
The pickerViewController.h File
The first step is to implement the declarations in the pickerViewController.h file. Since we plan on making our view controller both the delegate and data source for the UIPickerView instance the view controller must be declared as implementing both the UIPickerViewDelegate and UIPickerViewDataSource protocols.
Our application needs outlets to the PickerView, text field and label objects that will be placed into the user interface. In addition, two arrays are needed to store the country names and exchange rates. Finally, we will need to make sure the keyboard is hidden when the user touches the Return key, so an action method named textFieldReturn also needs to be declared to accommodate this requirement:
#import <UIKit/UIKit.h>

@interface pickerViewController : UIViewController
        <UIPickerViewDelegate, UIPickerViewDataSource>
{
        UIPickerView       *picker;
        NSArray            *countryNames;
        NSArray            *exchangeRates;
        UILabel            *resultLabel;
        UITextField        *dollarText;
}
@property (nonatomic, retain) IBOutlet UIPickerView *picker;
@property (nonatomic, retain) IBOutlet UILabel *resultLabel;
@property (nonatomic, retain) IBOutlet UITextField *dollarText;
@property (nonatomic, retain) NSArray *countryNames;
@property (nonatomic, retain) NSArray *exchangeRates;
-(IBAction)textFieldReturn:(id)sender;
@end
Save the file once the necessary changes have been made.
Designing the User Interface
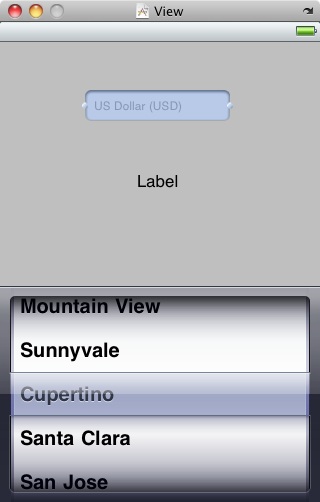
Within the main Xcode project window, double click on the pickerViewController.xib file to launch Interface Builder. Drag and drop a UIPickerView from the Library onto the View window and position it at the bottom of the view. Also add a label and text field. Stretch the right and left hand edges of the label until the dotted blue margin line appears. Using the Attribute Inspector (Command+1), configure centered alignment on the label.
Select the text field and change the Placeholder setting in the Attribute Inspector to US Dollars (USD). Once completed, the view should appear as illustrated in the following figure:
Ctrl-click on the File’s Owner entry in the documents window and drag the resulting line to the text field in the view. After releasing the line, select the dollarText outlet from the menu. Repeat these steps to connect to picker and result outlets to the picker and label objects respectively.
Next, select the PickerView component in the View window and display the Connections Inspector (Command+2). Click in the round circle to the right of the dataSource outlet in the inspector window and drag the line to the File’s Owner entry. Repeat this task for the delegate outlet.
Finally, select the text field object and click and drag from the circle to the right of the Did End On Exit event in the Connections Inspector to the File’s Owner. After releasing the mouse, select the textFieldReturn action method from the resulting label.
The user interface is now designed and the outlets and action connected. Save the design and exit from Interface Builder.
Initializing the Arrays
The data that will be used in our application is stored in two arrays, one for the country name and the other for the corresponding exchange rate. In the real world, the application would likely obtain uptodate exchange rate information from an external source, but for the purposes of this example we will hard code the prevailing rates at the time of writing. These arrays need to be initialized when the application loads, so the necessary code should be added to the viewDidLoad method of the pickerViewController.m file (be sure to remove the comment markers (/* and */) from around this method before adding the code. Now is also a good time to add the appropriate @synthesize directives:
#import "pickerViewController.h"

@implementation pickerViewController
@synthesize picker, countryNames, exchangeRates;
@synthesize resultLabel, dollarText;
.
.
- (void)viewDidLoad {
        self.countryNames = [[NSArray alloc] initWithObjects:
		@"Australia (AUD)", @"China (CNY)", @"France (EUR)",
		@"Great Britain (GBP)", @"Japan (JPY)", nil];

        self.exchangeRates = [[NSArray alloc]
		initWithObjects: [NSNumber numberWithFloat:0.9922],
               [NSNumber numberWithFloat:6.5938],
		[NSNumber numberWithFloat:0.7270],
               [NSNumber numberWithFloat:0.6206],
		[NSNumber numberWithFloat:81.57], nil];
        [super viewDidLoad];
}
Implementing the DataSource Protocol
The next step is to implement the methods that comprise the UIPickerViewDataSource protocol. Since we have declared the pickerViewController class as the data source we need to implement the methods in the pickerViewController.m file:
#pragma mark -
#pragma mark PickerView DataSource

- (NSInteger)numberOfComponentsInPickerView:(UIPickerView *)pickerView
{
        return 1;
}
- (NSInteger)pickerView:(UIPickerView *)pickerView
      numberOfRowsInComponent:(NSInteger)component
{
        return [countryNames count];
}
- (NSString *)pickerView:(UIPickerView *)pickerView
titleForRow:(NSInteger)row
forComponent:(NSInteger)component
{
        return [countryNames objectAtIndex:row];
}
The first method simply returns 1 since our picker only has one component. The second method returns the number of rows in the component by counting the number of elements in the country name array. Finally, the titleForRow method returns the corresponding country name for the requested row by using the row number as a reference into the country names array.
Implementing the Delegate
For the purposes of this example the only delegate method we need to implement is the one that get called when the user makes a selection from the PickerView component, The code for this method also belongs in the pickerViewController.m file and should be implemented as follows:
#pragma mark -
#pragma mark PickerView Delegate
-(void)pickerView:(UIPickerView *)pickerView didSelectRow:(NSInteger)row
inComponent:(NSInteger)component
{
        float rate = [[exchangeRates objectAtIndex:row] floatValue];
        float dollars = [dollarText.text floatValue];
        float result = dollars * rate;

        NSString *resultString = [[NSString alloc] initWithFormat:
		@"%.2f USD = %.2f %@", dollars, result,
               [countryNames objectAtIndex:row]];
        resultLabel.text = resultString;
        [resultString release];
}
This method takes the selected row number argument and uses it as a reference to obtain the exchange rate from the exchangeRates array. Next the dollar amount entered by the user is converted from a string to a floating point number and multiplied by the US Dollar amount to arrive at a conversion value.
Next a string is constructed from the dollar amount, the converted amount and the country name. This string is then displayed on the label and the string released.
Hiding the Keyboard
Since the keyboard will obscure the picker when displayed, the last task before testing the application is to make sure the keyboard is hidden when the user touches the Return key. Still within the pickerViewController.m file, therefore, add the textFieldReturn action method as follows:
-(IBAction)textFieldReturn:(id)sender
{
        [sender resignFirstResponder];
}
Testing the Application
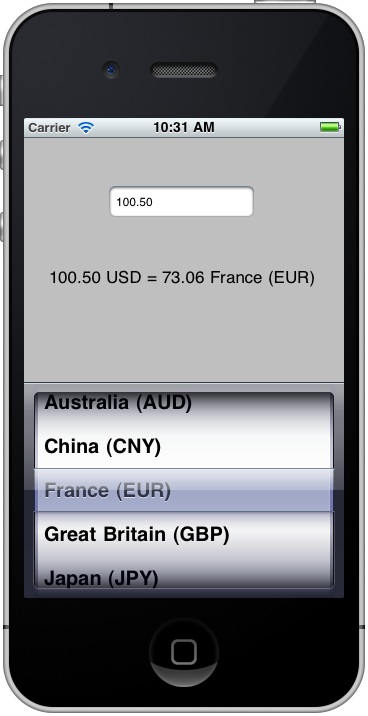
Once the code changes have been made and the corresponding files saved, click on the Build and Run button located in the Xcode project window toolbar. The application should load into the iOS Simulator where a dollar amount may be entered and countries selected to obtain currency conversion values:
Learn SwiftUI and take your iOS Development to the Next Level |
| Previous | Table of Contents | Next |
| Using the UIPickerView and UIDatePicker Components in iOS 4 iPhone Applications | Working with Directories on iOS 4 (iPhone) |


