Configuring BitLocker Drive Encryption on Windows Server 2008 R2
BitLocker Drive Encryption is a security feature first introduced in the Ultimate and Enterprise editions Windows Vista and subsequently incorporated into all editions of Windows Server 2008 inclucing the R2 release.
BitLocker performs a number of functions depending on the hardware support of the system on which Windows Server 2008 R2 is running. At the most basic level, BitLocker encrypts entire disk volumes so that the operating system files and user data contained on a disk drive cannot be accessed if the computer and/or drive are lost or stolen. In addition, a key is written to a USB flash drive during the BitLocker configuration process. This flash drive must be inserted into a USB port on the computer at system startup in order to gain access to the system.
When used in conjunction with a computer system that has a Trusted Platform Module (TPM) together with a Trusted Computing Group (TCG) compatible BIOS, BitLocker also provides additional features including verifying the integrity of the boot files prior to system startup. In addition, TPM support also provides the option to specify a PIN that must be entered on system startup in addition to the flash drive containing the key.
This chapter of Windows Server 2008 R2 Essentials provides a detailed overview of the steps necessary to configure BitLocker Drive Encryption.
BitLocker Prerequisites
Unfortunately BitLocker Drive Encryption is not supported on all systems. In fact, the following are mandatory prerequisites for using BitLocker:
- A minimum of 1.5GB of available disk space (either unallocated or available for reallocation from an existing partition).
- A BIOS which supports clearing of system RAM on reboot.
While not required to use BitLocker, in order to take advantage of the full range of BitLocker protection features the following optional requirements are also necessary:
- Trusted Platform Module (TPM) Chip
- Trusted Computing Group BIOS
Enabling BitLocker Drive Encryption
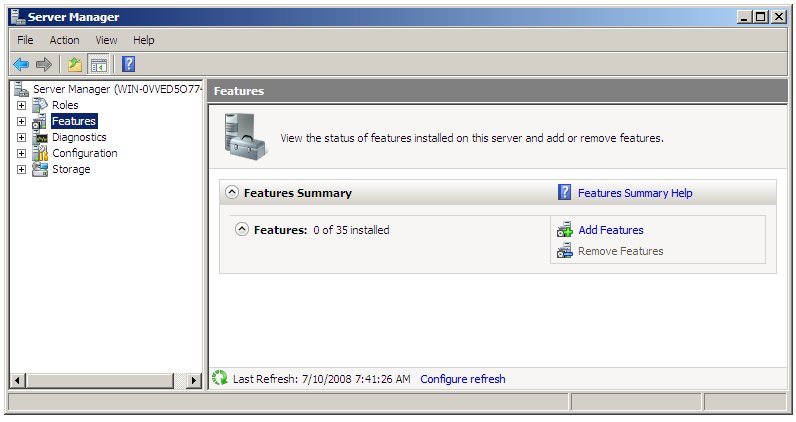
The first step in configuring BitLocker Drive Encryption involves enabling this particular feature within Windows Server 2008 R2. This is achieved using the Server Manager. To access the Server Manager either open the Start menu and select server manager or click on the Server Manager icon in the task bar. In the tree hierarchy located in the left hand panel of the Server Manager select the Features option. Once selected, the Server Manager will display the status of current feature configurations and provide options to add and remove features. The following figure illustrates the Server Manager in Features mode with no features currently installed:
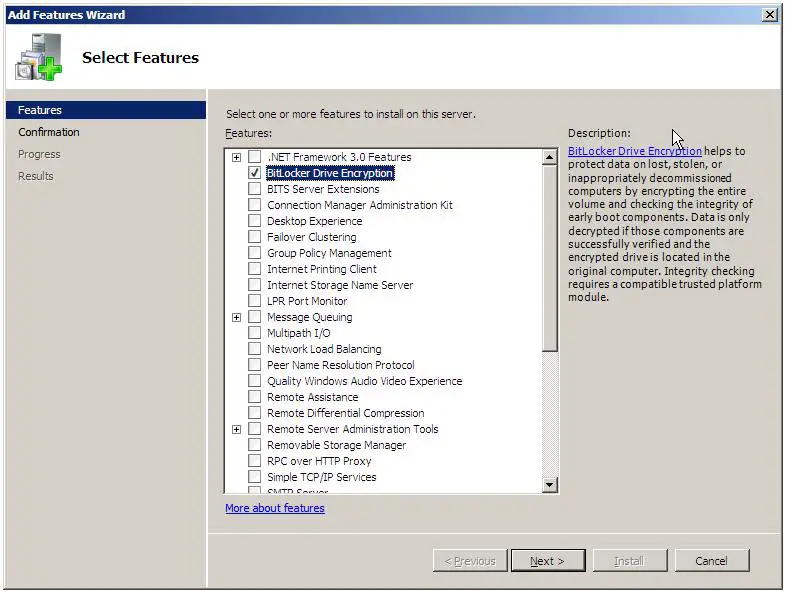
To add the BitLocker feature, begin by clicking on the Add Features option to invoke the New Features Wizard as shown below.
Select the BitLocker Drive Encryption option and click on the Next button. On the resulting Confirmation screen verify that you wish to enable BitLocker support by clicking on the Install button. The wizard will subsequently work through the installation process. The amount of time required to complete this task will vary depending on system speed. Overall progress can be tracked via the progress bar displayed on the Process screen.
Upon Completion of the installation process it will be necessary to reboot the system to implement the change. The restart can be triggered by clicking the You must restart this server to finish the installation process link shown on the wizard's Results page. Alternatively, close the wizard and select the restart option from the Start menu when it is convenient to do so. After the restart has completed the Add Features Wizard will restart and complete the final phases of the feature installation process. Once the final phase of the installation process has completed, click on the Close button to exit from the wizard.
Creating Partitions for BitLocker Drive Encryption
BitLocker Drive Encryption requires that there be two partitions on the hard disk drive. The first partition is referred to as the system volume and contains the unencrypted boot information. The second partition is referred to as the operating system volume. This is the volume which will be encrypted and contains the operating system and user data.
The system volume must be at least 1.5GB in size and must be created before proceeding with the BitLocker Drive Encryption process. This volume can be created either by using unallocated space on a drive, taking space from an existing volume, or the boot files can be merged into an another existing volume (other than the operating system volume). In order to ease the process of creating the system volume Microsoft provides a tool called the BitLocker Driver Preparation Tool. Previously, this tool had to be downloaded and installed from the Microsoft web site but is now pre-bundled with Windows Server 2008 R2. The executable is called BdeHdCfg.exe and is located in %SystemDrive\Windows\System32.
The BitLocker Drive Preparation Tool is a command-line utility and, as such, must be run from a command prompt window. To obtain a list of the command-line options available run the tool with the -? command-line option:
bdehdcfg -?
To obtain information about the existing disk drive configuration, run the BdeHdCfg.exe command with the -driveinfo command-line option. When running the tool on Windows Server 2008 R2 there is a good chance that the operating system installation process will have partitioned the disk drive for BitLocker compatibility. If this is the case, status information similar to the following will be reported by the preparation tool:
C:\Users\Administrator>BdeHdCfg -driveinfo
BitLocker Drive Preparation Tool version 6.1.7600
Copyright (C) 2006-2008 Microsoft Corporation.

Initializing, please wait...

This computer's hard drive is properly configured for BitLocker. It is not
necessary to run BitLocker Setup.
Running the same command on a system for which the drive is not configured for BitLocker is likely to result in output similar to the following:
C:\Users\Administrator>BdeHdCfg -driveinfo
BitLocker Drive Preparation Tool version 6.1.7600
Copyright (C) 2006-2008 Microsoft Corporation.
Initializing, please wait...
VALID TARGETS  SIZE (MB)  COMMANDS      MAX SHRINK  TARGET DETAILS
-------------  ---------  ------------  ----------  -----------------
   C:              16381  shrink              8140  Vista OS
This output tells us that the only option for this disk drive is to shrink the C: volume and the maximum amount by which it may be shrunk.
1.5GB of any unallocated space on the disk drive can be assigned to the system volume with a drive letter 'S:' using the following command:
bdehdcfg -target unallocated -newdriveletter s: -size 1500
Alternatively, free space from an existing volume can assigned to the system volume. This is referred to as performing a split. In practice the volume is shrunk and a new volume created with the freed space. In order to perform a split successfully the volume from which the space is to be removed must have 10% of free space still available after the 1.5GB split has been performed. The following command splits 1.5GB from the C: volume and assigns it to a new system volume with drive letter 'S:'.
bdehdcfg -target c: shrink -newdriveletter s: -size 1500
BitLocker Drive Preparation Tool version 6.1.7600
Copyright (C) 2006-2008 Microsoft Corporation.

Initializing, please wait...

New active drive S: will be created from 1500 MB of free space on drive C:
Do you want to continue? (Y/N):
Shrinking drive C: - Done.
Creating new active drive S: - Done.
Preparing drive for BitLocker - Done.
You must restart your computer to apply these changes.
Before restarting, save any open files and close all programs.
Finally, if a partition other than the operating system volume exists the boot files can be merged onto this partition. Once the merge is complete the partition must be assigned as the active partition. This process can be achieved using the merge option. For example, the following command merges the boot files onto the D: volume:
bdehdcfg -target d: merge
Once the system volume has been created the system must be restarted before proceeding.
Enabling BitLocker Drive Encryption
Once the system volume has been created and the system restarted the next step is to enable BitLocker support. The preparedness of the system and the option to enable BitLocker support are controlled from the BitLocker control panel which is accessed from the system Control Panel (Start->Control Panel).
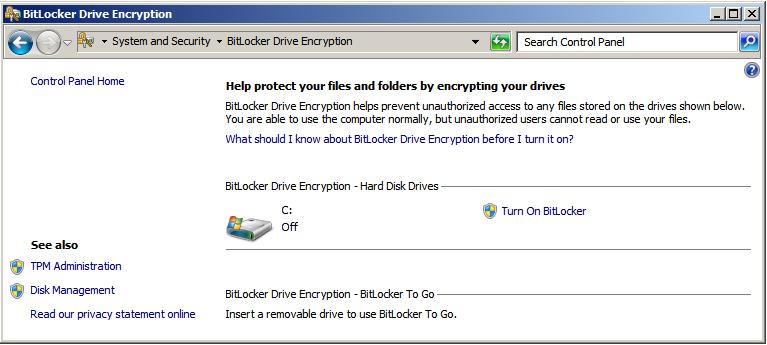
If the Control Panel is in Classic View mode simply double click on the BitLocker Drive Encryption icon. Alternatively, if the Control Panel is in Control Panel Home mode, select System and Security followed by BitLocker Drive Encryption. Once selected, a screen similar to the following should appear:
To enable BitLocker, click on the Turn On BitLocker option. If the system on which Windows Server 2008 R2 is running has TPM support the drives suitable for BitLocker encryption will be listed together with the option to activate the encryption. If, on the other hand, the hardware does not have TPM support a warning message is displayed stating:
A compatible Trusted Platform Module (TPM) Security Device must be present on this computer, but a TPm was not found.
Please contact your system administrator to enable BitLocker.
If the system has a TPM check in the system BIOS to verify that it is enabled. Also ensure that TPM is enabled in the Trusted Platform Module Management Console. If the system does not have a TPM it is possible to use BitLocker, but it will be necessary to change group policy to enable BitLocker support in the absence of a TPM.
Changing Group Policy for BitLocker
The group policy settings for BitLocker can be set either in Local Group Policy or Active Directory Group Policy. The policy settings allow BitLocker to be used without a TPM. In addition, settings are available to change BitLocker configuration for systems that do have a TPM.
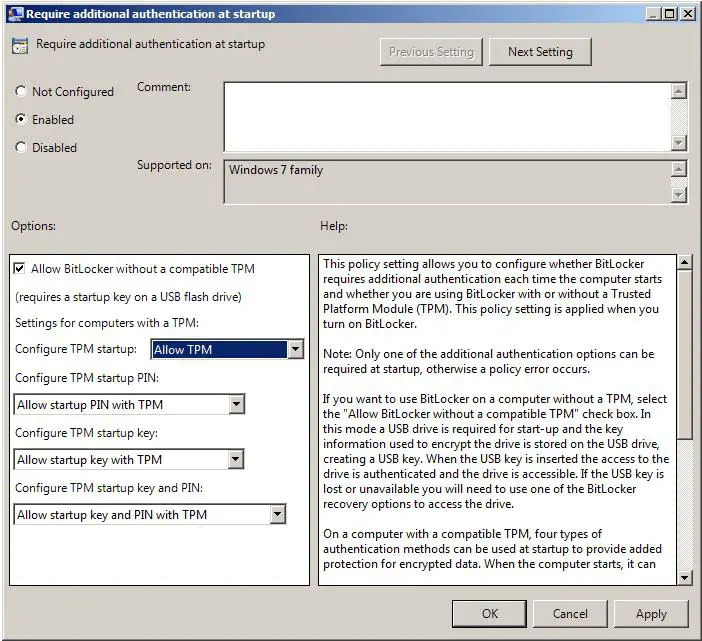
To access the BitLocker policy settings for the Local Computer Policy, open the Local Group Policy Editor by opening the Start menu and typing gpedit.msc in the Search text box and press enter. When the Local Group Policy Editor has started, select Local Computer Policy -> Computer Configuration -> Administrative Templates -> Windows Components -> BitLocker Drive Encryption -> Operating System Drives. When the BitLocker settings are displayed, double click on Require additional authentication at startup to launch the appropriate properties dialog. Within this dialog, select the Enabled option and then set the Allow BitLocker without compatible TPM check box:
For systems with a BitLocker-compatible TPM a number of other options are available which control whether users are required to create TPM startup keys or use startup PIN. Note that startup keys and PINs are mutually exclusive. If the system requires a startup key then PINs must be disallowed and vice versa. Having made the appropriate changes, click on Apply followed by OK to commit the changes.
Performing the Encryption and Generating Keys
With all the appropriate features and settings configured it is now time to perform the encryption. Open the BitLocker control panel as outlined above and click on the Turn on BitLocker link beneath the drive to be encrypted. The resulting dialog will warn you that BitLocker Encryption decreases performance and provide the option to cancel the operation. To proceed, select Yes.
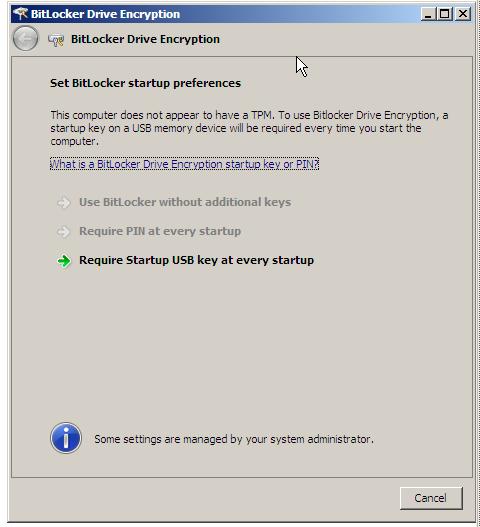
The next screen to appear is the Set BitLocker startup preferences screen. The options provided on this screen will be governed by whether the host system has a TPM or not. The following figure shows the screen on a system without a TPM, and as such only provides the option to use BitLocker with a USB flash drive containing a startup key:
Select the desired option to move to the next step. If using a USB startup key insert a removable USB memory device into a USB port when prompted to do so and click Save to save the Startup key to the device.
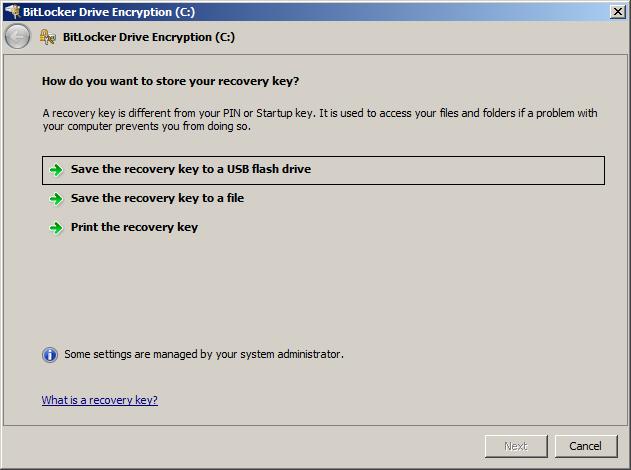
Next, the setup process will request that you save a recovery key. This will be required to unlock the system if BitLocker detects a problem with the integrity of the system (typically if the data on the disk has been tampered with while the system was shutdown):
Do not save the recovery key on the same USB device as the startup key, but instead insert a different device. It is recommended that multiple copies of the key be kept so it is also advised that the key be printed out and kept safely on file. Once the recovery password has been saved click Next to proceed. On the final screen, make sure the Run BitLocker system check toggle is set and click Continue to begin the encryption process. The system will restart and begin the encryption process, indicated by a dialog with a progress bar.
Once the encryption process is complete the startup key or PIN (depending on the configuration settings) will be required next time the system is started.
Regenerating BitLocker Startup Keys and Recovery Passwords
To regenerate previously generated startup keys and recovery passwords, enter the BitLocker Drive Encryption control panel (Start -> Control Panel -> Security -> BitLocker Drive Encryption) and click on Manage BitLocker Keys. The resulting screen will provide options to Duplicate the recovery password and Duplicate the startup key. The recovery key may be written to a USB drive or to a folder. The startup key must be saved to a USB memory device.
Disabling BitLocker Drive Encryption
BitLocker Drive Encryption may be disabled on either a temporary or permanent basis. To temporarily turn off encryption open the BitLocker control panel (Start -> Control Panel -> Security -> BitLocker Drive Encryption) and select Turn off BitLocker Drive Encryption under the desired volume and select Disable BitLocker Drive Encryption in the resulting screen.
To turn off BitLocker and decrypt a system volume repeat the above steps, selecting Decrypt the volume when asked to specify the level of decryption.
