Managing Windows Server 2008 Print Services
The previous chapter of Windows Server 2008 Essentials covered the configuration of the print services role on Windows Server 2008 and subsequent installation of shared printers on the server. This chapter is all about the day to day management of print services.
Managing Remote Print Servers
In the previous chapter it was stated that the Print Management tool provides a central location from which the print services for an entire network may be managed. So far we have only looked and managing the print server running on the local computer. In this section we will look at adding remote servers to the local Print Management configuration. For the purposes of this example a theoretical configuration consisting of two Windows Server 2008 systems named winserver-1 and winserver-2 is assumed. Both systems have the print services role installed and Print Management on winserver-1 will be configured to also manage print services on winserver-2. This is achieved by first launching Print Management on the local winserver-1 system (Start -> Administration Tools -> Print Management) and right clicking on the Print Servers node of the tree hierarchy in the left hand pane and select the Add/Remove Servers option.
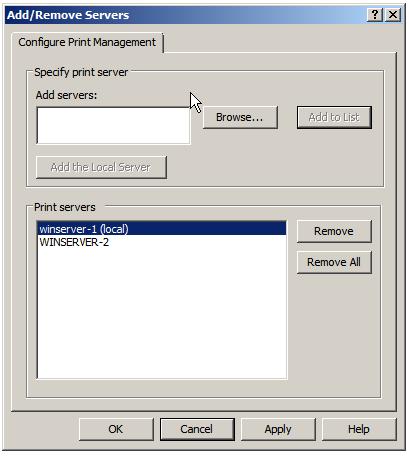
From the resulting menu, select the Add/Remove Servers option. The resulting dialog box displays the currently configured print servers under the management of local Print Management. If no remote print servers have been added previously the only server listed will be the local system. To add additional print servers eitehr enter a comma separated list of server names, or use the Browse button to locate servers on the network. When one or more servers have been selected, click on the Add to list button to add the servers to the list. The following figure illustrates the Add/Remove Servers dialog box configured with both the local and remote servers:
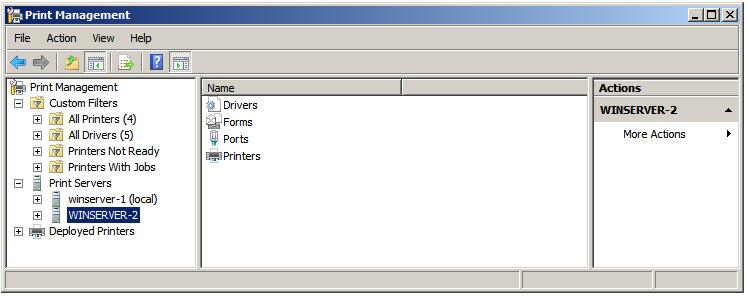
Once all the required remote print servers have been added to the list, click on Apply then close the dialog to return to the main Print Management window. The new print servers will now appear alongside the local server under Print Servers in the left hand pane of the Print Management screen as illustrated below:
Migrating Printers and Queues Between Servers
Windows Server 2008 also provides the ability to migrate both printers and print queues from one print server to another. This makes it easy to, for example, take a print server off-line for maintenance or to permanently re-assign a printer from one print server to another. The steps outlined below assume that print Management has been configured to manage both the source and target print servers as outlined in the preceding section of this chapter. If this is not the case, the printer export file will need to be copied onto the destination server or made available via file sharing and imported using Print Management on that server.
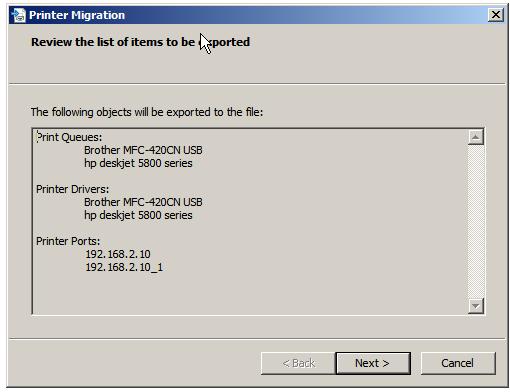
This form of migration is performed using the Printer Migration Wizard which, along with most other tasks, is accessed from the Print Management interface. Once Print Management is up and running, right click on the server in the left pane from which the printer is to be migrated (the source server) and select Export Printers To a File from the menu. Print Management will subsequently display a dialog listing the printer drivers, port and queues currently configured on the selected print server as illustrated below:
After reviewing the listed information click Next and select a suitable location to save the printer export file and click Next once again to perform the export process. Depending on the number of printers being exported and the size of the drivers the export process may take a few minutes to complete. If the export was successful a message will appear beneath the progress bar stating this fact. If the export was unsuccessful, click on the Open Event Viewer button provided to learn more about the cause of the problem so that remedial action may be taken. Assuming a successful export click Finish to dismiss the Printer Migration dialog.
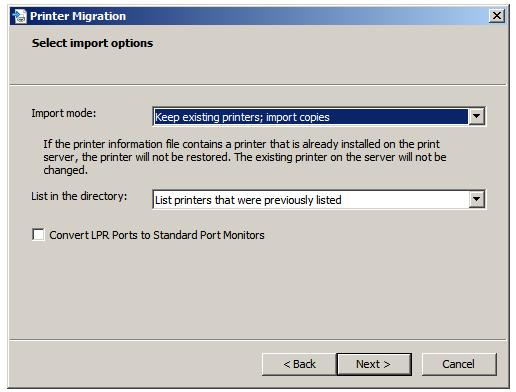
The next step is to import the printers into the target server. Begin by right clicking on the destination server in the Print Management window and selecting Import printers from a file.... In the resulting dialog, use the browse button to navigate to the export file, select it and click on Next to proceed. Once the file has been rad a screen will appear identical to the one displayed prior to exporting the printer objects in the preceding step. Review this information and click Next to display the Select import options screen as illustrated in the following figure:
These options require a little explanation:
- Keep existing printers; import copies - It is possible that a printer being imported is already also installed on the destination server. With this option selected, the original printer on the destination server will be left unchanged and the new printer imported as a copy.
- Overwrite existing printers - If the printer being imported is already installed on the target server it is overwritten by the imported copy when this option is selected.
- List printers that were previously listed - When selected, only printers that were already listed in Active Directory will still be listed after the import process is completed.
- List all printers - All printers are listed in Active Directory
- Don't list any printers - No printers are listed in Active Directory
Once the required settings are configured, click Next to initiate the printer import process. The printer configurations, drivers and queues will be subsequently be imported onto the target print server. If errors are reported click on the Open Event Viewer button to obtain additional information. In particular, be mindful of printers that were physically connected to the source print server. Since they are not physically connected to the target server an error will likely occur during the migration. Even if the printer was physically moved to the target system prior to migration it is also possible that it is connected to a different physical port to that used on the source server. Such probelsm can be resolved by right clicking on the imported printer in Print Management, selecting Properties and making the necessary configuration changes.
Configuring Printer Permissions
Access to printers is controlled through the configuration of printer permissions. By default, a printer is accessible to all users on the local system, and if shared, all users elsewhere on the network. Printer permissions are divided into two categories, special permissions and standard permissions. before describing how to change the permissions on a printer it is first important to understand the meaning of each permission option.
The standard printer permissions are outlined in the following table:
| Permission | Description |
|---|---|
| Allows users and groups to send documents to the printer and to manage their own print jobs. Also includes the Read special permission allowing viewing, but not alteration, of printer permissions | |
| Manage Printers | Allows full management of the printer, including changing shared status, changing of permissions and properties, taking ownership of printers and print jobs and starting and stopping print jobs. Includes the Read, Change and Take Ownership special permissions. |
| Manage Documents | Allows user and groups to manage print jobs but does not provide the ability to print. Permissions consist of pausing, restarting, resuming and reordering and canceling print jobs. Includes the Read, Change and Take Ownership special permissions |


