Configuring and Managing RAID 5 on Windows Server 2008
This chapter of Windows Server 2008 Essentials will focus on the creation and management of RAID 5 configurations on Windows Server 2008.
An Overview of RAID 5
RAID 5 consists of three or more volumes each located on a separate physical drive. As with RAID 0, RAID 5 also uses disk striping, whereby blocks of data are divided up into stripes with each stripe written to a different disk. RAID 5, however, differs quite considerably from RAID 0. Under RAID 5, not only are the data stripes written, but also parity information relating to the data. The key to RAID 5 fault tolerance is the fact that the parity information for a particular data stripe is always written to a different drive from the drive containing the corresponding data stripe. This means that if a disk fails, the corresponding parity information stored on another disk can be used for error detection and data correction (also referred to as regeneration).
Whilst RAID 5 has considerable advantages over RAID 0 there are one or two drawbacks that should be taken into consideration when considering this storage option. Firstly, there is the inevitable performance overhead inherent in calculating and storing parity information for each data stripe written to disk. Secondly, the loss of more than own disk in a RAID array will be insufficient parity data on the remaining disks to regenerate the original data. That said, RAID 5 does provide considerable advantages that generally outweigh the disadvantages.
Configuring RAID 5 Using Windows Server 2008 Disk Management
A Windows Server 2008 RAID 5 configuration may be set up using the Disk Management snap-in. This is accessed either from the Server Manager or Computer Management tools. To launch the Server Manager, open the Start menu and click on the Server Manager option, or click on the Server Manager icon in the task bar. Alternatively launch Computer Management from Start -> All Programs -> Administration Tools -> Computer Management or run compmgmt.csc at the command prompt or in a Run dialog.
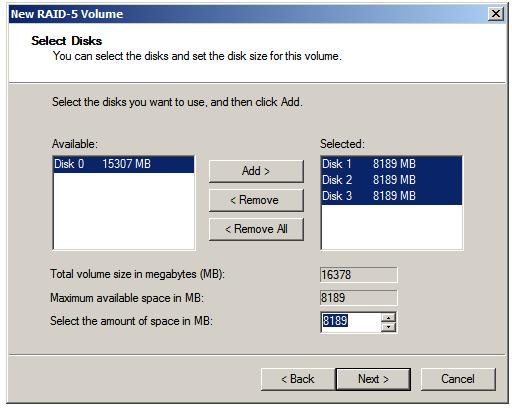
As previously noted, RAID 5 implementation requires a minimum of 3 disk drives. For the purposes of this tutorial a system containing four disk drives is assumed. In this scenario, disk 0 is the system disk and disks 1 though 3 are available for use in the RAID 5 configuration. Before proceeding the disks will need to be initialized using either the MBR or GPT partition style. Assuming these prerequisites are met the first step is to right click on one of the 3 disks in the Disk Management graphical view. In the resulting popup menu select the New RAID-5 Volume... option to invoke the New RAID-5 Volume wizard. On the wizard's welcome page click on the Next button to proceed to the Disk Selection screen. This screen contains a list of disk drives available for inclusion in the disk array together with a list of selected disks. Currently only the current disk is included in the Selected list. Two more disks must be added to the selected disks before the RAID 5 array can be built. Select disks from the Available list and click on the Add> button to add the disk to the selected list. Once sufficient disks (in this case disks 1, 2 and 3) are selected the Next button will activate to allow the remainder of the configuration to be completed. Note that disk 0 (the system disk) is not included in the RAID 5 array:
With the disk selections completed, the Next button proceeds to the drive letter and mount point assignment screen. Once these settings are configured click Next to proceed to the Format Volume screen. Select the appropriate file system and compression options and click on Next to proceed to the Summary screen. Review the information displayed and click on Finish to initiate the RAID 5 creation process. During this process the Disk Management graphical view will list the disks as Formatting and then Resynching. The amount of time these phases will take depends on the size of the volumes in question. Once the process is complete the status will change to Healthy and the RAID 5 volume is ready for use.
Configuring RAID 5 from the Command Prompt using DiskPart
In addition to configuring RAID 5 from within Disk Management, the configuration may also be implemented from the command prompt using DiskPart. DiskPart may be launched either from a command prompt or a Run dialog simply by typing diskpart. Once invoked, DiskPart will display the DiskPart command prompt and is ready to receive commands.
The first step in the configuration process is to identify the disks attached to the system using the list disk command:
For the purposes of this chapter disks 1, 2 and 3 will be used to create a RAID 5 configuration. Each of these disks need to be converted to dynamic disks before the configuration can proceed. This is achieved by selecting each disk in turn and executing the convert dynamic command:


