A Cloud Functions and Firebase Cloud Storage Example
| Previous | Table of Contents | |
| A Firebase Cloud Functions Tutorial |
The chapter entitled Firebase Cloud Functions introduced the basic concepts of working with Cloud Functions and Firebase Cloud Storage, including uploading and downloading files from within a cloud function. This chapter will work through the implementation of a cloud function intended to be triggered whenever an image file is uploaded to a storage bucket. The function will download the image file, convert it to monochrome then upload the converted file.
The CloudStorage App
The cloud function created in this chapter is intended to be used in conjunction with an example Android Studio project named CloudStorage_Functions which is included in the sample code download available from the following web page:
http://www.ebookfrenzy.com/web/firebase_android
Load the project into Android Studio and connect the project to Firebase by selecting the Tools -> Firebase menu option, selecting the Authentication option and clicking on the Email and Password authentication link. In the resulting panel, click on the Connect to Firebase button and follow the usual steps to connect to the Firebase Examples project.
Run the app on a suitable device or emulator and, when the app is running, either create a new email-based user account or sign in using an existing account.
The app has bundled with it an image file which is displayed within the ImageView object as shown in Figure 55‑1:
Figure 55‑1
When the upload button is clicked, the image file is uploaded to Firebase Cloud Storage. The objective of this tutorial is to implement a cloud function to be triggered when the file is uploaded. This cloud function will download the file, convert it to monochrome then upload the converted file. Selecting the Download button within the app will download the converted image and display it to the user.
Leave the app running in preparation for testing the cloud function later in the chapter.
Setting Cloud Storage Rules
The app will upload the image file as a file named mountain.jpg in the /photos/<userid> path. To ensure that the app has permission to write to this location the Cloud Storage rules need to be modified. Open the Firebase console in a browser window and select the Storage option. Within the Storage screen, click on the Rules tab and change the rules to the following:
service firebase.storage {
  match /b/{bucket}/o {
    match /photos/{userId}/mountain.jpg {
        allow read;
        allow write: if request.auth.uid == userId;
    }
    match /photos/{userId}/mono_mountain.jpg {
        allow read;
        allow write: if request.auth.uid == userId;
    }
  }
}
When the changes have been made, commit them by clicking on the Publish button.
Installing Dependencies
The cloud function will make use of the child-process-promise and Google Cloud Storage Node.js packages, both of which need to be installed before writing the code for the function:
npm install --save child-process-promise
npm install --save @google-cloud/storage
Writing the Cloud Function
The cloud function will be added to the same index.js file as used in the previous chapters. Open a terminal or command-prompt window and change directory to the MyCloudFunctions/functions project folder. If you have not yet created the project used in earlier chapters, refer to the steps in the chapter entitled Installing the Firebase CLI.
Edit the index.js file and modify it to declare the two package dependencies:
const functions = require('firebase-functions');
const admin = require('firebase-admin');
const gcs = require('@google-cloud/storage')();
const spawn = require('child-process-promise').spawn;

admin.initializeApp(functions.config().firebase);
Remaining within the index.js file, add the imageConverter cloud function as follows:
exports.imageConverter = functions.storage.object().onChange(event => {

    const object = event.data;
    const fileBucket = object.bucket;
    const filePath = object.name;
    const bucket = gcs.bucket(fileBucket);
    const contentType = object.contentType;
    const resourceState = object.resourceState;
    const tempFilePath = `/tmp/mountain.jpg`;

    const fileName = filePath.split('/').pop();

    if (fileName.startsWith('mono_')) {
        return;
    }

    if (!contentType.startsWith('image/')) {
        console.log('Not an image file.');
      return;
    }

    if (resourceState === 'not_exists') {
      console.log('File is being deleted.');
      return;
    }

    return bucket.file(filePath).download({
      destination: tempFilePath
    }).then(() => {
      console.log('Image downloaded locally to', tempFilePath);
      return spawn('convert', [tempFilePath, '-monochrome',
		tempFilePath]).then(() => {
         console.log('Thumbnail created at', tempFilePath);
         const monoFilePath =
		filePath.replace(/(\/)?([^\/]*)$/, '$1mono_$2');
         console.log('Uploading file ' + monoFilePath);
         return bucket.upload(tempFilePath, {
              destination: monoFilePath
            });
          });
    });
});
The function begins by extracting some properties from the event data and assigning them to constants. A constant is also declared containing the path to the temporary file that will be used during the image conversion:
const object = event.data;
const fileBucket = object.bucket;
const filePath = object.name;
const bucket = gcs.bucket(fileBucket);
const contentType = object.contentType;
const resourceState = object.resourceState;
const tempFilePath = `/tmp/mountain.jpg`;
Next, the filename component is extracted from the path and a test performed to identify if the filename begins with mono_. When the file is converted and uploaded the filename is prefixed with mono_ to differentiate it from the original file. If the filename has this prefix, it means that this event has been triggered by the function itself uploading the converted file. To avoid the function being called recursively, it simply returns to avoid another conversion upload taking place:
const fileName = filePath.split('/').pop();

if (fileName.startsWith('mono_')) {
    return;
}
The code then checks the file’s content type to verify that it is an image file and returns if it is not. A check is also made to make sure that this is not a file deletion event:
if (!contentType.startsWith('image/')) {
    console.log('Not an image file.');
    return;
}

if (resourceState === 'not_exists') {
    console.log('File is being deleted.');
    return;
}
Having verified that it makes sense to proceed with the conversion, the file is downloaded:
return bucket.file(filePath).download({
      destination: tempFilePath
    }).then(() => {
Since this download function returns a Promise, a then() call is made on the Promise object to provide the image conversion code to be executed when the download completes:
console.log('Image downloaded locally to', tempFilePath);
      return spawn('convert', [tempFilePath, '-monochrome',
		tempFilePath]).then(() => {
Since the spawn function also returns a Promise, another then() call is made containing the code to prefix the filename with mono_ and to upload the file to Cloud Storage after the conversion completes:
const monoFilePath =
	filePath.replace(/(\/)?([^\/]*)$/, '$1mono_$2');
         console.log('Uploading file ' + monoFilePath);
         return bucket.upload(tempFilePath, {
              destination: monoFilePath
         });
After making the changes, save the index.js file and deploy it using the following command:
firebase --only functions:imageConverter
Testing the Cloud Function
Return to the device or emulator on which the Android app is running and tap the Upload button to upload the file to cloud storage. After the upload completes, navigate to the Storage section of the Firebase console, select the Files tab and navigate to the photos/<userId> folder where both the original and monochrome versions of the file should be listed as shown in Figure 55‑2:
Figure 55‑2
If the monochrome file is not listed, check the cloud function logs either in the Functions screen of the Firebase console or by running the following Firebase CLI command:
firebase functions:log
If syntax errors are reported, edit the index.js file and check for mistakes made when entering the code. Another possibility is that the following error is reported:
E imageConverter: Function killed. Error: memory limit exceeded
To resolve the memory limit problem, the settings for the function will need to be changed within the Google Cloud Platform console.
Increasing Cloud Function Memory
To increase the memory limit for a cloud function, open a browser window and navigate to the Google Cloud Platform Console at the following URL:
https://console.cloud.google.com
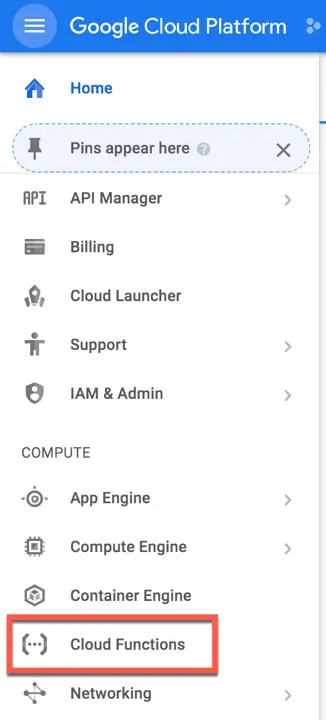
Sign in using the same Google account associated with your Firebase projects and select the Cloud Functions option from the left-hand navigation panel:
Figure 55‑3
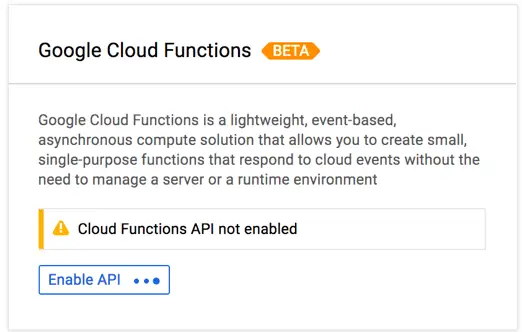
If the dialog shown in Figure 55‑4 appears, click on the Enable API button:
Figure 55‑4
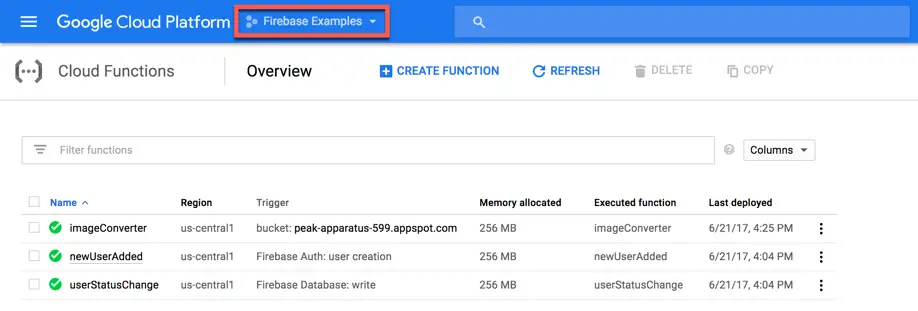
On the Cloud Functions screen, select the Firebase Examples project from the drop down menu at the top of the page (highlighted in Figure 55‑5) at which point all of the cloud functions for that project will be listed:
Figure 55‑5
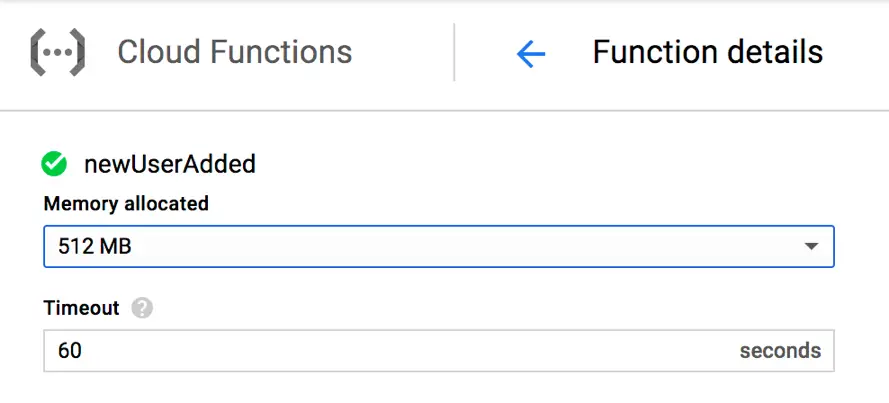
Display details for the imageConverter function by clicking on the function name in the list. In the details screen, note that Memory allocation is currently set to 256 MB. To increase this, click on the Edit button in the toolbar at the top of the page and increase the memory allocation to 512 MB:
Figure 55‑6
Save the new memory allocation setting and then upload the file once again from within the Android app. If the monochrome image file now appears in the cloud storage section of the Firebase console, click the Download button within the app at which point the monochrome version of the image should download and appear in the ImageView.
Summary
This chapter has demonstrated the use of Firebase Cloud Functions to detect when Cloud Storage events occur. The example also covered the downloading, modification and uploading of cloud storage files from within a cloud function, including spawning a process to call the ImageMagick convert tool to transform the image.
The chapter also covered the steps to increase the memory allocated to the virtual machine in which a cloud function runs. If a memory shortage is preventing a function from executing, a message to this effect will be included in the log output for the function.
| Previous | Table of Contents | |
| A Firebase Cloud Functions Tutorial |


