An Example Interactive WatchKit App using Actions and Outlets
| Previous | Table of Contents | Next |
| An Overview of the WatchKit App Architecture | An Overview of WatchKit Tables |
| Purchase the fully updated watchOS 2/Swift 2 edition of this book in eBook ($12.99) or Print ($27.99) format watchOS 2 App Development Essentials Print and eBook (ePub/PDF/Kindle) editions contain 35 chapters. |
Having covered actions and outlets in the previous chapter, it is now time to make practical use of these concepts. With this goal in mind, this chapter will work through the creation of a WatchKit app intended to demonstrate the way in which the Interface Builder and Assistant Editor features of Xcode work together to simplify the creation of actions and outlets to implement interactive behavior within a WatchKit app.
About the Example App
The purpose of the Watchkit app created in this chapter is to calculate a recommended gratuity amount when dining at a restaurant. A mechanism will be provided for the user to select the amount of the bill and then tap a button to display the recommended tip amount (assuming a percentage of 20%).
Creating the TipCalcApp Project
Start Xcode and, on the Welcome screen, select the Create a new Xcode project option. On the template screen choose the Application option located under iOS in the left hand panel followed by Single View Application in the main panel. Click Next, set the product name to TipCalcApp, enter your company identifier and make sure that the Devices menu is set to Universal. Before clicking Next, change the Language menu to Swift if necessary. On the final screen, choose a location in which to store the project files and click on the Create button to proceed to the main Xcode project window.
Adding the WatchKit App Target
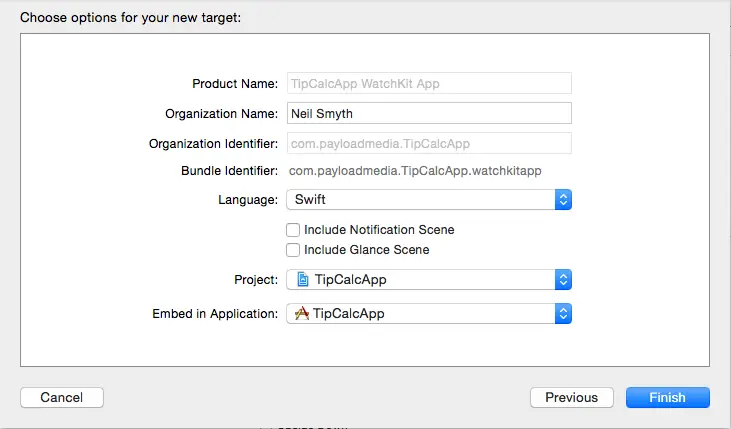
For the purposes of this example we will assume that the iOS app has already been implemented. The next step, therefore, is to add the WatchKit app target to the project. Within Xcode, select the File -> New -> Target… menu option. In the target template dialog, select the Apple Watch option listed beneath the iOS heading. In the main panel, select the WatchKit App icon and click on Next. On the subsequent screen (Figure 5-1) turn off the Include Glance Scene and Include Notification Scene options before clicking on the Finish button:
Figure 5-1
As soon as the extension target has been created, a new panel will appear requesting permission to activate the new scheme for the extension target. Activate this scheme now by clicking on the Activate button in the request panel.
Designing the WatchKit App User Interface
Within the Xcode Project Navigator panel unfold the TipCalcApp WatchKit App folder entry and select the Interface.storyboard file to load it into the Interface Builder tool.
The user interface for the app is going to consist of two Label objects, a Slider and a Button. Begin the design by locating the Label object in the Object Library panel and dragging and dropping it onto the scene so that it appears at the top of the scene layout. Select the newly added label and display the Attributes Inspector in the utilities panel (View -> Utilities -> Show Attributes Inspector). Within the inspector panel, change the text so that it reads $0.00 and change the Alignment setting so that the text is positioned in the center of the label.
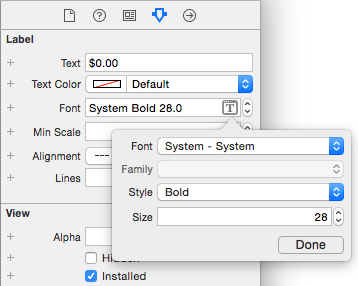
Remaining within the Attributes Inspector panel, click on the ‘T’ icon located in the far right of the Font attribute text field to display the font setting panel. Within this panel, change the Font setting to System, the Style to Bold and the Size value to 28 as shown in Figure 5-2. Once the font settings are complete, click on the Done button to commit the changes.
Figure 5-2
With the Label object still selected within the scene, locate the Position section within the Attribute Inspector panel and change the Horizontal property setting to Center.
Next, drag a Slider object from the library and drop it onto the scene so that it appears beneath the Label object. Select the Slider object in the scene and, within the Attributes Inspector, configure the Minimum and Maximum attributes to 0 and 100 respectively and enable the Continuous checkbox. Since we want the slider to adjust in $1 units the Steps value needs to be changed to 100.
Drag and drop a second Label object so that it is positioned beneath the slider. Select the new label and set the same alignment, font and positioning properties as those used for the first label. This time, however, change the Text Color attribute so that the text is displayed in green.
Finally, position a Button object beneath the second label. Double click on the button and change the text so it reads “Calculate Tip”. With the button still selected, use the Attribute Inspector and change the Vertical property located in the Position section of the panel to Bottom.
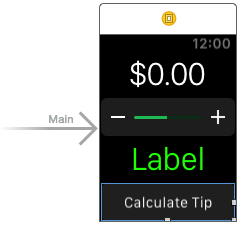
At this point the scene layout should resemble that shown in Figure 5-3:
Figure 5-3
The user interface design is now complete. The next step is to configure outlets on the two Label objects so that the values displayed can be controlled from within the code of the interface controller in the WatchKit extension. Before doing so, however, it is worth taking a look at the interface controller class file.
Reviewing the Interface Controller Class
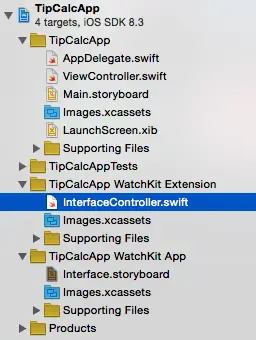
As previously discussed, each scene within the storyboard of a WatchKit app has associated with it an interface controller class located within the WatchKit extension. By default, the Swift source code file for this class will be named InterfaceController.Swift and will be located within the Project Navigator panel under the <AppName> WatchKit Extension folder where <AppName> is replaced by the name of the containing iOS app. Figure 5-4, for example, highlights the interface controller source file for the main scene of the TipCalcApp extension:
Figure 5-4
Locate and select this file so that it loads into the editing panel. Once loaded, the code should read as outlined in the following listing:
import WatchKit
import Foundation

class InterfaceController: WKInterfaceController {

    override func awakeWithContext(context: AnyObject?) {
        super.awakeWithContext(context)

        // Configure interface objects here.
    }

    override func willActivate() {
        // This method is called when watch view controller is about to be visible to user
        super.willActivate()
    }

    override func didDeactivate() {
        // This method is called when watch view controller is no longer visible
        super.didDeactivate()
    }

}
Xcode has created an interface controller class implementation that overrides a subset of the lifecycle methods outlined in the chapter entitled An Overview of WatchKit App Architecture. Later in this chapter some code initialization code will be added to the willActivate() method. At this point, some outlets need to be configured so that changes can be made to the Label objects in the main WatchKit app scene.
Establishing Outlet Connections
Outlets provide the interface controller class with access to the interface objects within the corresponding storyboard scene. Outlets can be created visually within Xcode by using Interface Builder and the Assistant Editor panel.
To establish outlets, begin by loading the Interface.storyboard file into the Interface Builder tool. Within Interface Builder, click on the scene so that it is highlighted before displaying the Assistant Editor by selecting the View -> Assistant Editor -> Show Assistant Editor menu option. Alternatively, it may also be displayed by selecting the center button (the one containing an image of interlocking circles) of the row of Editor toolbar buttons in the top right hand corner of the main Xcode window as illustrated in the following figure:
Figure 5-5
In the event that multiple Assistant Editor panels are required, additional tiles may be added using the View -> Assistant Editor -> Add Assistant Editor menu option.
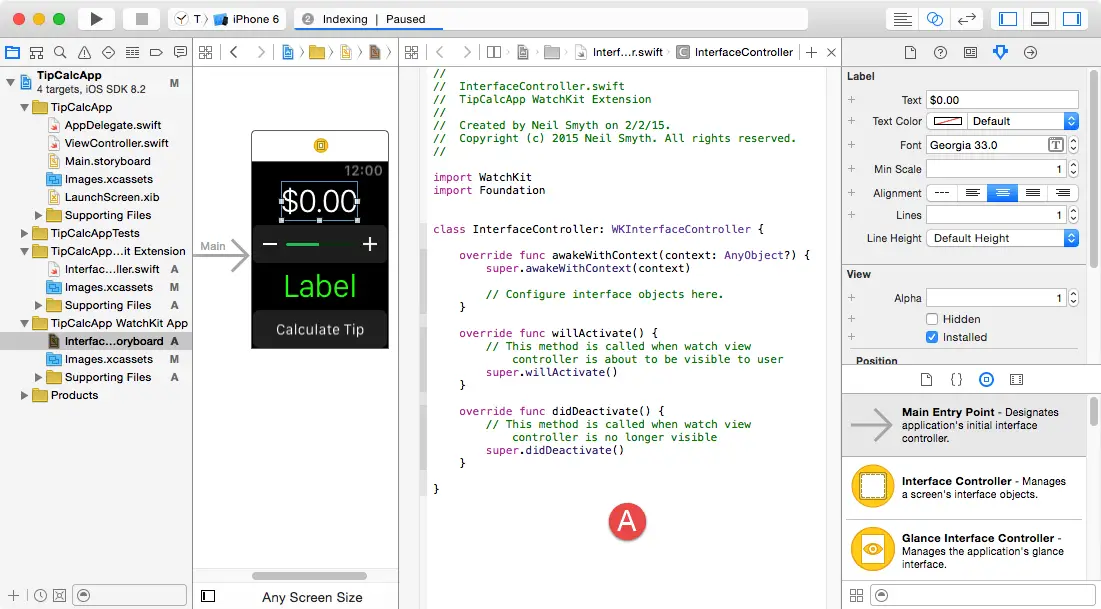
By default, the editor panel will appear to the right of the main editing panel in the Xcode window. For example, in Figure 5-6 the panel to the immediate right of the Interface Builder panel is the Assistant Editor (marked A):
Figure 5-6
By default, the Assistant Editor will be in Automatic mode, whereby it automatically attempts to display the correct source file based on the currently selected item in Interface Builder. If the correct file is not displayed, use the toolbar along the top of the editor panel to select the correct file. The small instance of the Assistant Editor icon in this toolbar can be used to switch to Manual mode allowing the file to be selected from a pull-right menu containing all the source files in the project:
Figure 5-7
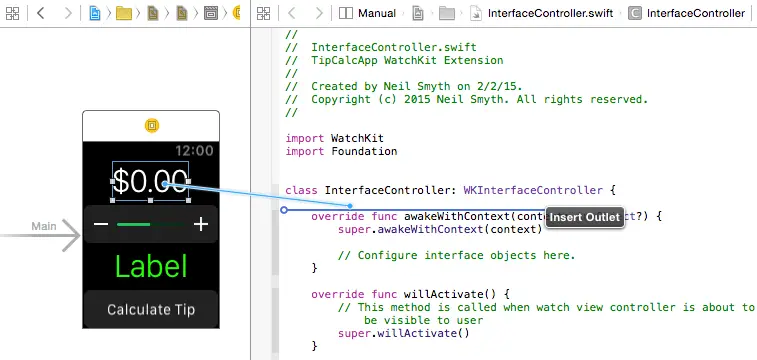
Make sure that the InterfaceController.swift file is displayed in the Assistant Editor and establish an outlet for the top-most label by Ctrl-clicking on the Label object in the scene and dragging the resulting line to the area immediately beneath the class InterfaceController declaration line in the Assistant Editor panel as shown in Figure 5-8:
Figure 5-8
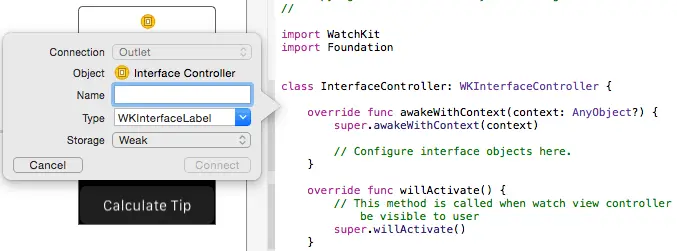
Upon releasing the line, the configuration panel illustrated in Figure 5-9 will appear requesting details about the outlet to be defined.
Figure 5-9
| Purchase the fully updated watchOS 2/Swift 2 edition of this book in eBook ($12.99) or Print ($27.99) format watchOS 2 App Development Essentials Print and eBook (ePub/PDF/Kindle) editions contain 35 chapters. |
Repeat the above steps to establish an outlet for the second Label object named tipLabel.
Once the connections have been established, review the InterfaceController.swift file and note that the outlet properties have been declared for us by the Assistant Editor:
import WatchKit
import Foundation

class InterfaceController: WKInterfaceController {

    @IBOutlet weak var amountLabel: WKInterfaceLabel!
    @IBOutlet weak var tipLabel: WKInterfaceLabel!
.
.
.
}
When we reference these outlet variables within the interface controller code we are essentially accessing the objects in the user interface.
Establishing Action Connections
Now that the outlets have been created, the next step is to connect the Slider and Button objects to action methods within the interface controller class. When the user increments or decrements the slider value the interface controller will need to change the value displayed on the amountLabel object to reflect the new value. This means that an action method will need to be implemented within the interface controller class and connected via an action to the Slider object in the storyboard scene.
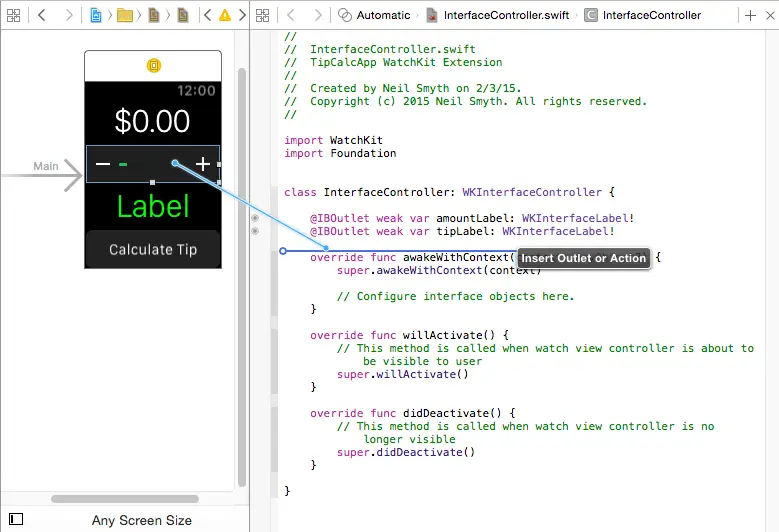
With the scene displayed in the Interface Builder and the InterfaceController.swift file loaded into the Assistant Editor panel, Ctrl-click on the Slider object in the storyboard scene and drag the resulting line to a position immediately beneath the tipLabel outlet as illustrated in Figure 5-10:
Figure 5-10
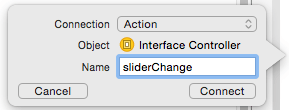
Once the line has been released, the connection configuration dialog will appear (Figure 5 11). Within the dialog, select Action from the Connection menu and enter sliderChange as the name of the action method to be called when the value of the slider is changed by the user:
Figure 5-11
Click on the Connect button to establish the action and note that Xcode has added a stub action method at the designated location within the InterfaceController.swift file:
import WatchKit
import Foundation

class InterfaceController: WKInterfaceController {

    @IBOutlet weak var amountLabel: WKInterfaceLabel!
    @IBOutlet weak var tipLabel: WKInterfaceLabel!

    @IBAction func sliderChange(value: Float) {
    }
.
.
}
An action method will also need to be called when the user taps the Button object in the user interface. Ctrl-click on the Button object in the scene and drag the resulting line to a position beneath the sliderChange method. On releasing the line, the connection dialog will appear once again. Change the connection menu to Action and enter calculateTip as the method name before clicking on the Connect button to create the connection.
Implementing the sliderChange Action Method
The Slider object added to the scene layout is actually an instance of the WatchKit framework WKInterfaceSlider class. When the user adjusts the slider value, that value is passed to the action method assigned to the object, in this instance the sliderChange method created in the previous section.
It is the responsibility of this action method to display the current value on the amount label using the amountLabel outlet variable and to store the current amount locally within the interface controller object so that it can be accessed when the user requests that the tip amount be calculated. Select the InterfaceController.swift file and modify it to add a floating point variable in which to store the current slider value and to implement the code in the sliderChange method:
class InterfaceController: WKInterfaceController {

    @IBOutlet weak var amountLabel: WKInterfaceLabel!
    @IBOutlet weak var tipLabel: WKInterfaceLabel!

    var currentAmount: Float = 0.00

    @IBAction func sliderChange(value: Float) {
        let amountString = String(format: "%0.2f", value)
        amountLabel.setText("$\(amountString)")
        currentAmount = value
    }
.
.
}
The code added to the action method performs a number of tasks. First a new String object is created based on the current floating point value passed to the action method from the Slider object. This is formatted to two decimal places to reflect dollars and cents. The setText method of the amountLabel outlet is then called to set the text displayed on the Label object in the user interface, prefixing the amountString with a dollar sign. Finally, the current value is assigned to the currentAmount variable where it can be accessed later from within the calculateTip action method.
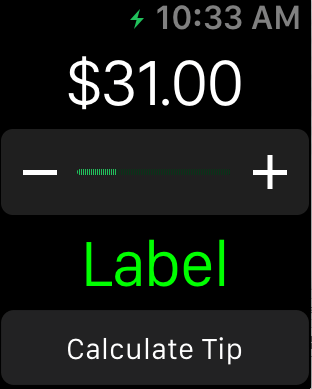
Make sure that the run target in the Xcode toolbar is set to TipCalcApp Watchkit App and click on the run button to launch the app. Once it has loaded into the simulator, click on the – and + slider buttons to change the current value. Note that the amount label is updated each time the value changes:
Figure 5-12
Implementing the calculateTip Action Method
The calculateTip action method will calculate 20% of the current amount and display the result to the user via the tipAmount outlet, once again using string formatting to display the result to two decimal places prefixed with a dollar sign:
@IBAction func calculateTip() {
    let tipAmount = currentAmount * 0.20
    let tipString = String(format: "%0.2f", tipAmount)
    tipLabel.setText("$\(tipString)")
}
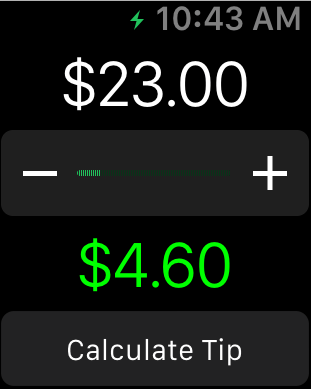
Run the application once again, adjust the slider and click on the Calculate Tip button, verifying that the tip amount is displayed on the tip Label object as shown in Figure 5-13:
Figure 5-13
Hiding the Tip Label
Until the user taps the calculate button, the tip label is largely redundant. The final task for the project, therefore, is to hide the tip label until the app is ready to display the recommended tip amount. The Label object can be hidden by adding some code to the willActivate lifecycle method within the InterfaceController.swift class file as follows:
override func willActivate() {
    // This method is called when watch view controller is about to be visible to user
    super.willActivate()
    tipLabel.setHidden(true)
}
This method uses the tipLabel outlet to call the setHidden method on the Label object so that it is hidden from the user. When an object is hidden it is invisible to the user and the user interface layout behaves as though the object no longer exists. As such, the layout will re-arrange to occupy the vacated space. To hide an object whilst retaining the occupied space, call the setAlpha method passing through a value of 0 to make the object transparent.
Having hidden the label during the initialization phase, a line of code needs to be added to the calculateTip method to reveal the Label object after the tip has been calculated:
@IBAction func calculateTip() {
    let tipAmount = currentAmount * 0.20
    let tipString = String(format: "%0.2f", tipAmount)
    tipLabel.setText("$\(tipString)")
    tipLabel.setHidden(false)
}
Run the app one last time and verify that the tip label remains hidden until the calculate button is pressed.
Summary
The Interface Builder tool and the Assistant Editor panel can be used together to quickly establish outlet and action connections between the user interface objects in a storyboard scene and the underlying interface controller scene in the WatchKit extension. This chapter has worked through the creation of a sample application project designed to demonstrate this technique. This chapter also made use of the willActivate lifecycle method to perform an initialization task and briefly covered the hiding and showing of objects in a WatchKit scene.
| Purchase the fully updated watchOS 2/Swift 2 edition of this book in eBook ($12.99) or Print ($27.99) format watchOS 2 App Development Essentials Print and eBook (ePub/PDF/Kindle) editions contain 35 chapters. |
| Previous | Table of Contents | Next |
| An Overview of the WatchKit App Architecture | An Overview of WatchKit Tables |
