Configuring Fedora Linux Remote Access using SSH
SSH is a TCP/IP service that provides a secure mechanism for remotely logging into one system over either a local network or the internet into another system. SSH also provides the ability to transfer files between remote systems. When a user logs into a remote system using SSH, they receive a command prompt allowing them to enter commands on the remote system as if they were sitting at the remote system and had opened a terminal session.
In this chapter we will cover the steps necessary to configure a Fedora Linux system to accept SSH connections. This involves installing the SSH server on the local systems and configuring the firewall to allow SSH connections.
Installing SSH on an Fedora Linux System
In order for a system to accept SSH connections the system must first be running the SSH server. By default, Fedora Linux installs the SSH server so it is not usually necessary to install it. To check if it is installed and running use the following command:
/sbin/service sshd status
This will generate output similar to the following if the service is installed and running:
sshd (pid 9488 9486 1850) is running...
If the service is not installed it can be installed as follows:
su -
yum install openssh-server
The installation process with download the SSH server, install it and start the service running in the background. You may now attempt to connect from a remote system (see below for details of how to do this). If you receive a "connection refused" message when you try to connect it you may need to configure the firewall to allow SSH connections to be established to this system.
If the service is installed, but not running, it can be started either from the command-line:
/sbin/service sshd start
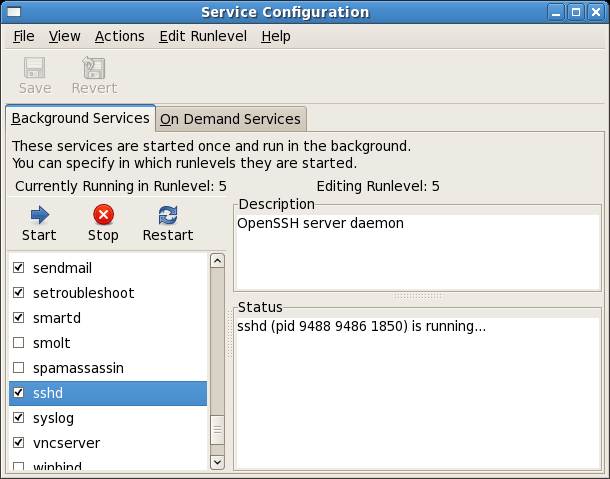
or by using the GUI Service Configuration tool accessed via the System->Administration->Services' menu option. Once the tool has loaded, simply scroll down the listy of services until you reach sshd. Check the box so that is starts on system re-boot and then click the Start button.
Configuring the Fedora Linux Firewall to Allow SSH Connections
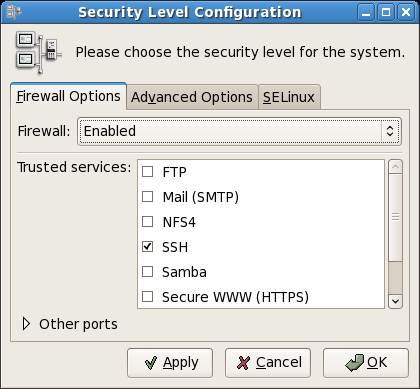
If you are using a firewall to protect your system you will need to allow SSH connections before you be able to connect from a remote system. If you are using the basic firewall configuration (see Basic Fedora Linux Firewall Configuration) you can allow SSH connections using the Security Level Configuration tool. This tool is launched from the System->Firewall and SELinux menu option as appears as follows:
If the box next to SSH is not already checked, check it and click Apply
If you have configured your firewall using the Firestarter tool you will need to set up an incoming connection policy to allow connections to the SSH service. Configuring Firestarter is covered in detail in Using Firestarter to Configure a Fedora Linux Firewall.
Using SSH on Fedora Linux
SSH can be used to log into your system from a remote system. It is also possible to test that the SSH server is running and accessible from the local machine. SSH connections are established using the ssh client utility.
To connect from your local machine back to itself use the following command:
ssh -l username ipaddresss
Where username is the name of the user you wish to log in as and ipaddress is the IP address of your system. You can also substitute the hostname of the system in place of the IP address. If you do not know the IP address run the ipconfig command in a terminal window. This will output information similar to:
eth0      Link encap:Ethernet  HWaddr 00:13:72:0B:14:57
          inet addr:192.168.2.21  Bcast:192.168.2.255  Mask:255.255.255.0
          inet6 addr: fe80::213:72ff:fe0b:1457/64 Scope:Link
          UP BROADCAST RUNNING MULTICAST  MTU:1500  Metric:1
          RX packets:4261067 errors:0 dropped:0 overruns:0 frame:0
          TX packets:4409081 errors:0 dropped:0 overruns:0 carrier:0
          collisions:0 txqueuelen:100
          RX bytes:2068332349 (1.9 GiB)  TX bytes:2408187471 (2.2 GiB)
          Base address:0xcce0 Memory:fe3e0000-fe400000
In the above output the IP address is shown as inet addr:, in this case 192.168.2.21.
To connect from a remote system perform the same steps above using either the IP address or host name of the remote host to which you connect. Enter your password when prompted and you will find yourself logged into the remote system.
Copying files using SSH
The SSH service provides a mechanism for copying files to and from a remote system. Copying is performed using the scp utility. To copy a file to a directory on a remote system, execute the following command:
scp myfile.txt [email protected]:/home/demo
Where myfile.txt is the name of the file to be uploaded to the remote system, username is the name of user account to be used to log into the remote system, 192.168.2.1 is replaced by the real IP address or hostname of the system and /home/demo represents the directory into which the file should be copied.
The above file could similarly be copied from the remote system to the local system as follows:
scp [email protected]:/home/demo/myfile.txt .
The above command will copy the remote file to the current directory on the local system.
Disabling the SSH Server
Having configured the system to run the SSH server we can now look at how to disable it. As we mentions previously the SSH server runs in the background as a service. In order to disable SSH we need to turn off the SSH service. This can be achieved using the Services tool or from the command line. To disable the sshd service from the command line:
su -
/sbin/service sshd stop
To launch the services tool click on the desktop System menu and select Services from the Administration sub-menu. Enter your password when prompted to do so. The Services tool will appear containing a list of all available services. Scroll down to find the sshd entry as shown below:
Uncheck the box next to the SSH entry and click on the Stop button. The SSH server is now disabled and will not restart if the system is re-booted. To re-enable the server, repeat the above steps and check the box next to sshd to enable the service on re-boot and press Start to immediately start the service.


