Installing Xcode and Compiling Objective-C on Mac OS X
| Previous | Table of Contents | Next |
| The History of Objective-C | Installing and using GNUstep and Objective-C on Windows |
| Purchase the full edition of this Objective-C book in Print ($14.99) or eBook ($12.99) format Objective-C 2.0 Essentials Print and eBook (ePub/PDF/Kindle) editions contain 31 chapters. |
In later chapters we will look at how to install and use Objective-C on Windows and Linux systems for those that do not have access to Mac OS X. If you are planning to develop iOS applications (or Mac OS X applications for that matter), however, you are going to need to use an Intel based Mac OS X system at some point in the future. Perhaps the biggest advantage of using Mac OS X as your Objective-C learning platform (aside from the ability to develop iOS and Mac OS X applications) is the fact that you get to use Apple's Xcode development tool. Xcode is a powerful and easy to use development environment that is available for a minimal charge to anyone fortunate enough to own an Apple computer running Mac OS X.
In this chapter we will cover the steps involved in installing Xcode and writing and compiling a simple Objective-C program in this environment.
Installing Xcode on Mac OS X
Xcode may or may not be pre-installed on your Mac OS X system. To find out if you already have it, open the Finder and look for it in the Developer subfolder of the Applications folder. If the Developer folder does not exist, or does not contain Xcode then you will need to install it.
The best way to obtain Xcode is to download it from the Apple web site. The URL to download Xcode is http://developer.apple.com/technology/xcode.html.
In order to download Xcode 4.3 with the iOS 5 SDK, you will either need to be a member of the iOS Developer programs or purchase a copy from the Mac App Store. The download is over 3.5GB in size and may take a number of hours to complete depending on the speed of your internet connection.
Starting Xcode
Having successfully installed the SDK and Xcode, the next step is to launch it so that we can write and then create a sample iPhone application. To start up Xcode, open the Finder and search for Xcode. Since you will be making frequent use of this tool, take this opportunity to drag and drop it into your dock for easier access in the future. Click on the Xcode icon in the dock to launch the tool.
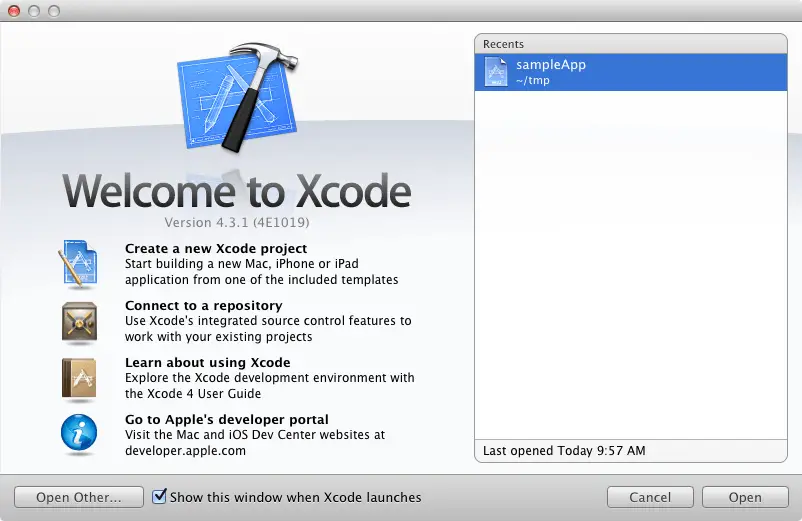
Once Xcode has loaded, and assuming this is the first time you have used Xcode on this system, you will be presented with the Welcome screen from which you are ready to proceed:
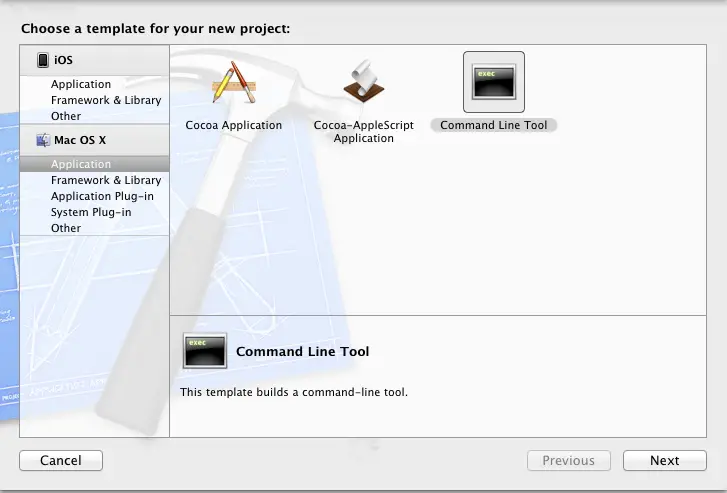
Click on the option to Create a new Xcode project to display the template selection screen. Within the template selection screen, select the Application entry listed beneath MacOS X in the left hand panel followed by Command Line Tool in the main panel:
Click Next and on the resulting options panel name the project sampleApp and select Foundation from the Type menu. Also verify that the Use Automatic Reference Counting option is selected.
Before Automatic Reference Counting (ARC) support was introduced to recent versions of Apple’s compiler, an Objective-C programmer was responsible for retaining and releasing objects in application code. This typically entailed manually adding retain and release method calls to code in order to manage memory usage. Failing to release an object would result in memory leaks (whereby a running application’s memory usage increases over time), whilst releasing an object too soon typically caused an application to crash. ARC is implemented by Apple’s LLVM compiler which scans the source code and automatically inserts appropriate retain and release calls prior to compiling the code, thereby making the life of the Objective-C programmer much easier.
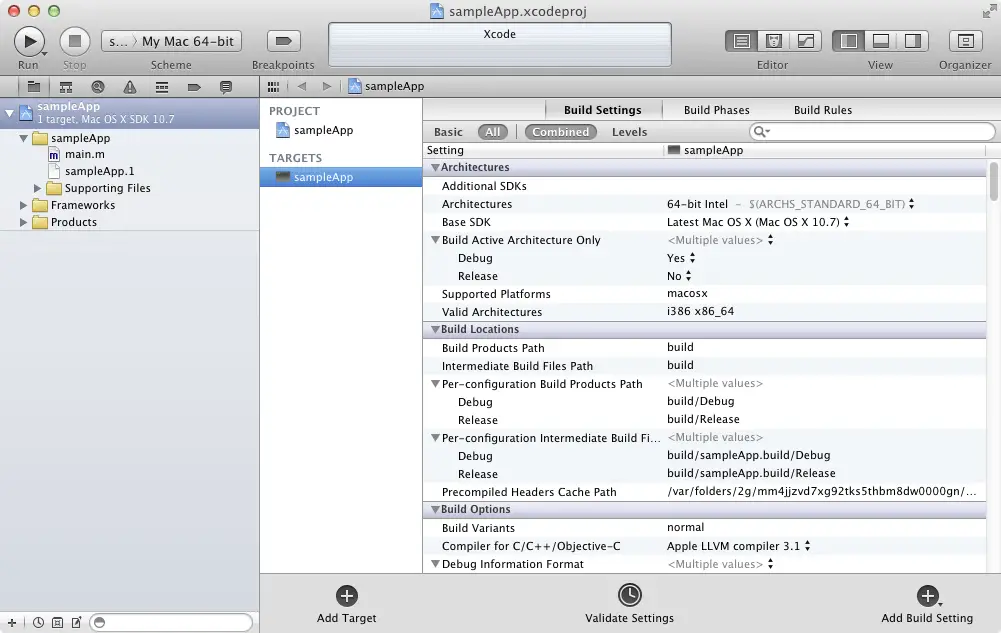
Click Next and on the subsequent screen choose a suitable location on the local file system for the project to be created before clicking on the Create button. Xcode will subsequently create the new project and open the main Xcode window:
Writing an Objective-C Application with Xcode
Xcode will create skeleton versions of the files needed to build a command-line based Objective-C application. Objective-C source files are identified by the .m filename extension. In the case of our example, Xcode has pre-created a main source file named main.m and populated it with some basic code ready for us to edit. To view the code, select main.m from the list of files so that the code appears in the editor area. The skeleton code reads as follows:
#import <Foundation/Foundation.h>

int main(int argc, const char * argv[])
{
    @autoreleasepool {
        // insert code here...
        NSLog(@"Hello, World!");
    }
    return 0;
}
Modify the NSLog line so that it reads:
NSLog(@"This is my first Objective-C App!");
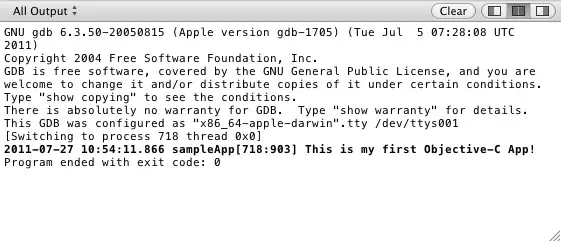
With the change made, the next step is to compile and run the application. Since the code is intended to display a message in the console, the first step is to make sure the Xcode console window is displayed b y selecting the View -> Debug Area -> Activate Console menu option. Next, run the application by selecting the Run option located in the Xcode toolbar. Once this option has been selected, Xcode will compile the source code and run the application, displaying the message in the Xcode console panel:
Compiling Objective-C from the Command Line
While Xcode provides a powerful environment that will prove invaluable for larger scale projects, for compiling and running such a simple application as the one we have been working with in this chapter it is a little bit of overkill. It is also a fact that some developers feel that development environments like Xcode just get in the way and prefer to use a basic editor and command line tools to develop applications. After all, in the days before integrated development environments came into favor, this was how all applications were developed.
Whilst we are not suggesting that everyone abandon Xcode in favor of the vi editor and GNU compiler, it is useful to know that the option to work from the command line is available.
Before attempting to compile code from the command line, the first step is to ensure that the Xcode Command Line Tools are installed. To achieve this, select the Xcode -> Preferences menu option and in the preferences dialog select the Downloads category. If the Command Line Tools are not yet installed, click on the Install button to begin the installation process.
Using your favorite text or programming editor, create a file named hello.m containing the following Objective-C code:
#import <Foundation/Foundation.h>

int main(int argc, const char * argv[])
{
    @autoreleasepool {
        // insert code here...
        NSLog(@"Hello, World!");
    }
return 0;
}
Save the file and then open a Terminal window (if you aren't already working in one), change directory to the folder containing the source file and compile the application with the following command:
clang -framework Foundation hello.m -o hello
Assuming the code compiles without error it can be run as follows:
./hello
2012-04-18 13:27:11.621 hello[275:707] Hello, World!
Compared to using Xcode that seems much simpler, but keep in mind that the power of Xcode really becomes evident when you start developing larger scale projects.
Summary
The goal of this chapter has been to outline the steps involved in installing the Xcode development environment on Mac OS X. Objective-C programs can be written and compiled both from within Xcode and via the command prompt in a Terminal window. A brief overview of memory management and Automatic Reference Counting has been provided followed by the creation, compilation and execution of a simple Objective-C program.
| Purchase the full edition of this Objective-C book in Print ($14.99) or eBook ($12.99) format Objective-C 2.0 Essentials Print and eBook (ePub/PDF/Kindle) editions contain 31 chapters. |
| Previous | Table of Contents | Next |
| The History of Objective-C | Installing and using GNUstep and Objective-C on Windows |


