Installing Ubuntu 11.04 on a Windows Disk with Wubi
| Previous | Table of Contents | Next |
| Installing Ubuntu 11.04 on a Windows System (Dual booting) | Allocating an Existing Windows Partition to Ubuntu 11.04 |
As described in How to Download and Try Ubuntu 11.04, there are a number of ways to run Ubuntu, including two options for running Ubuntu alongside a pre-existing Windows installation.
One such option is to repartition the disk containing Windows to make room for Ubuntu in a dual boot environment (as outlined in the chapter entitled Installing Ubuntu 11.04 on a Windows System (Dual booting). A second option, and the topic of this chapter, is to use the Windows-based Ubuntu Installer (Wubi) to install the Ubuntu distribution within a folder on a Windows disk from where it may subsequently be started using a dual boot configuration.
What is Wubi?
The Windows-based Ubuntu Installer (Wubi) allows Ubuntu to be installed within a folder of a Windows file system. An option to boot Ubuntu is then added to the Windows boot menu giving the user the ability to boot either into Windows or Ubuntu when the system starts up. In essence, Wubi allows a Windows/Ubuntu dual boot configuration to be set up without the need to reduce the size of a Windows partition and create new Linux partitions to accommodate the Ubuntu installation.
Downloading Wubi
Wubi consists of a small installer executable which must be downloaded onto the target Windows system. This file can be downloaded from the download page of the Ubuntu web site and may be listed as Windows Installer or Windows Installer for Ubuntu, or accessed by selecting the Run it with Windows option.
Starting the Wubi Installer
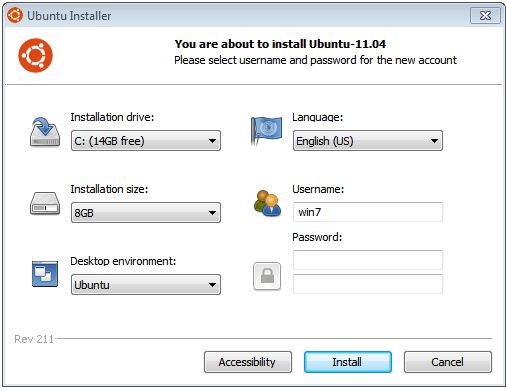
Once the Wubi installer has been downloaded, navigate to the location to which it was downloaded and double click on it to run it. Once invoked, the initial screen will appear providing access to a number of installation options. Select the Install inside Windows option to display the Wubi installation configuration screen:
From this screen, select the destination Windows disk drive, the amount of disk space on that drive to be allocated to Ubuntu (a minimum of 8GB is recommended), and a suitable user name and password to be used to gain access to Ubuntu once the installation is complete. In addition, specify a language other than English if necessary and choose a desktop environment (unless you have any objection to the default Unity desktop, which is covered in this book, this option should be left unchanged).
Once the settings are configured, click on Install to initiate the installation process. During the installation process, Wubi will install a number of Ubuntu distribution files in the \ubuntu folder of the designated Windows disk drive together with two additional files named wubildr and wubldr.mbr.
Once the download is complete, the setup program will report that the system needs to be rebooted to complete the Ubuntu installation. This may be performed either now or at a later and more convenient time.
Completing the Ubuntu Installation
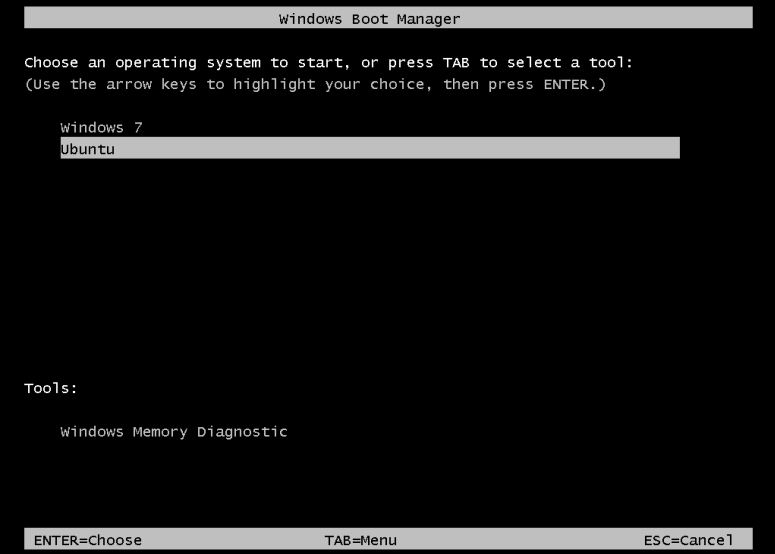
Once the initial Wubi installation process is complete and the system is restarted, Windows will present a boot menu providing the option to boot into either the original Windows system or the Ubuntu system installed by Wubi. A typical boot menu is illustrated in the following figure:
Selecting Ubuntu from the menu and pressing the Enter key will start the Ubuntu boot process. If this is the first time that the Ubuntu installation has been started the system will perform a number of tasks to complete the operating system installation process. This process may take some time depending on system performance, but is only necessary the first time the Ubuntu system is started. Subsequent start up times will be significantly reduced. Once the installation is complete, Ubuntu will reboot the system.
Starting the Ubuntu System
Once the installation is complete, restart the computer and select Ubuntu from the boot menu. Once Ubuntu has started, log into the desktop environment using the user name and password specified during the initial Wubi setup configuration.
Removing Ubuntu
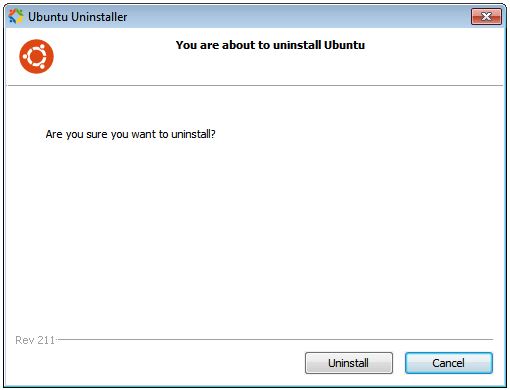
The Ubuntu installation can be removed at any time by booting Windows, navigating to the \ubuntu folder on the disk drive onto which Ubuntu was installed and double clicking on the uninstall-wubi executable. The uninstaller will launch and seek confirmation that Ubuntu is to be removed from the system as illustrated below:

Clicking on the Uninstall button will initiate the removal process.
| Previous | Table of Contents | Next |
| Installing Ubuntu 11.04 on a Windows System (Dual booting) | Allocating an Existing Windows Partition to Ubuntu 11.04 |


