Creating an Interactive iOS 6 iPhone App
| Previous | Table of Contents | Next |
| An Overview of the iPhone iOS 6 Application Development Architecture | Writing iOS 6 Code to Hide the iPhone Keyboard |
Learn SwiftUI and take your iOS Development to the Next Level |
In the previous chapter we looked at the design patterns that we will need to learn and use regularly in the course of developing iOS 6 based iPhone applications. In this chapter we will work through a detailed example intended to demonstrate the View-Controller relationship together with the implementation of the Target-Action pattern to create an example interactive iOS 6 based iPhone application.
Creating the New Project
The purpose of the application we are going to create is to perform unit conversions from Fahrenheit to Centigrade. Obviously the first step is to create a new Xcode project to contain our application. Start Xcode and on the Welcome screen select Create a new Xcode project. On the template screen choose the Application option located under iOS in the left hand panel and select Single View Application. Click Next, set the product name and class prefix to UnitConverter, enter your company identifier, make sure that the Devices menu is set to iPhone and that the storyboard and unit test options are switched off. On the final screen, choose a location in which to store the project files and click on Create to proceed to the main Xcode project window.
Creating the User Interface
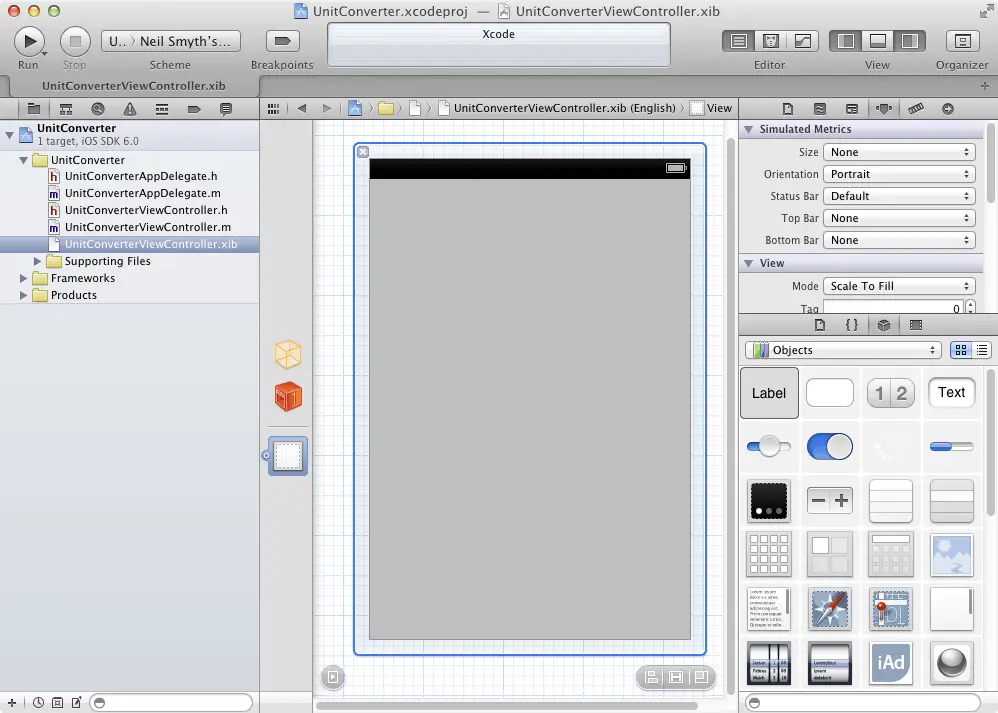
Before we begin developing the logic for our interactive application we are going to start by designing the user interface. When we created the new project, Xcode generated an Interface Builder NIB file for us and named it UnitConverterViewController.xib. It is within this file that we will create our user interface, so select this file from the project navigator in the left hand panel to load it into Interface Builder. Once Interface Builder has loaded the file, select the far right of the three View buttons in the Xcode toolbar to display the right hand panel. In the lower panel, select the Show the Object library toolbar button (the black 3D cube) to display the UI components. Alternatively, simply select the View -> Utilities -> Show Object Library menu option:
Figure 11-1
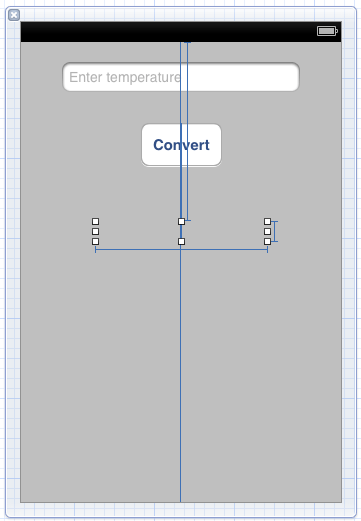
From the Object Library panel, drag a Text Field object onto the View design area. Resize the object and position it so that it appears as outlined in Figure 11-2.
Within the Attribute Inspector panel (View -> Utilities -> Show Attribute Inspector), type the words Enter temperature into the Placeholder text field. This text will then appear in a light gray color in the text field as a visual cue to the user.
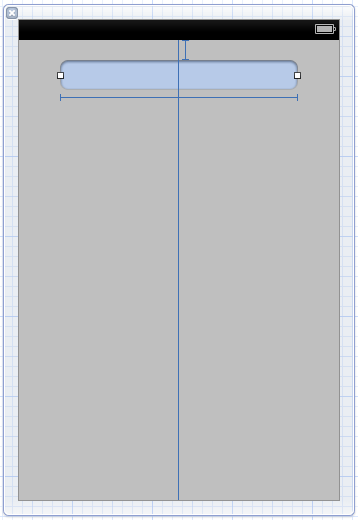
Figure 11-2
Now that we have created the text field into which the user will enter a temperature value, the next step is to add a Button object which may be pressed to initiate the conversion. To achieve this drag and drop a Rounded Rect Button object from the Library to the View. Double click the button object so that it changes to text edit mode and type the word Convert onto the button. Finally, select the button and drag it beneath the text field until the blue dotted line appears indicating it is centered vertically in relation to the text field before releasing the mouse button.
The last user interface object we need to add is a label where the result of the conversion will be displayed. Add this by dragging a Label object from the Library window to the View and position it beneath the button. Stretch the width of the label so that it is approximately a third of the overall width of the view and reposition it using the blue guidelines to ensure it is centered in relation to the button.
Double click on the label to highlight the text and press the backspace key to clear it (we will set the text from within a method of our View Controller class when the conversion calculation has been performed). Though the label is now no longer visible it is still present in the view. If you click where it is located it will be highlighted with the resize dots visible.
At this point the user interface design phase of our project is complete and the view should appear as illustrated in Figure 11-3. We now are ready to try out a test build and run.
Figure 11-3
Building and Running the Sample Application
Before we move on to implementing the controller code for our application and then connecting it to the user interface we have designed we should first perform a test build and run of the application so far. Click on the Run button located in the toolbar to compile the application and run it in the simulator. If you are not happy with the way your interface looks feel free to reload it into Interface Builder and make improvements. Assuming the user interface appears to your satisfaction in the simulator we are ready to start writing some Objective-C code to add some logic to our controller. Exit from the simulator before proceeding to the next step by selecting the iOS Simulator -> Quit iOS Simulator menu option.
Adding Actions and Outlets
When the user enters a temperature value into the text field and touches the convert button we need to trigger an action which will perform a calculation to convert the temperature. The result of that calculation will then be presented to the user via the label object. The Action will be in the form of a method which we will declare and implement in our View Controller class. Access to the text field and label objects from the view controller method will be implemented through the use of Outlets.
Before we begin, now is a good time to highlight an example of the use of subclassing as previously described in An Overview of the iPhone iOS 6 Application Development Architecture. The UIKit framework contains a class called UIViewController which provides the basic foundation for adding view controllers to an application. In order to create a functional application, however, we inevitably need to add functionality specific to our application to this generic view controller class. This is achieved by subclassing the UIViewController class and extending it with the additional functionality we need.
When we created our new project, Xcode anticipated our needs and automatically created a subclass of UIViewController and named it UnitConverterViewController (using the class prefix entered when the project was initially created). In so doing, Xcode also created two source files; a header file named UnitConverterViewController.h and a source code file named UnitConverterViewController.m.
Selecting the UnitConverterViewController.h file in the Xcode project navigator panel will display the contents of the file in the editing pane:
#import <UIKit/UIKit.h>

@interface UnitConverterViewController : UIViewController
@end
As we can see from the above code, a new class called UnitConverterViewController has been created that is a subclass of the UIViewController class belonging to the UIKit framework.
The next step is to extend the subclass to include the two outlets and our action method. We will begin by adding outlets for our text field and label objects by declaring variables and using the IBOutlet keyword:
#import <UIKit/UIKit.h>

@interface UnitConverterViewController : UIViewController

@property (strong, nonatomic) IBOutlet UILabel *resultLabel;
@property (strong, nonatomic) IBOutlet UITextField *tempText;
@end
Next we need to declare the action that will be called when the user touches the Convert button in our user interface. This is declared using the IBAction keyword:
#import <UIKit/UIKit.h>

@interface UnitConverterViewController : UIViewController

@property (strong, nonatomic) IBOutlet UILabel *resultLabel;
@property (strong, nonatomic) IBOutlet UITextField *tempText;
- (IBAction)convertTemp:(id)sender;
@end
We have now declared that our View Controller class contains a method called convertTemp:. Having made that declaration, we need to implement the method in the implementation source file. To do so, select the UnitConverterViewController.m file so that the contents appear in the editing pane.
#import "UnitConverterViewController.h"

@interface UnitConverterViewController ()

@end

@implementation UnitConverterViewController

- (void)viewDidLoad
{
    [super viewDidLoad];
    // Do any additional setup after loading the view, typically from a nib.
}

- (void)didReceiveMemoryWarning
{
    [super didReceiveMemoryWarning];
    // Dispose of any resources that can be recreated.
}

@end
At the bottom of the file, and before the @end marker, add the new convertTemp: method as follows:
#import "UnitConverterViewController.h"

@implementation UnitConverterViewController
.
.
.
- (void) convertTemp: (id) sender {
    double farenheit = [_tempText.text doubleValue];
    double celsius = (farenheit - 32) / 1.8;

    NSString *resultString = [[NSString alloc]
           initWithFormat: @"Celsius %f", celsius];
    _resultLabel.text = resultString;
}
@end
Before we proceed it is probably a good idea to pause and explain what is happening in the above code. Those already familiar with Objective-C, however, may skip the next few paragraphs.
In this file we are implementing the convertTemp: method originally declared in the .h file. This method takes as a single argument a reference to the sender. The sender is the object that triggered the call to the method (in this case our Button object). Whilst we won’t be using this object in the current example, this can be used to create a general purpose method in which the behavior of the method changes depending on how (i.e. via which object) it was called. We could, for example, create two buttons labeled Convert to Fahrenheit and Convert to Celsius respectively, each of which calls the same convertTemp: method. The method would then access the sender object to identify which button triggered the event and perform the corresponding type of unit conversion.
Next, the code declares a variable of type double in order to handle the fact that the user may have entered a floating point value. We then use dot notation to access the text property (which holds the text displayed in the text field) of the UITextField object. By convention this object is referenced using the property name declared for the outlet prefixed with an underscore character (in this case _tempText). This property is itself an object of type NSString. The NSString class has an instance method named doubleValue that converts the string value to a double. We therefore call this method on the text property and assign the result to our farenheit variable.
Having extracted the text entered by the user and converted it to a number, we then perform the conversion to Celsius and store the result in another variable named celsius. Next, we create a new NSString object and initialize it with text comprising the word Celsius and the result of our conversion. In doing so, we declare a pointer to this new object and call it resultText.
Finally, we use dot notation to assign the new string to the text property of our UILabel object so that it is displayed to the user.
Before proceeding to the next section of this chapter, now is a good time to perform a build and run to make sure that no errors exist in the code. Click on the Run button in the toolbar and correct any reported syntax errors or warnings.
Connecting the Actions and Outlets to the User Interface
The final step in developing our application is to connect the actions and outlets we have declared in the view controller class to the actual objects in the user interface view. Fortunately, this can all be done visually from within the Interface Builder tool.
With this in mind, select the UnitConverterViewController.xib file to load the user interface into Interface Builder. We will begin by connecting the IBOutlet instance variables we created in our view controller class to the label and text field objects respectively. Located in the narrow panel to the left of the graphical view of the user interface are three icons. Clicking on the grey circle containing a white arrow at the bottom of this panel will expand the panel to provide more detail if it is not already expanded:
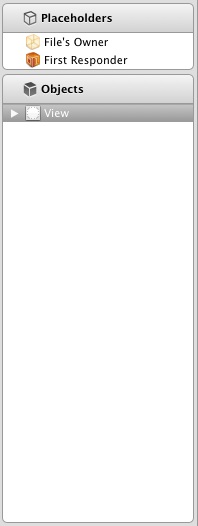
Figure 11-4
The top icon is the File’s Owner. This icon represents the file containing the class that invokes the user interface contained in the NIB file when the application runs. In this instance it is the UnitConverterViewController class, where we declared our actions and outlets.
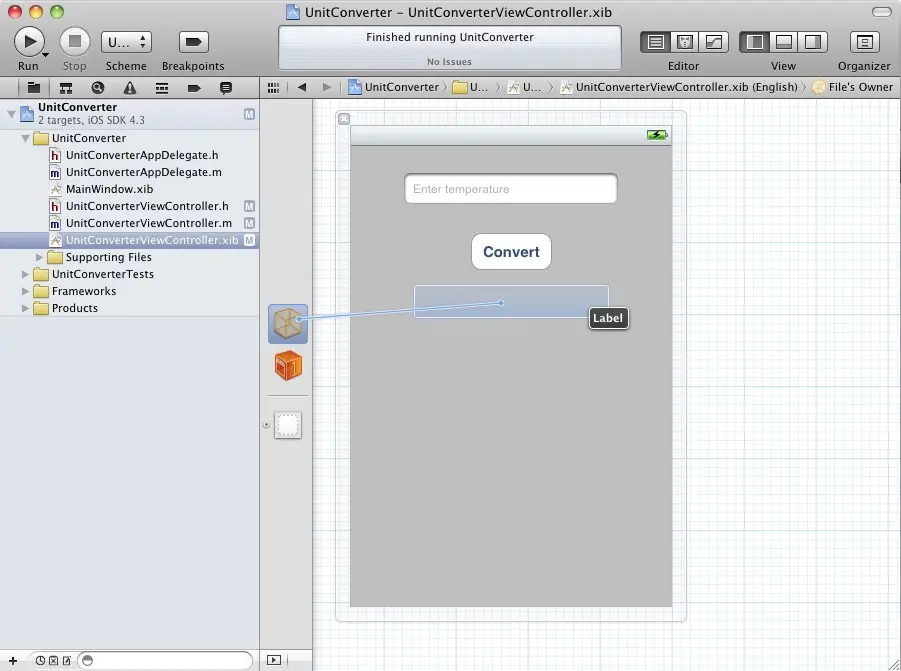
To connect the resultLabel IBOutlet variable to the label object, hold down the Control key on the keyboard, click on the File’s Owner icon and drag the mouse to the location of the label object in the user interface design. A blue line will extend from the icon to the object as illustrated in Figure 11-5:
Figure 11-5
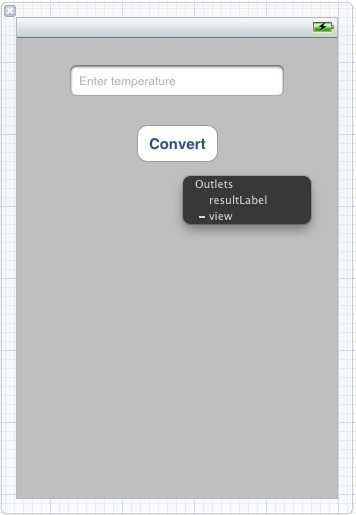
Upon releasing the mouse button, Interface Builder will display a list of IBOutlet variables matching the type of the object selected:
Figure 11-6
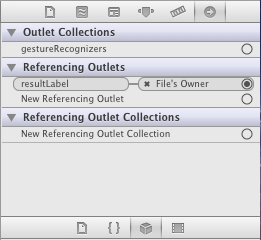
Select resultLabel from the menu to complete the connection. Repeat these steps to connect the tempText outlet to the text field object. In order to view the connections you have created, display the Connections Inspector by selecting the far right hand toolbar option in the top section of the right hand panel or selecting View -> Utilities -> Show Connections Inspector. For example, Figure 11-7 shows the connection information for our label object listed under Referencing Outlets:
Figure 11-7
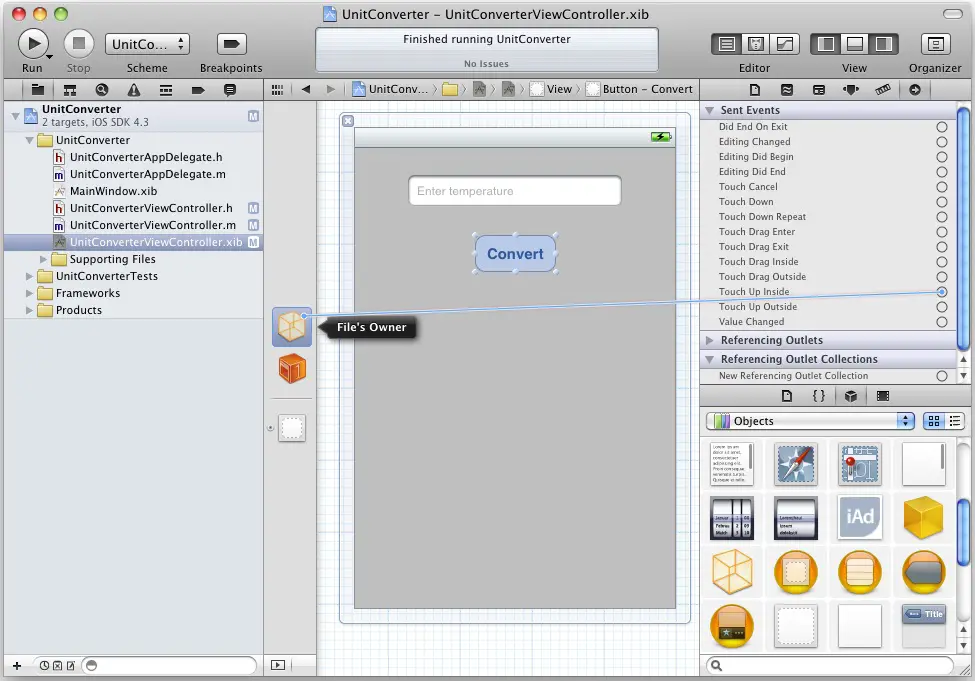
The final step is to connect the button object to our convertTemp action method. Cocoa Touch objects typically have a wide range of events that may be triggered by the user. To obtain a full listing of the events available on a particular object, display the Connections Inspector and select the button object in the view window. Listed under Sent Events in the connections panel is a list of the events that may be triggered by the button object. In this instance, we are interested in the Touch Up Inside event. This event is triggered when a user touches and then releases the button without first sliding it outside the boundaries of the button. When this action is performed we want our convertTemp method to be called. To make this connection, move the mouse pointer to the small circle next to the Touch Up Inside event in the connections panel, click the mouse button and drag to the File’s Owner icon as illustrated in Figure 11-8.
Releasing the mouse button over the File’s Owner object will display a menu with a list of methods available in the view controller class. In our case the only method is convertTemp so select that method to initiate the connection. The event listing in the Connections panel will subsequently update to reflect the new connection.
Figure 11-8
Building and Running the Finished Application
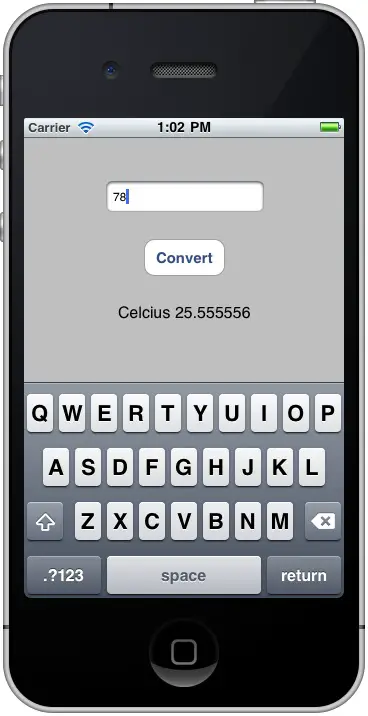
From within the Xcode project window click on Run to compile the application and run it in the simulator. Once the application is running, click inside the text field and enter a Fahrenheit temperature. Next, click on the Convert button to display the equivalent temperature in Celsius. Assuming all went to plan your application should appear as outlined in the following figure (note that if the keyboard obscures the result label you will need to reload the user interface design into Interface Builder and move the label, button and text field objects so that they are all positioned in the top half of the view):
Figure 11-9
Summary
In this chapter we have put into practice some of the theory covered in previous chapters, in particular the separation of the view from the controller, the use of subclassing and the implementation of the Target-Action pattern through the use of actions and outlets.
You may have noticed whilst testing your application that once the keyboard is displayed it doesn’t then go away even when you touch the Return key or any other area on the screen. In order to make the keyboard disappear we need to write some code. The next chapter, entitled Writing iOS 6 Code to Hide the iPhone Keyboard provides a tutorial on how to hide the keyboard when either the keyboard Return key or the background view are touched by the user.
Learn SwiftUI and take your iOS Development to the Next Level |
| Previous | Table of Contents | Next |
| An Overview of the iPhone iOS 6 Application Development Architecture | Writing iOS 6 Code to Hide the iPhone Keyboard |


