A watchOS 2 WatchKit Dynamic Layout and Animation Tutorial
| Previous | Table of Contents | Next |
| A watchOS 2 WatchKit Animated Image Tutorial | Working with Fonts and Attributed Strings in watchOS 2 |
| Purchase the full edition of this watchOS 2 App Development Essentials book in eBook ($12.99) or Print ($27.99) format watchOS 2 App Development Essentials Print and eBook (ePub/PDF/Kindle) editions contain 35 chapters. |
Although the initial layout of a WatchKit app scene is defined at design time from within the Interface Builder environment, this does not mean that dynamic changes cannot be made to certain aspects of the appearance of the objects in the scene during runtime. A number of API calls have been introduced with watchOS 2 that allow the size, position and appearance of the interface objects in a scene to be changed dynamically from within the code of the running app. It is now possible, for example, to change the position and size of an object in a scene from within the code of an interface controller.
watchOS 2 also includes the ability to animate some of the property changes made to the interface objects in a scene allowing, for example, an object to slide slowly from one position on the screen to another. Both dynamic layout changes and animation are the topics of this chapter.
Changing the Position of an Interface Object
The vertical position of an interface object can be changed via a call to the object’s setVerticalAlignment method, passing through one of the following values:
- WKInterfaceObjectVerticalAlignment.Top
- WKInterfaceObjectVerticalAlignment.Center
- WKInterfaceObjectVerticalAlignment.Bottom
Similarly, the horizontal position of an interface object may be changed via a call to the object’s setHorizontalAlignment method using one of the following values:
- WKInterfaceObjectHorizontalAlignment.Left
- WKInterfaceObjectHorizontalAlignment.Center
- WKInterfaceObjectHorizontalAlignment.Right
The following code, for example, sets top and left alignment properties on an interface object referenced by an outlet named myObject:
myObject.setHorizontalAlignment(.Left)
myObject.setVerticalAlignment(.Top)
Changing the Size of an Interface Object
The size of an interface object may be set in terms of width and height. Options are available to set these dimensions based on specific dimension values or as a percentage of the size of the container in which the object resides. Interface objects may also be configured to be sized to fit content.
Specific width and height settings are applied to an interface object using the setHeight and setWidth methods. For example:
myObject.setWidth(10)
myObject.setHeight(10)
Size changes relative to the width of the container are made using the setRelativeHeight and setRelativeWidth methods. The values are declared as a percentage and may also include a positive or negative offset value in points.
The following line of code sets the width of an interface object to 60% of the width of the container:
myObject.setRelativeWidth(0.6, withAdjustment: 0)
The following code, on the other hand, sets the height of an interface object to 30% of the container’s width with an adjustment of -20 points:
myObject.setRelativeHeight(0.3, withAdjustment: -20)
Finally, an interface object may be configured such that it sizes to fit its content using the sizeToFitWidth and sizeToFitHeight methods:
myObject.sizeToFitHeight()
myObject.sizeToFitWidth()
Setting the Visibility of an Interface Object
The visibility of an interface object can be changed from within code via a call to the object’s setHidden method:
myObject.setHidden(true)
myObject.setHidden(false)
The transparency of an interface object is adjusted using the setAlpha method, passing through a value between 0.0 and 1.0 with 1.0 representing a fully opaque appearance:
myObject.setAlpha(0.5)
| Purchase the full edition of this watchOS 2 App Development Essentials book in eBook ($12.99) or Print ($27.99) format watchOS 2 App Development Essentials Print and eBook (ePub/PDF/Kindle) editions contain 35 chapters. |
Animating Interface Changes
The concept of animation within the scene of a WatchKit app involves the use of so-called animation block methods. Animation block methods are used to mark the beginning and end of a sequence of changes to the appearance of interface objects within a scene. Once the end of the block is reached, the animation is performed over a specified duration. For the sake of example, consider a Button object connected to an outlet named myButton. The application requires that the button gradually fade from view over a period of 3 seconds. This can be achieved by making the button transparent through the use of the alpha property:
myButton.setAlpha = 0
Simply setting the alpha property to 0, however, causes the button to immediately become transparent. In order to make it fade out of sight gradually we need to place this line of code in a call to the animateWithDuration: animation block method as follows:
self.animateWithDuration(3.0, animations: {
    self.myButton.setAlpha(0.0)
})
When the above code is executed, the object will gradually fade from view over a period of 3 seconds.
An Animation Example
Start Xcode and create a new iOS project. On the template screen choose the Application option located under watchOS in the left hand panel and select iOS App with WatchKit App. Click Next, set the product name to AnimateInterfaceApp, enter your organization identifier and make sure that the Devices menu is set to Universal. Before clicking Next, change the Language menu to Swift and switch off all of the Include options. On the final screen, choose a location in which to store the project files and click on Create to proceed to the main Xcode project window.
Designing the User Interface
Select the Interface.storyboard file located under AnimateInterfaceApp WatchKit App so that it loads into Interface Builder. Locate the Group object in the Object Library panel and drag and drop it onto the scene in the storyboard canvas.
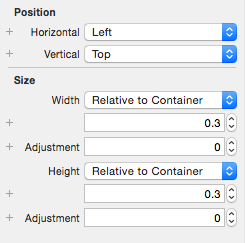
With the Group object selected, display the Attributes Inspector panel and set the background color to a light shade of blue. Set both the width and height size properties to Relative to container with values set to 0.3 as illustrated in Figure 22-1:
Figure 22-1
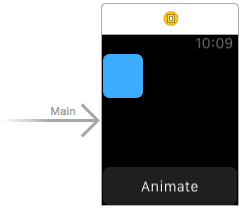
Drag and drop a Button object onto the scene and use the Attributes Inspector panel to change the Vertical position property to position the object at the bottom of the scene. Double click on the Button object and change the text to read “Animate”. On completion of these steps the user interface layout should resemble that of Figure 22-2:
Figure 22-2
Display the Assistant Editor panel and establish an outlet connection from the Group object named myGroup and an action connection from the Button object named changeLayout.
Performing the Layout Changes and Animation
Locate and select the InterfaceController.swift file and modify the changeLayout method to animate a sequence of changes to the size, position and color of the Group object in the scene layout over a 3 second duration:
@IBAction func changeLayout() {
    self.animateWithDuration(3.0, animations: {

        self.myGroup.setRelativeWidth(0.7, withAdjustment: 0)
        self.myGroup.setRelativeHeight(0.5, withAdjustment: 0)
        self.myGroup.setHorizontalAlignment(.Right)
        self.myGroup.setVerticalAlignment(.Bottom)
        self.myGroup.setBackgroundColor(UIColor.redColor())
    })
}
Testing the Animation
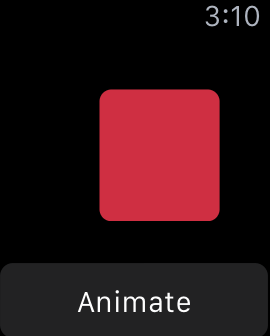
Compile and run the app on an Apple Watch or using the Watch Simulator and tap the Animate button at which point the Group object should smoothly move to the bottom right hand corner as it gradually increases in size and changes color from blue to red:
Figure 22-3
Summary
Although the user interface layout for a WatchKit app scene needs to be pre-designed statically within Interface Builder, a number of mechanisms are available for making dynamic changes to interface objects once the app is running. Changes such as the size, alignment and transparency of the interface objects within a scene can all be made from within the code of an interface controller class. The animation features of watchOS 2 can also be used to animate the changes as they are made to the layout of a scene.
| Purchase the full edition of this watchOS 2 App Development Essentials book in eBook ($12.99) or Print ($27.99) format watchOS 2 App Development Essentials Print and eBook (ePub/PDF/Kindle) editions contain 35 chapters. |
| Previous | Table of Contents | Next |
| A watchOS 2 WatchKit Animated Image Tutorial | Working with Fonts and Attributed Strings in watchOS 2 |


