Creating a Simple iPad iOS 4 App (Xcode 4)
| Previous | Table of Contents | Next |
| Installing Xcode 4 and the iOS 4 SDK (iPad) | Testing iOS 4 Apps on the iPad – Developer Certificates and Provisioning Profiles (Xcode 4) |
Learn SwiftUI and take your iOS Development to the Next Level |
If you have not previously developed applications for either the iPhone or even Mac OS X then there is much that will be new to you as an iPad app developer. Whilst you may or may not have used Mac OS X before it is unlikely that you will have ever used the Xcode integrated development environment. It is also unlikely that you will have any familiarity with the iOS SDK or the frameworks that were covered in the chapter entitled iOS 4 Architecture and SDK Frameworks. Since Apple is the only company to fully embrace Objective-C it is also likely you have not had cause to use this programming language before.
With so much being new and unfamiliar, the first step will be to work through a very simple example to get us started. In doing so, we will be following a time honored tradition by providing this example in the form of a simple “Hello World” program. The “Hello World” example was first used in a book called the C Programming Language written the creators of C, Brian Kernighan and Dennis Richie. Given that the origins of Objective-C can be traced back to the C programming language it is only fitting that we use this example for iOS 4 and the iPad.
Starting Xcode 4
As with all iPad iOS apps, the development of our example will take place within the Xcode 4 development environment. If you have not already installed this tool together with the latest iOS SDK refer first to Installing Xcode 4 and the iOS 4 SDK. Assuming that the installation is complete, launch Xcode either by clicking on the icon on the dock (assuming you created one) or use the Finder to navigate to Macintosh HD -> Developer -> Applications -> Xcode.
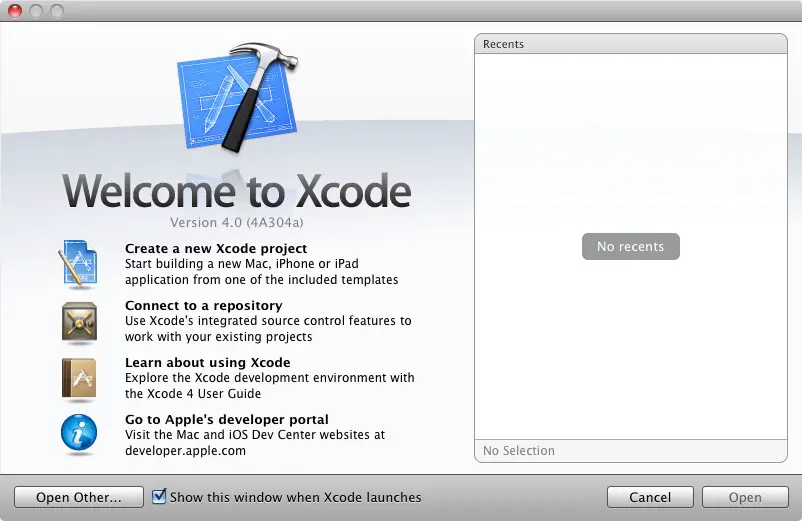
When launched for the first time, and until you turn off the Show this window when Xcode launches toggle, the screen illustrated in the following figure will appear by default:
If you do not see this window simply select the Window -> Welcome to Xcode menu option to display it.
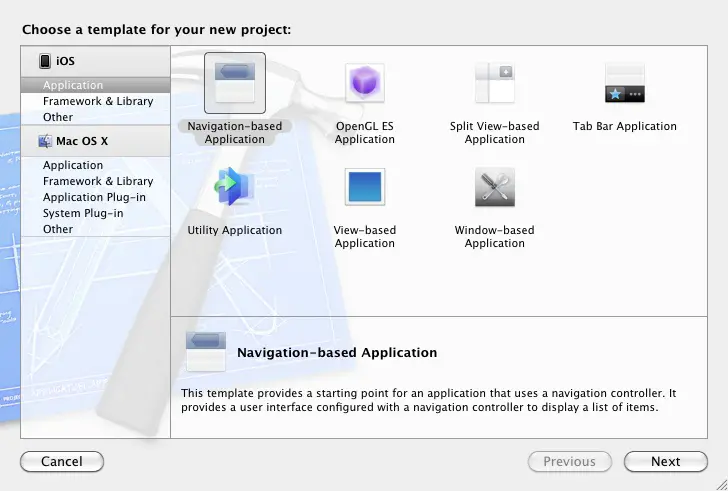
From within this window click on the option to Create a new Xcode project. This will display the main Xcode 4 project window together with the New Project panel where we are able to select a template matching the type of project we want to develop:
The panel located on the left hand side of the window allows for the selection of the target platform providing options to develop an application either for an iOS based device or Mac OS X.
Begin by making sure that the Application option located beneath iOS is selected. The main panel contains a list of templates available to use as the basis for an application. The options available are as follows:
- Navigation-based Application – Though the name may suggest otherwise, this type of application has nothing to do with maps and street directions. In fact it allows you to create a list based application. Selecting an item from a list displays a new view corresponding to the selection. The template then provides a Back button to return to the list. You may have seen a similar technique used for news based applications, whereby selecting an item from a list of headlines displays the content of the corresponding news article. This template is primarily aimed at iPhone based applications.
- Open GL ES Application – As discussed in iOS 4 Architecture and SDK Frameworks, the OpenGL ES framework provides an API for developing advanced graphics drawing and animation capabilities. The Open GL ES Application template creates a basic application containing an Open GL ES view upon which to draw and manipulate graphics.
- Split View Application – An iPad only application template with a user interface containing two views in a master-detail configuration whereby a one view provides a list and second displays detailed information corresponding to the current list selection.
- Tab Bar Application – Creates a template application with a tab bar. The tab bar typically appears across the bottom of the device display and can be programmed to contain items which, when selected, change the main display to different views. The iPhone’s built-in Phone user interface, for example, uses a tab bar to allow the user move between favorites, contacts, keypad and voicemail.
- Utility Application – Creates a template consisting of a two sided view. For an example of a utility application in action, load up the standard iPhone weather application. Pressing the blue info button flips the view to the configuration page. Selecting Done rotates the view back to the main screen. Aimed primarily at iPhone based applications.
- View-based Application – Creates a basic template for an application containing a single view.
- Window-based Application – The most basic of templates and creates only a window and a delegate. If none of the above templates match your requirements then this is the option to take.
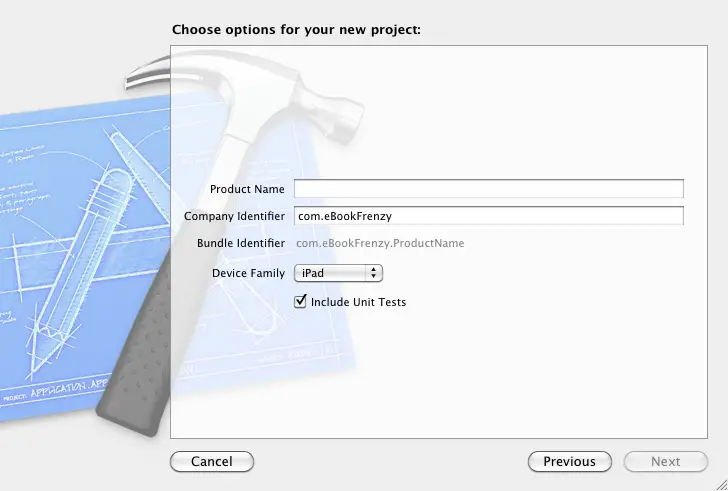
For the purposes of our simple example, we are going to use the View-based Application template so select this option from the new project window and click Next to configure some project options:
On this screen, enter a name for the application that is going to be created, in this case “HelloWorld”. The company identifier is typically the reversed URL of your company’s website, for example “com.mycompany”. This will be used when creating provisioning profiles and certificates to enable applications to be tested on a physical iPad device (covered in more detail in Testing iOS 4 Apps on the iPad – Developer Certificates and Provisioning Profiles).
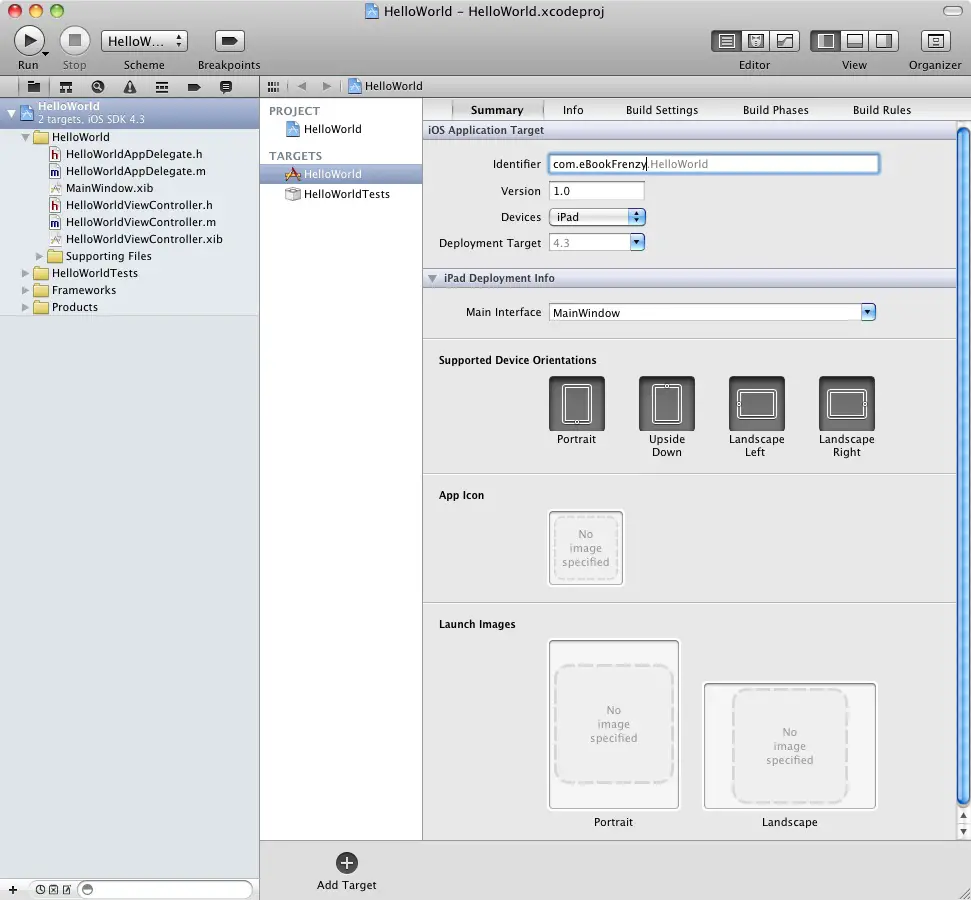
Make sure that iPad is currently selected from the Device Family menu before clicking the Next button to proceed. On the final screen, choose a location on the file system for the new project to be created and click on Create. Once the new project has been created the main Xcode window will appear as follows:
Before we proceed we should take some time to look at what Xcode has done for us. Firstly it has created a group of files that we will need to create our application. Some of these are Objective-C source code files (with a .m extension) where we will enter the code to make our application work, others are header or interface files (.h) that are included by the source files and are where we will also need to put our own declarations and definitions. In addition, the .xib files are the save files used by the Interface Builder tool to hold the user interface designs we will create. Older versions of Interface Builder saved designs in files with a .nib extension so these files, even today, are called NIB files. Also present will be one or more files with a .plist file extension. These are Property List files that contain key/value pair information. For example, the HelloWorld-info.plist file contains resource settings relating to items such as the language, icon file, executable name and app identifier. The list of files is displayed in the Project Navigator located in left hand panel of the main Xcode project window. A toolbar at the top of this panel contains options to display other information such as build and run history, breakpoints, compilation errors and warnings, symbol navigator and a search panel.
The center panel of the window, by default, shows a summary of the settings for the application. This includes the identifier specified during the project creation process and the target device. Options are also provided to configure the orientations of the device that are to be supported by the application together with options to upload an icon (the small image the user selects on the device screen to launch the application) and splash screen image (displayed to the user while the application loads) for the application.
In addition to the Summary screen, tabs are provided to view and modify additional settings consisting of Info, Build Settings, Build Phases and Build Rules. As we progress through subsequent chapters of this book we will explore some of these other configuration options in greater detail. To return to the Summary panel at any future point in time, make sure the Project Navigator is selected in the left hand panel and select the top item (the application name) in the navigator list. When a source file is selected from the list in the main panel, the contents of that file will appear in the center panel where it may then be edited. To open the file in a separate editing window, simply double click on the file in the list.
Learn SwiftUI and take your iOS Development to the Next Level |
Creating the iOS App User Interface
Simply by the very nature of the environment in which they run, iPad apps are almost exclusively visually oriented. As such, a key component of just about any iPad based app involves a user interface through which the user will interact with the application and, in turn, receive feedback. Whilst it is possible to develop user interfaces by writing code to create and position items on the screen, this is a complex and error prone process. In recognition of this, Apple provides a tool called Interface Builder that allows a user interface to be visually constructed by dragging and dropping components onto a canvas and setting properties to configure the appearance and behavior of those components. Interface Builder was originally developed some time ago for creating Mac OS X applications, but has now been updated to allow for the design of iOS app user interfaces for the iPhone and iPad and fully integrated in the Xcode version 4.
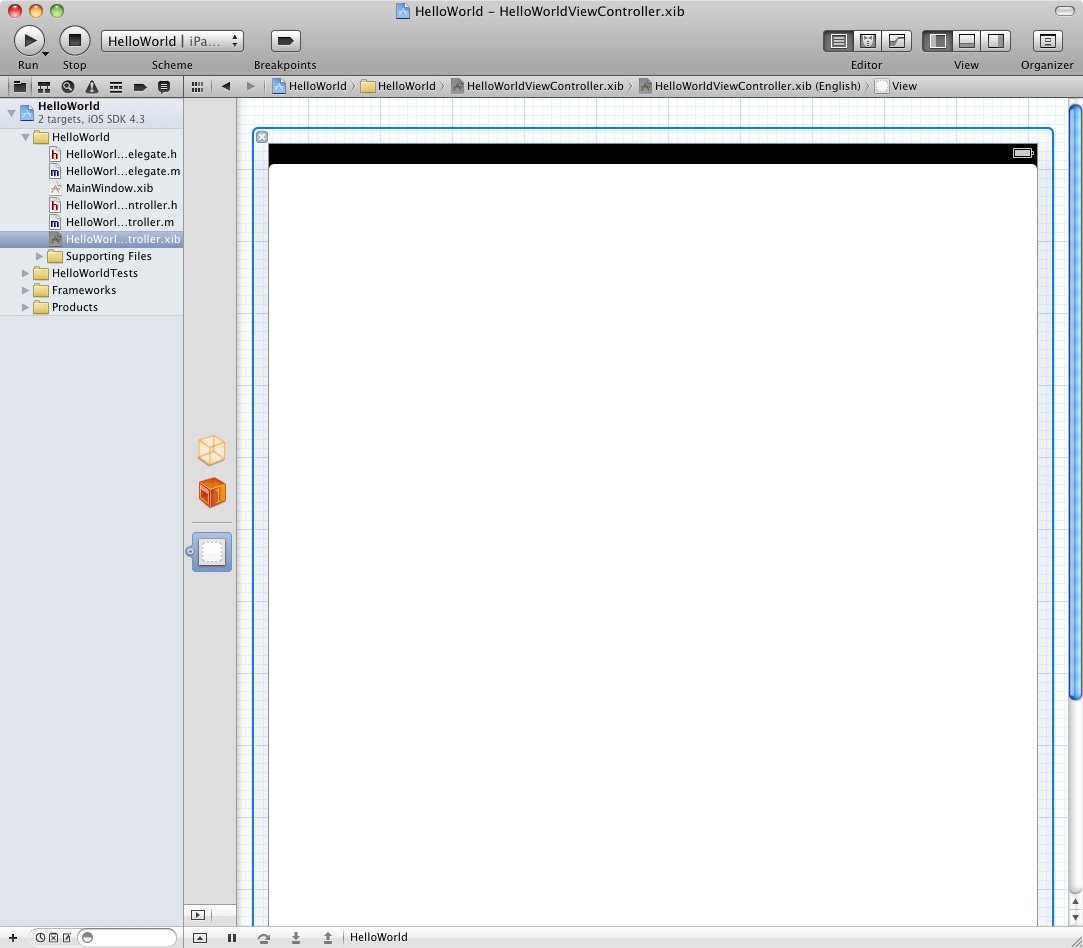
As mentioned in the preceding section, Xcode pre-created a number of files for our project, some of which have a .xib filename extension. These are Interface Builder save files (remember that they are called NIB files, not XIB files). The file we are interested in for our HelloWorld project is called HelloWorldViewController.xib. To load this file into Interface Builder simply select the file name in the list in the left hand panel. Interface Builder will subsequently appear in the center panel as shown in the following figure:
In the center panel a visual representation of the user interface of the application is displayed. Initially this consists solely of the UIView object. This UIView object that was added to our design by Xcode when we selected the View-based Application option during the project creation phase. We will construct the user interface for our HelloWorld app by dragging and dropping user interface objects onto this UIView object. Designing a user interface consists primarily of dragging and dropping visual components onto the canvas and setting a range of properties and settings. In order to access objects and property settings it is necessary to display the Xcode right hand panel. This is achieved by selecting the right hand button in the View section of the Xcode toolbar:
The right hand panel, once displayed, will appear as illustrated in the following figure:
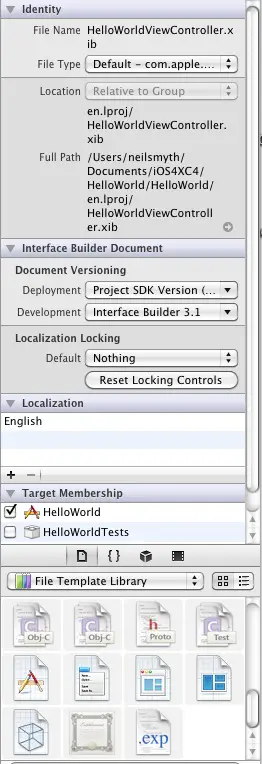
Along the top edge of the panel is a row of buttons that change the settings displayed in the upper half of the panel. By default the File Inspector is displayed. Options are also provided to display quick help, the Identity Inspector, Attributes Inspector, Size Inspector and Connections Inspector. Before proceeding, take some time to review each of these selections to gain some familiarity with the configuration options each provides. Throughout the remainder of this book extensive use of these inspectors will be made.
The lower section of the panel defaults to displaying the file template library. Above this panel is another toolbar containing buttons to display other categories. Options include frequently used code snippets to save on typing when writing code, the object library and the media library. For the purposes of this tutorial we need to display the object library so click in the appropriate toolbar button (the three dimensional cube). This will display the UI components that can be used to construct our user interface. Move the cursor to the line above the lower toolbar and click and drag to increase the amount of space available for the library if required. In addition, the objects are categorized into groups that may be selected using the menu beneath the toolbar. The layout buttons may also be used to switch from a single column of objects with descriptions to multiple columns without descriptions.
Changing Component Properties
With the property panel for the View selected in the main panel, we will begin our design work by changing the background color of this view. Begin by making sure the View is selected and that the Attribute Inspector (View -> Utilities -> Attribute Inspector) is displayed in the right hand panel. Click on the gray rectangle next to the Background label to invoke the Colors dialog. Using the color selection tool, choose a visually pleasing color and close the dialog. You will now notice that the view window has changed from gray to the new color selection.
Adding Objects to the User Interface
The next step is to add a Label object to our view. To achieve this, select Controls from the library panel menu, click on the Label object and drag it to the center of the view (horizontal guide markers will appear to indicate when the object is centered in each plane). Once it is in position release the mouse button to drop it at that location:
Using the blue markers surrounding the label border, stretch first the left and then right side of the label out to the edge of the view until the vertical blue dotted lines marking the recommended border of the view appear. With the Label still selected, click on the centered alignment button in the Layout attribute section of the Attribute Inspector (View -> Utilities -> Attribute Inspector) to center the text in the middle of the screen. Click on the current font attribute setting to choose a larger font setting, for example a Georgia bold typeface with a point size of 72.
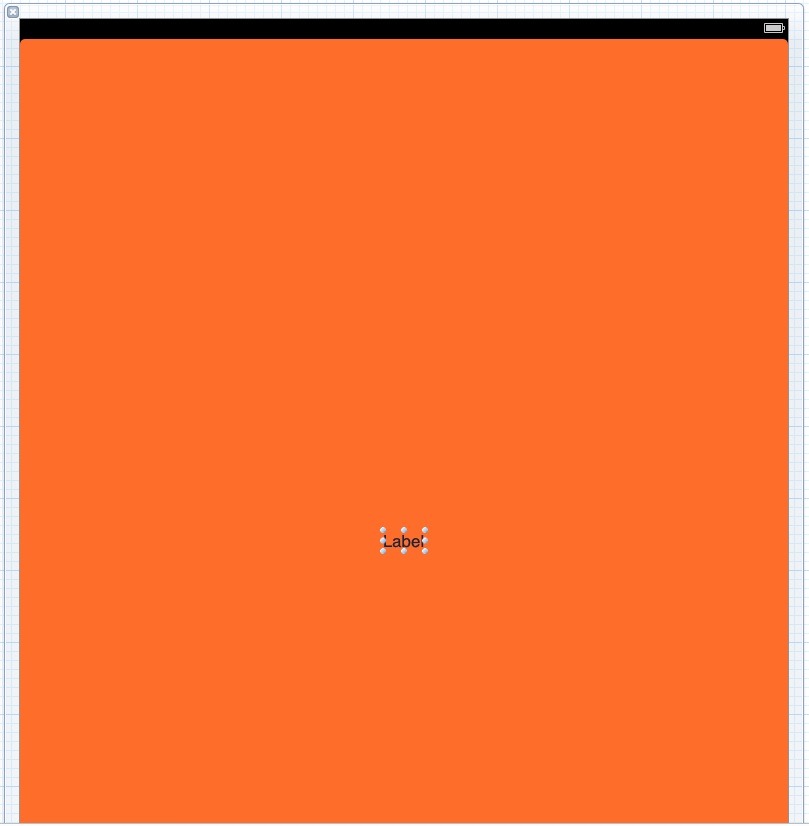
Finally, double click on the text in the label that currently reads “Label” and type in “Hello World”. At this point, your View window will hopefully appear as outlined in the following figure (allowing, of course, for differences in your color and font choices):
Building and Running an iPad App in Xcode 4
Before an app can be run it must first be compiled. Once successfully compiled it may be run either within a simulator or on a physical iPad device. The process for testing an app on a physical device requires some additional steps to be performed involving developer certificates and provisioning profiles and will be covered in detail in Testing iOS 4 Apps on the iPad – Developer Certificates and Provisioning Profiles. For the purposes of this chapter, however, it is sufficient to run the app in the simulator.
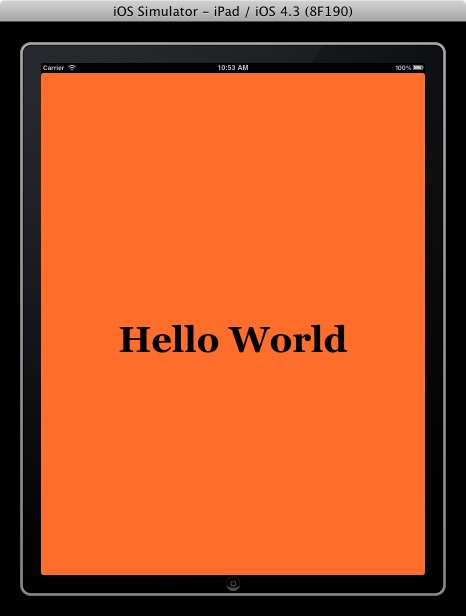
Within the main Xcode 4 project window make sure that the menu located in the top left hand corner of the window (to the right of the Stop button) has the iPad Simulator option selected and then click on the Play toolbar button to compile the code and run the app in the simulator. The small iTunes style window in the center of the Xcode toolbar will report the progress of the build process together with any problems or errors that cause the build process to fail. Once the app is built, the simulator will start and the HelloWorld app will run:
Dealing with Build Errors
As we have not actually written or modified any code in this chapter it is unlikely that any errors will be detected during the build and run process. In the unlikely event that something did get inadvertently changed thereby causing the build to fail it is worth taking a few minutes to talk about build errors within the context of the Xcode environment.
If for any reason a build fails, the status window in the Xcode 4 toolbar will report that an error has been detected by displaying “Build” together with the number of errors detected and any warnings. In addition, the left hand panel of the Xcode window will update with a list of the errors. Selecting an error from this list will take you to the location in the code where corrective action needs to be taken.
Learn SwiftUI and take your iOS Development to the Next Level |
| Previous | Table of Contents | Next |
| Installing Xcode 4 and the iOS 4 SDK (iPad) | Testing iOS 4 Apps on the iPad – Developer Certificates and Provisioning Profiles (Xcode 4) |


