An Overview of the Amazon In-App Purchasing API
| Previous | Table of Contents | Next |
| Marking Android Map Locations using Amazon Map Overlays | A Simple Amazon In-App Purchasing Example Application |
<google>BUY_KINDLE_FIRE</google>
Gone are the days when a developer made money solely by charging the user an upfront fee to purchase an application. These days, most of the revenue generated by commercial applications comes through selling additional features from within the installed and running application. This might, for example, take the form of an ongoing subscription to a periodical magazine or newspaper based application, or the one time purchase of so called “virtual goods” (such as a tractor in a farming simulation), or access to a more advanced level in a game. The concept of spending money within an application is referred to as “In-App Purchasing” or IAP. In the world of Kindle Fire Android application development, this service is provided by the Amazon In-App Purchasing API.
Understanding the Different Types of In-App Purchase
The way in which the In-App Purchasing API is used depends to some extent on the type of purchase that is being implemented. In-App purchases fall into one of three different categories:
- Consumable Content – This type of purchase refers to content that may expire or be used up within the application such that it needs to be purchased multiple times by the user. Consumable purchases are only available on the device on which the purchase was made.
- Entitled Content – Entitled content refers to purchases that only need to be made once by the user (for example for accessing a higher level in a game). Entitled purchases are accessible on every device on which the corresponding user is registered.
- Subscription Content – Subscription content is similar to entitled content in that the purchase is initiated only once and is available on all of the user’s registered devices. Subscription purchases, however, are configured to auto-renew at periodical intervals.
Local and Remote Content
All of the previously described content types can be classified as either local or remote. The term local content refers to the type of content that is already contained within the application but simply needs to be unlocked once the purchase has been initiated.
Remote content, on the other hand, is content which needs to be downloaded or accessed from a remote server (such as the latest issue of a digital magazine or access to a streaming pay-per-view video event).
In terms of remote content, it is the responsibility of the application developer to provide a remote hosting environment to deliver the content once the purchase has been made within the application.
The Architecture of the Amazon In-App Purchasing API
In order to implement in-app purchasing, it is important first to have a basic understanding of the four elements that make up the Amazon In-App Purchasing system, the architecture of which consists of a number of key elements:
The Purchasing Observer
The process of making a purchase within an Android application is asynchronous. In other words, after the application has initiated a purchase, the API works independently of the application to complete the transaction. Once the purchase is completed, the application receives notification of the success or otherwise of the transaction. In order to receive this notification, the application must create an observer class and register it with the Purchasing Manager. The observer class must be implemented by subclassing the Amazon BasePurchasingObserver class and, in doing so, override a number of callback methods. At a minimum, the observer class must implement the following mandatory methods:
- onItemDataResponse() – This method is called and passed an ItemDataResponse object in response to a call on the initiateItemDataRequest() method of the Purchasing Manager instance. This data can be used to extract information about the availability and description of an item in order to present information about available items to the user.
- onPurchaseResponse() – Called when the Amazon in-app purchase system has completed processing a purchase that was initiated via a call to the initiatePurchaseRequest() method of the Purchasing Manager instance. The method is passed a PurchaseResponse object from which the application can identify whether the purchase was successful or not.
In addition to the above mandatory callback methods, the following methods may also be optionally implemented subject to the requirements of the application:
- onGetUserIdResponse() – This method is called in response to a call to the initiateGetUserIdRequest() method of the Purchasing Manager instance and is passed the results in the form of a GetUserIdResponse object.
- onPurchaseUpdatesResponse() – Called in response to a call to the initiatePurchaseUpdatesRequest() method of the Purchasing Manager, this method is passed a PurchaseUpdateResponse object containing information about the current user’s previously purchased items.
- onSdkAvailable() – This method is called after the Purchasing Observer instance has been registered with the Purchasing Manager. As will be described later, the purchasing API can be used in either production or test modes. This method is passed as an argument a Boolean value indicating the mode in which the application is running (true for test mode and false for production).
It is important to be aware of the fact that the code in the above methods is executed within the same thread as the application user interface. That being the case, any time consuming tasks (such as downloading a large content file) should be performed within a different thread to avoid locking up the user interface, a topic that was covered in some detail in the chapter entitled A Basic Overview of Android Threads and Thread Handlers.
Once an observer class has been implemented it must be registered with the Purchasing Manager instance via a call to the manager’s registerObserver() method. It is recommended that this call be made within the onStart() method of the main activity of the application:
public void onStart() {
     super.onStart();
     BuyerObserver buyerObserver = new BuyerObserver(this);
     PurchasingManager.registerObserver(buyerObserver);
}
The Purchasing Manager
The Purchasing Manager is the class through which the application will initiate in-app purchase tasks. The application will create an instance of this class, register an observer with it and then make method calls on the instance to perform tasks such as obtaining information about previous purchases, identifying the application ID of the current user and initiating a purchase. Once a Purchasing Manager method has been called, the class will work independently of the application and call a corresponding method of the registered Purchasing Observer object to report results. Key methods available on the PurchasingManager class are as follows:
- registerObserver() – Registers the designated object as the purchasing observer. All future method calls will result in calls to the corresponding callback methods of the observer as outlined previously in this chapter. Once completed, this method triggers a call to the onSdkAvailable() method of the registered observer.
- initiateGetUserIdRequest() – Requests the application specific ID of the user currently logged into the Kindle Fire device. It is useful to call this method in the onResume() method of the activity to ensure that the current user did not change while the application was suspended. Once completed, this method triggers a call to the onGetUserIdResponse() method of the registered observer.
- initiateItemDataRequest() – Returns data about the specified list of products referenced by SKU codes. Once completed, this method triggers a call to the onItemDataResponse() method of the registered observer.
- initiatePurchaseUpdatesRequest() – Requests the status of all previous purchases made by the user. This method is of particular importance when an application needs to synchronize entitled content across multiple devices. Once completed, this method triggers a call to the onPurchaseUpdatesResponse() method of the registered observer.
- initiatePurchaseRequest() – Initiates the purchase of the item specified by the referenced SKU code. Once completed, this method triggers a call to the onPurchaseResponse() method of the registered observer.
The Amazon Client
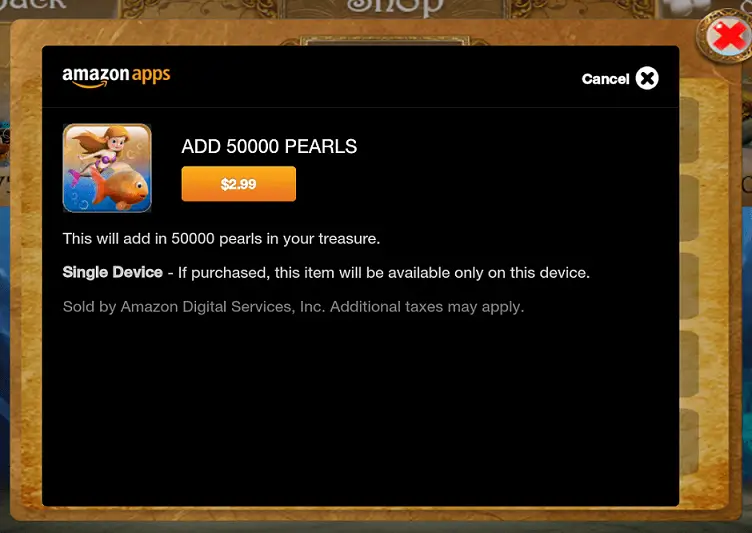
The Amazon Client is a service on the device that is activated when an application initiates a purchase using the Amazon In-App API. This client is responsible for all interaction with the user during the purchasing process, including presenting a user interface through which the purchase will be performed. Figure 43-1, for example, illustrates the user interface of the client during the purchase of virtual treasure within a game:
Figure 43-1
The client operates entirely independently of the application and handles all aspects of the process, including presenting errors to the user in the event that the purchase cannot be completed (for example due to an expired or invalid credit card number). Once the purchase is complete, the application will be notified via the registered observer and must, assuming a successful outcome, act accordingly to provide access to the purchased content or feature. Since the user will have already been notified by the client of an unsuccessful purchase, it is not necessary for the application itself to report this to the user.
The SDK Tester
It goes without saying that it would quickly become expensive if you had to make real purchases each time you wanted to test the in-app purchasing features of an application. In fact, only applications that have been approved by Amazon and published through the Amazon Mobile App Distribution portal are able to make real in-app purchases. Applications that have not yet been published can, instead, be used with the SDK Tester tool. This application can be installed on either a physical Kindle Fire device or an emulator and used to simulate the in-app purchasing process. If an application that has not yet been published attempts to make an in-app purchase, the system will divert the requests to the SDK Tester tool instead of to the Amazon Client.
When the SDK Tester tool is installed, a JSON data file containing information about the products available for purchase must also be uploaded to the SD Card storage of the device. The tester tool also has a range of configuration options that can be used to simulate a variety of purchasing conditions such as an invalid product SKU or an attempt to purchase entitled content that has already been purchased. Use of the SDK Tester and the format of the JSON data file will be covered in more detail in the next chapter (A Simple Amazon In-App Purchasing Example Application).
Defining In-App Purchase Items
In-app purchasing does not make much sense without some items to purchase. These items (referred to as in-app items) are configured within the Amazon Mobile App Distribution portal and are specific to your developer account. When defining an in-app item, it is possible to configure the following properties, some of which are mandatory:
- Title – The title of the item (up to 128 characters)
- SKU – The SKU (derived from the Stock Keeping Unit codes used for inventory control of physical products) uniquely identifies the item. SKU codes are specific to your developer account and must be unique within that context. The actual codes are case sensitive strings of up to 150 characters and can comprise letters (a-z and A-Z), numbers (0-9) and dashes, dots and underscores.
- Price – The price to be charged for the item in US Dollars. The item can be free, or priced in the range of $0.99 to $99.99.
- Description – A description for the item (up to 1200 characters).
- Availability Start Date – An optional GMT based date at which the item is to be made available for purchase.
- 114 x 114 icon – A 32-bit PNG image for the item with a transparent background.
- 512 x 512 Icon– A 32-bit PNG image for the item with a transparent background.
- Screenshots – Up to 10 screenshots to promote the item. Accepted sizes are 800x480, 1024x600, 1280x720, 1280x800 or 1920x1200 in portrait or landscape format.
- Purchase Screenshot – A screenshot of the screen exactly as it will appear after the purchase has completed. Accepted sizes are 800x480, 1024x600, 1280x720, 1280x800 or 1920x1200 in portrait or landscape format.
- Content Delivery Selection – Indicates whether the purchase simply requires the unlocking of built in content, or that content be downloaded from a server.
When creating a subscription item, properties are also available to specify the subscription period (weekly, biweekly, monthly, annually etc) and to set up a free trial period for a specified amount of time.
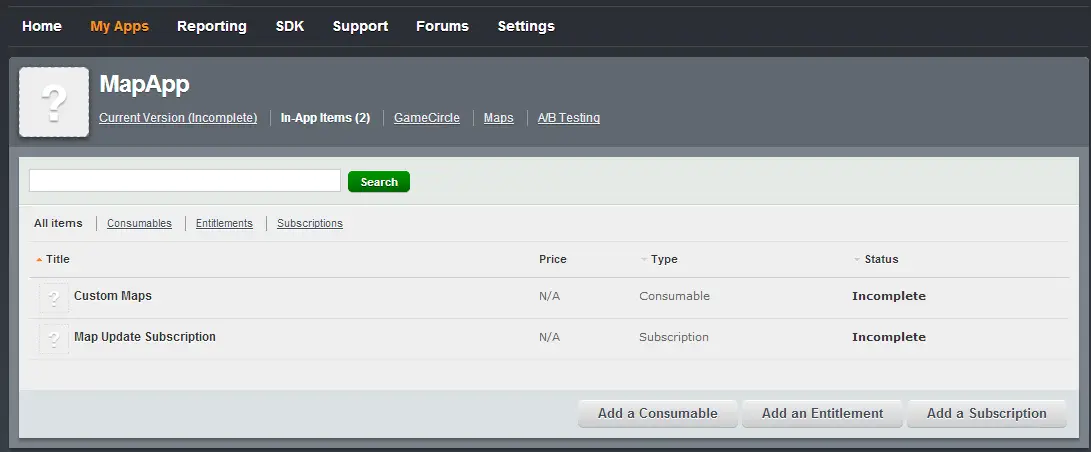
New in-app items are created by logging into the Amazon Mobile App Distribution portal (https://developer.amazon.com/welcome.html) and selecting the My Apps link at the top of the page. Within the list of registered apps, click on the desired app and in the resulting screen select the In-App Items link. On the In-App Items screen (Figure 43-2), click on either the Add a Consumable, Add an Entitlement or Add a Subscription button to add the required item type:
Figure 43-2
The exact screen that subsequently appears will depend on the type of item being added. Once the screen appears, simply work through the different settings until the configuration is complete. Once added, the new item will appear in the list of in-app items for the currently selected app.
Preparing a Project to use the In-App Purchasing API
As with the Amazon Maps API, the In-App Purchasing API is part of the Amazon Mobile SDK. If you have already downloaded this SDK following the instructions in the chapter entitled Working with the Amazon Maps API on the Kindle Fire then there is no need to download it a second time. If, on the other hand, the SDK has not yet been installed on your system, it can be downloaded using the following link:
https://developer.amazon.com/sdk/download/sdk.html
Once downloaded, unzip the archive into a suitable location.
The In-App Purchasing JAR file will need to be added to the build path of any application that requires in-app purchasing functionality. Locate the project for which support is required within the Eclipse Package Explorer panel, right-click on the project name and select the Properties option from the resulting menu. Within the Properties dialog, select the Java Build Path category from the left hand panel and within the Java Build Path panel click on the Add External JARS… button. In the JAR selection dialog, navigate to the following location (where <sdk path> is replaced by the location on your file system where the Amazon Mobile SDK was installed in the previous step):
<sdk path>/InAppPurchasing/lib
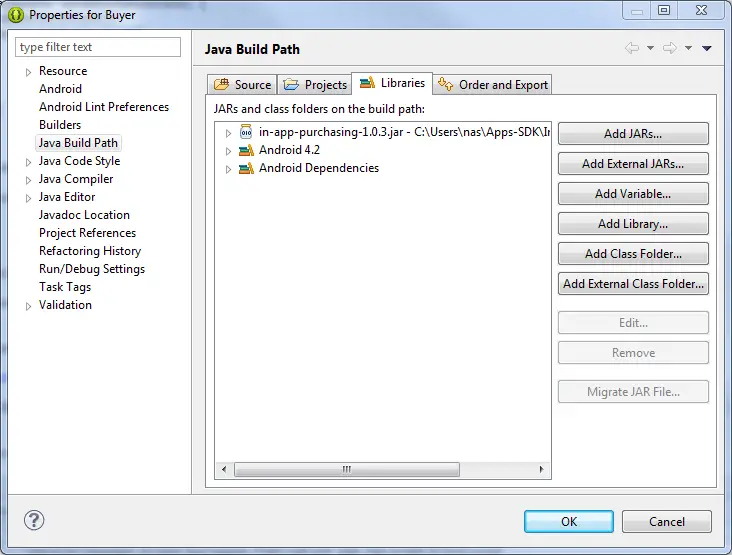
From within the libs directory, select the in-app-purchasing jar file. At time of writing, this file is named in-app-purchasing-1.0.3.jar but may have been superseded since then by a newer version. Once selected, click on the Open button to add the JAR file to the project. Once added, it should be listed in the Java Build Path panel as illustrated in Figure 43-3:
Figure 43-3
Assuming the JAR file is now listed, click on OK to close the Properties dialog.
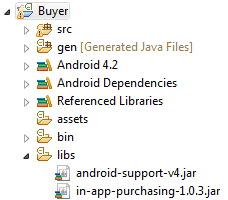
Finally, the jar file needs to be added to the libs folder of the project. Within a file browser window, locate the jar file and drag and drop it onto the libs folder of the project in the Package Explorer panel so that it is listed as illustrated in Figure 43 -4. When prompted whether to copy or link the library, select the copy option:
Figure 43-4
Modifying the Manifest File
As the purchase process is progressing, the Amazon Client will notify the application’s purchasing observer using broadcast intents. In order for the application to receive these intent notifications, it is necessary to add a receiver entry to the application’s manifest file. This is achieved by adding the following lines:
<receiver android:name="com.amazon.inapp.purchasing.ResponseReceiver">
 <intent-filter>
  <action android:name="com.amazon.inapp.purchasing.NOTIFY"
   android:permission="com.amazon.inapp.purchasing.Permission.NOTIFY" />
 </intent-filter>
</receiver>
This entry must be placed within the <application> element of the file.
Summary
The Amazon In-App Purchasing API allows additional content or features to be purchased by the user from within a running application. These purchases can be consumable, entitled or subscription based and may be built into an application and unlocked after the purchase, or downloaded from a remote fulfillment server. This chapter has provided an overview of in-app purchasing, including an overview of the main elements that combine to provide in-app purchase support. Finally, the chapter walked through the initial steps necessary to prepare an application project to use the API. The next chapter will work step-by-step through the creation of a basic example project designed to implement the purchase of a consumable item.
<google>BUY_KINDLE_FIRE</google>
| Previous | Table of Contents | Next |
| Marking Android Map Locations using Amazon Map Overlays | A Simple Amazon In-App Purchasing Example Application |


