Preparing an iOS 6 App to use iCloud Storage
| Previous | Table of Contents | Next |
| iOS 6 iPhone Directory Handling and File I/O – A Worked Example | Managing Files using the iOS 6 UIDocument Class |
Learn SwiftUI and take your iOS Development to the Next Level |
In 2007 Catawba County in western North Carolina used tax incentives to persuade Apple, Inc. to build a data center in the town of Maiden (current population 3269) where Apple subsequently spent $1 billion building a 500,000 sq. foot data center. During construction of the center much speculation circulated in the media as to the purpose of the building. At Apple’s 2011 World Wide Developer Conference in San Francisco all speculation was laid to rest when the iCloud service was announced to the public.
This chapter is intended to provide an overview of iCloud and to walk through steps involved in preparing an iOS 6 iPhone application to utilize the services of iCloud.
What is iCloud?
From the perspective of the average iPhone or iPad owner, iCloud represents a vast remote storage service onto which device based data may be backed up and music stored for subsequent streaming to multiple iCloud supported platforms and devices. By default each registered user account gets 5GB of storage space for free and the option to purchase more as needed (stored music does not count towards the storage count).
From the perspective of the iOS application developer, on the other hand, iCloud represents a set of programming interfaces and SDK classes that facilitate the storage of files and data on iCloud servers hosted at Apple’s data centers (of which the Maiden, NC facility is now just one of many) from within an iPhone or iPad application.
iCloud Data Storage Services
The current version of the iOS SDK provides support for two types of iCloud based storage, namely iCloud Document Storage and iCloud Key-Value Data Storage. iCloud document storage allows data files and documents on the user’s device to be stored on iCloud. Once stored, these files may be subsequently retrieved from iCloud storage via any supported device or platform using the owner’s iCloud account details.
The iCloud key-value storage service allows small amounts of data packaged in key/value format to be stored in the cloud. This service is intended to provide a way for the same application to synchronize user settings and status when installed on multiple devices. A user might, for example, have the same game application installed on both an iPhone and an iPad. The game application would use iCloud key-value storage to synchronize the player’s current position in the game and the prevailing score, thereby allowing the user to switch between devices and resume the game from the same state.
Preparing an Application to Use iCloud Storage
Implementing iCloud based storage within an iOS 6 application is not simply a case of making appropriate calls to the SDK iCloud APIs. In order to access iCloud services the application must be associated with an application ID and a corresponding provisioning profile configured to enable iCloud access. In addition, the application itself must also be configured with specific entitlements to enable one or both of the two iCloud storage methods outlined in the preceding section of this chapter.
Finally, it is also important to note that it is not possible to test iCloud functionality in the iOS Simulator. The application must, therefore, be installed on a physical iOS device.
Clearly, iPhone developers who are not yet members of the iOS Developer Program will need to enroll before implementing any iCloud functionality. Details on enrolling in this program are outlined in the Joining the Apple iOS Developer Program chapter of this book.
The remainder of this chapter will cover the steps necessary to create an iCloud enabled provisioning profile and to configure the necessary entitlements for both document and key/value based storage.
Creating an iOS 6 iCloud enabled App ID
In order to create an iCloud enabled App ID the first step is to log into the iOS Developer Program Member Center. Once logged in, select the link to the iOS Provisioning Portal and click on the App IDs link. Create a new App ID by clicking on the New App ID button.
In the resulting screen, name the App ID, leave the Bundle Seed menu set to Generate New and provide a bundle identifier formatted as follows:
com.yourdomain.yourappname
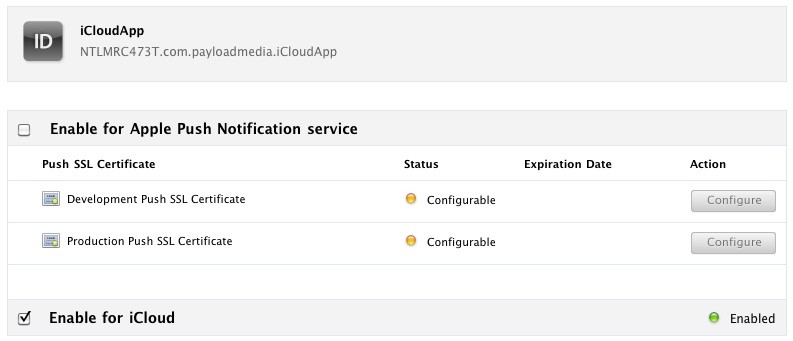
In the above example com.yourdomain will need to be replaced by the reverse URL of your domain name. Click on Submit and note that the new app ID is now listed on the main App ID screen:
Figure 34-1
Note from the iCloud row of the table that this functionality is currently enabled. This is the default setting. In the event that iCloud support was not enabled by default, or to disable the option, click on the Configure link to display the Configure App ID screen. Select the check box next to Enable for iCloud and click Done to commit the configuration change:
Figure 34-2
Creating and Installing an iCloud Enabled Provisioning Profile
If the new profile is listed as Pending in the main Provisioning screen, simply use the browser reload button to refresh the page. Once the profile is listed as active, click on the Download button to save the .mobileprovision file to your local system. Once downloaded, drag and drop the file onto the Xcode icon in the desktop dock to install it into the provisioning profiles library. At this point the Xcode Organizer window should appear. Connect your iPhone to the system so that it is listed under DEVICES in the left hand panel of the Organizer window. Select Provisioning Profiles from beneath the LIBRARY heading and drag and drop the new profile onto the Provisioning Profiles entry located beneath the iPhone device under the DEVICES heading.
Once completed, the provisioning profile is installed and ready to be used when developing an application.
Creating an iCloud Entitlements File
Any applications that intend to use iCloud storage in any way must obtain entitlements appropriate to the iCloud features to be used. These entitlements are placed into an entitlements file that is included in the Xcode project and built into the application at compile time.
If the application is intended to make use of iCloud document storage then the entitlements file must include a request for the com.apple.developer.ubiquity-container-identifiers entitlement. Similarly, if the key-value store is to be used then the com.apple.developer.ubiquity-kvstore-identifier entitlement must be included. Applications that require both forms of iCloud storage must include both entitlements. The entitlements file is an XML file in which the requests are stored in a key-value format. The keys are the entitlement identifiers outlined above and the values are represented by one or more container identifiers comprised of the developer’s ID and a custom string that uniquely identifies the application (the corresponding application’s App ID is generally recommended, though not mandatory, for this value). The entitlements file may be created either manually or automatically from within the Xcode environment.
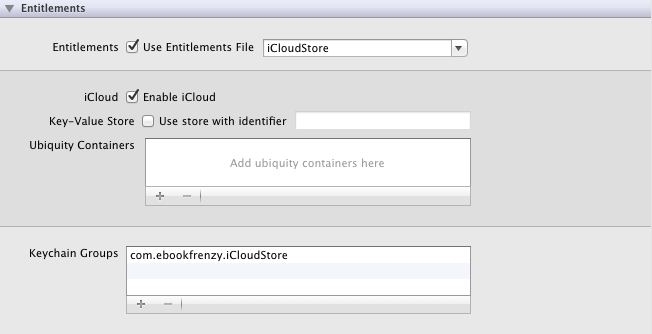
To create the entitlements from within Xcode, select the application target from the top of the project navigator and scroll down the resulting Summary panel until the Entitlements section comes into view. To enable iCloud access set the Entitlements and Use iCloud checkboxes as illustrated in Figure 34-3:
Figure 34-3
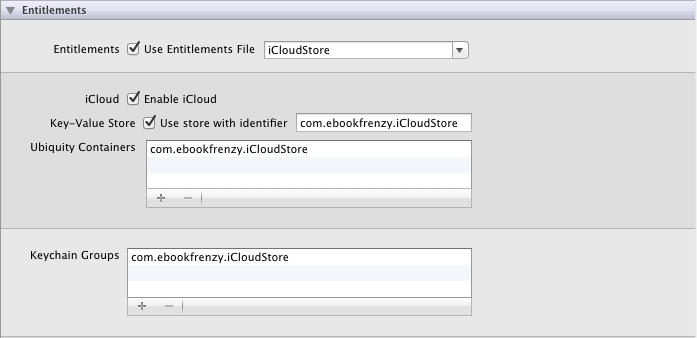
Once enabled, the entitlements file will appear in the project navigator panel. Note that by default, Xcode only enables iCloud container storage. If key-value storage is also required make sure that the iCloud Key-Value Store option is also selected. Having enabled container storage, the next task is to add an iCloud container into which files can be stored. To do so, simply click on the ‘+’ button located beneath the iCloud Containers list box. The following figure illustrates both container and key-value entitlements enabled together with a single iCloud container:
Figure 34-4
Manually Creating the Entitlements File
As an alternative to using the Xcode entitlements interface it is also possible to manually create the entitlements file. An example entitlements file containing entitlements to both document and key-value storage with a single iCloud container would read as follows:
<?xml version="1.0" encoding="UTF-8"?>
<!DOCTYPE plist PUBLIC "-//Apple//DTD PLIST 1.0//EN" "http://www.apple.com/DTDs/PropertyList-1.0.dtd">
<plist version="1.0">
<dict>
        <key>com.apple.developer.ubiquity-container-identifiers</key>
        <array>
                <string>$(TeamIdentifierPrefix).com.yourdomain.icloudapp</string>
        </array>
        <key>com.apple.developer.ubiquity-kvstore-identifier</key>
        <string>$(TeamIdentifierPrefix).com.yourdomain.icloudapp</string>
</dict>
</plist>
Create this file using a text editor and save it as <appname>.entitlements (where <appname> is the name of your application), modifying the App ID accordingly for each entitlement request. Once saved, the file may be included into the corresponding Xcode project by opening the project and using the File -> Add File menu option or by dragging the file from a Finder window and dropping it onto the Xcode project navigator panel. The contents of the file may be viewed and modified from within Xcode at any time by selecting it in the Xcode project navigator panel so that it appears in the editing panel as illustrated in Figure 34-5:
Figure 34-5
To modify a value simply double click on the corresponding field to enter edit mode.
Accessing Multiple Ubiquity Containers
The ubiquity-container-identifiers value is an array that may reference multiple iCloud containers. If an application requires access to more than one ubiquity container it will need to specifically reference the identifier of the required container. This is achieved by specifying the container identifier when constructing URL paths to documents within the iCloud storage. For example, the following code fragment defines a container identifier constant and then uses it to obtain the URL of the container in storage:
#define UBIQUITY_CONTAINER_URL @"ABCDEF12345.com.yourdomain.icloudapp”

ubiquityURL = [[filemgr
     URLForUbiquityContainerIdentifier:UBIQUITY_CONTAINER_URL]
     URLByAppendingPathComponent:@"Documents"];
If nil is passed through as an argument in place of the container identifier the method will simply return the URL of the first container in the ubiquity-container-identifiers array of the entitlements file:
ubiquityURL = [[filemgr
     URLForUbiquityContainerIdentifier:nil]
     URLByAppendingPathComponent:@"Documents"];
Ubiquity Container URLs
When documents are saved to the cloud they will be placed in sub folders of a folder on iCloud using the following path:
/private/var/mobile/Library/Mobile Documents/<ubiquity container id>/
Summary
iCloud brings cloud based storage and application data synchronization to iOS 6 based applications. Before an application can take advantage of iCloud it must first be provisioned with an iCloud enabled profile and built against an appropriately configured entitlements file.
Learn SwiftUI and take your iOS Development to the Next Level |
| Previous | Table of Contents | Next |
| iOS 6 iPhone Directory Handling and File I/O – A Worked Example | Managing Files using the iOS 6 UIDocument Class |


