A watchOS 2 WatchKit Inline Notification Text Reply Tutorial
| Previous | Table of Contents | |
| A watchOS 2 WatchKit Custom Notification Tutorial |
<google>BUY_WATCHOS2</google>
As outlined in the chapter entitled An Overview of Notifications in watchOS 2, notifications are now able to accept text input from the user and pass that input along to the corresponding WatchKit app. In this chapter, the example created in A watchOS 2 WatchKit Custom Notification Tutorial will be extended to include the option for the user to input text via the custom notification panel.
Adding the Inline Reply Action
Begin by launching Xcode and opening the CustomNotifyApp project. Once loaded, locate and edit the AppDelegate.swift file and modify the didFinishLaunchingWithOptions method so that it reads as follows:
func application(application: UIApplication, didFinishLaunchingWithOptions launchOptions: [NSObject: AnyObject]?) -> Bool {

    let replyAction: UIMutableUserNotificationAction =
        UIMutableUserNotificationAction()
    replyAction.identifier = "REPLY_IDENTIFIER"
    replyAction.title = "Reply"
    replyAction.destructive = false
    replyAction.authenticationRequired = false
    replyAction.behavior = .TextInput

    let notificationCategory:UIMutableUserNotificationCategory =
        UIMutableUserNotificationCategory()

    notificationCategory.identifier = "WEATHER_CATEGORY"

    notificationCategory.setActions([replyAction],
        forContext: UIUserNotificationActionContext.Default)

    let settings = UIUserNotificationSettings(forTypes:
        [UIUserNotificationType.Sound,
         UIUserNotificationType.Alert,
         UIUserNotificationType.Badge],
         categories: [notificationCategory])

    application.registerUserNotificationSettings(settings)

    return true
}
The code in this method now creates a user notification action configured to display “Reply” with the behavior set to request text input and then uses this configuration when registering the notification.
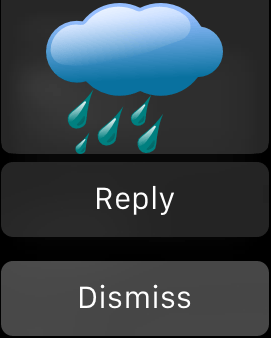
Compile and run the CustomNotifyApp WatchKit App and, once the updated WatchKit app has installed on the Apple Watch or Simulator, launch the companion iOS app and tap on either the Snow or Rain button. Immediately lock the screen on the iPhone and make sure that the Apple Watch screen is active. After the delay has elapsed the notification should appear on the display as shown in Figure 35 1. Note that in addition to the Dismiss button, the Reply action button now also appears within the notification:
Figure 35-1
Configuring Text Input Suggestions
In order to obtain a list of input suggestions, a call will be made by the WatchKit framework to the suggestionsForResponseToActionWithIdentifier method of the notification controller class. This method is passed the notification category identifier and the notification object and expects in return an array of String objects containing the suggested text to be displayed in the text input screen. Locate the NotificationController.swift file in the Project Navigator panel and add the suggestionsForResponseToActionWithIdentifier method so that it reads as follows:
override func suggestionsForResponseToActionWithIdentifier(identifier: String, forLocalNotification localNotification: UILocalNotification, inputLanguage: String) -> [String] {

    let suggestions = ["Bring an Umbrella", "Pack Snow Gear"]
    return suggestions
}
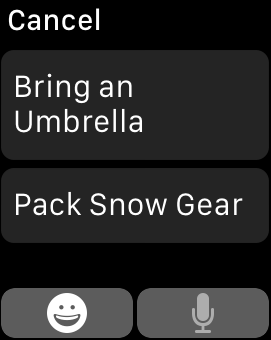
Repeat the previous steps to install the WatchKit app and trigger the notification from the iOS app. When the notification appears on the Apple Watch or Simulator, tap the Reply button and note that the suggested input options are listed and available for selection:
Figure 35-2
Handling the Text Input Action
The final task in implementing text input with a notification is to handle the input once it has been submitted by the user. When text has been input for a local notification, the handleActionWithIdentifier:forLocalNotification:withResponseInfo: method of the extension delegate will be called and passed the notification category identifier, the notification object and the user response info dictionary. Contained within the dictionary is a key-value pair where the key is set to UIUserNotificationActionResponseTypedTextKey and the value is the text that was provided by the user. Select the ExtensionDelegate.swift file and implement this method now so that it reads as follows:
func handleActionWithIdentifier(identifier: String?, forLocalNotification localNotification: UILocalNotification, withResponseInfo responseInfo: [NSObject : AnyObject]) {

        print(responseInfo[UIUserNotificationActionResponseTypedTextKey])
}
For the purposes of testing, this method simply prints the entered text to the Xcode console.
Testing the App
Compile and run the app once again and trigger the notification so that it is displayed on the Apple Watch or Watch Simulator. Tap the Reply button and use either the dictation or suggested input values to input text.
Summary
This chapter has added support for notification inline text replies to the custom notification app created in the preceding chapter. This involved the addition of a user notification action configured for text input, the declaration of suggested input strings and the implementation of a handler within the Watch app extension delegate class.
<google>BUY_WATCHOS2</google>
| Previous | Table of Contents | |
| A watchOS 2 WatchKit Custom Notification Tutorial |


