A watchOS 2 App Custom Font Tutorial
| Previous | Table of Contents | Next |
| Working with Fonts and Attributed Strings in watchOS 2 | An Introduction to the watchOS 2 WatchKit WKInterfacePicker Object |
<google>BUY_WATCHOS2</google>
WatchKit provides a set of built-in “system” fonts available for use when displaying text within a WatchKit app. In addition to these system fonts it is also possible to install and use custom fonts within a WatchKit app user interface. This chapter will present the steps involved in installing and using a custom font within a WatchKit app project.
Using Custom Fonts in WatchKit
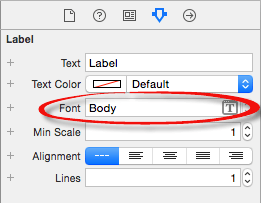
The system fonts supported by WatchKit can be selected at design time from the Font menu (Figure 21 1) which can be found in the Attributes Inspector when an interface object containing text is selected in a storyboard scene.
Figure 21-1
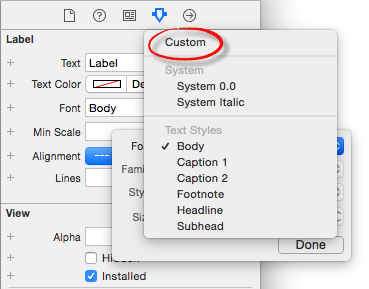
When custom fonts are bundled with the project they can be applied to interface objects by clicking on the “T” icon in the Font field and, in the resulting panel, clicking on the current Font setting and selecting the Custom option (Figure 21-2) from the resulting menu. If the Custom option is not selectable then custom fonts have yet to be added to the project:
Figure 21-2
Custom fonts may also be applied to text at runtime from within the interface controller class of a scene through the use of attributed strings. Custom fonts cannot, however, be used within Notification and Glance scenes.
The remainder of this chapter will work through a tutorial that demonstrates how custom fonts can be added to a WatchKit app project and used both from within Interface Builder and within the code of an interface controller class.
Downloading a Custom Font
Fonts are supplied in font files and can be obtained from a variety of sources at a range of prices and quite often free of charge. WatchKit and iOS currently support TrueType (.ttf) and OpenType (.otf) formats. For the purposes of this example the Sofia font bundled with the sample code archive will be used as the custom font. If you have not already downloaded the sample code for the book it can be obtained from the following URL:
http://www.ebookfrenzy.com/code/watchOS2BookSamples.zip
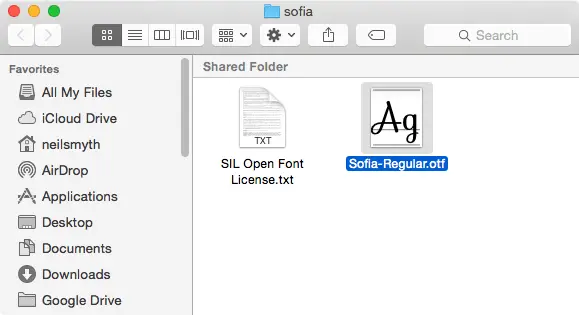
Once the package has been downloaded and unpacked, navigate in a Finder window to the custom_font folder which contains the Sofia-Regular.otf file as outlined in Figure 21 3:
Figure 21-3
This font file will be added to the WatchKit app project later in this chapter so keep the Finder window open.
Creating the Custom Font Project
Start Xcode and create a new iOS project. On the template screen choose the Application option located under watchOS in the left hand panel and select iOS App with WatchKit App. Click Next, set the product name to CustomFont, enter your organization identifier and make sure that the Devices menu is set to Universal. Before clicking Next, change the Language menu to Swift and switch off all of the Include options. On the final screen, choose a location in which to store the project files and click on Create to proceed to the main Xcode project window.
Designing the WatchKit App Scene
Within the Project Navigator panel, locate and select the Interface.storyboard file located under the CustomFont WatchKit App folder so that it loads into the Interface Builder environment. From the Object Library panel, drag and drop a Group interface object onto the scene canvas. With the Group object selected in the scene, display the Attributes Inspector and change the Layout property to Vertical. In the Alignment section of the attributes panel change both the Horizontal and Vertical menus to Center.
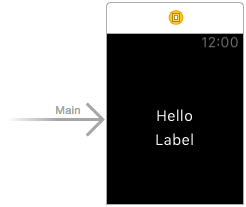
Drag and drop two Label objects from the Object Library panel onto the Group object in the scene layout. Double-click on the upper label and change the text so it reads “Hello”. Shift-click on each Label object so that both are selected and, within the Attributes Inspector panel, change the Horizontal Alignment property to Center. On completion of these steps, verify that the scene matches the layout shown in Figure 21 4:
Figure 21-4
The last task to perform within Interface Builder is to establish an outlet connection on the second Label object. Display the Assistant Editor panel, verify that it is displaying the content of the InterfaceController.swift file and Ctrl-click and drag from the lower Label to a position immediately beneath the class declaration line in the editor panel. On releasing the line use the connection dialog to establish an outlet named labelObject.
Adding the Custom Font to the Project
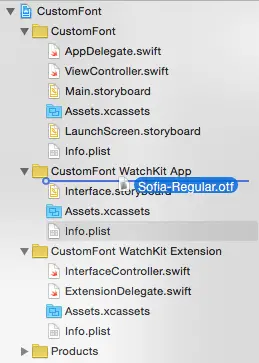
There are two steps to integrating a custom font into a WatchKit app. The first step is to add the font file to the project. For the purposes of this example, the Sofia-Regular font will be used. Locate this font in the Finder window and drag and drop it beneath the CustomFont WatchKit App entry in the Xcode project navigator.
Figure 21-5
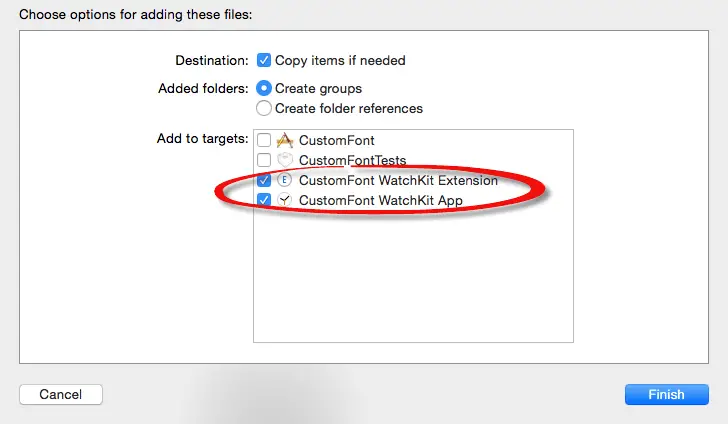
Since the font will need to be accessible to both the WatchKit App and the extension, make sure that both targets are selected in the options panel (Figure 21 6) before clicking on the Finish button:
Figure 21-6
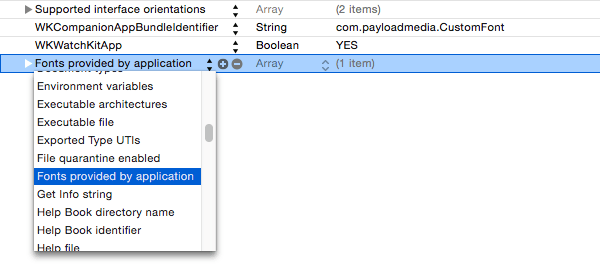
In addition to adding the font file to the project and configuring the targets, an entry for the font needs to be added to the Info.plist files for both the WatchKit app and extension targets. Begin by selecting the Info.plist file located under the CustomFont WatchKit App folder in the Project Navigator panel. Once the file has loaded into the property list editor, select the last row in the list so that it highlights in blue. Click on the + button that appears in the selected row to add a new entry to the list. From the dropdown menu that appears, scroll down to and select the Fonts provided by application option as illustrated in Figure 21-7:
Figure 21-7
Click on the arrow to the left of the newly added row to list the first item in the array of fonts. Double click in the Value column of this row to enter into editing mode, type in the full file name of the custom font file including the .otf filename extension and press the keyboard Enter key:
Figure 21-8
The same entry also needs to be added to the Info.plist file of the extension target. Select the Info.plist file listed under the CustomFont WatchKit Extension folder and repeat the above steps to add an entry for the same font file.
With these steps completed it should now be possible to begin using the custom font within the WatchKit app. <google>BUY_WATCHOS2</google>
Selecting Custom Fonts in Interface Builder
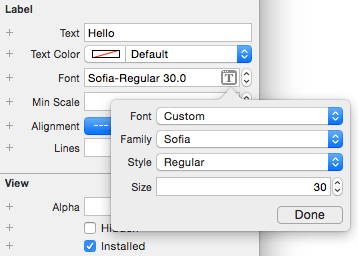
Once a custom font has been integrated into an Xcode project it should be listed as an option from within the Attributes Inspector panel. To verify this, open the Interface.storyboard file, select the upper Label object and display the Attributes Inspector. Click on the “T” icon in the Font field. In the resulting panel, click on the Font entry and select Custom from the popup menu. With the custom font option selected, the Sofia Regular font should be listed as outlined in Figure 21-9:
Figure 21-9
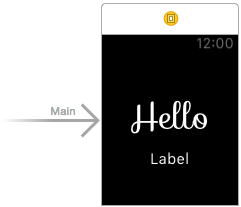
Set the Size property to 35 points and click on the Done button. Refer to the storyboard scene where the “Hello” text should now have been rendered using the custom font selection:
Figure 21-10
Using Custom Fonts in Code
Custom fonts can also be used in conjunction with attributed string objects to display text at run time from within the interface controller class of a storyboard scene. The technique will now be used to display some text on the second label using the same Sofia custom font.
As previously outlined in the chapter entitled Working with Fonts and Attributed Strings in WatchKit, attributed strings are represented using the NSAttributedString and NSMutableAttributedString classes and allow text to be combined with attributes such as fonts and colors. To begin with, a reference to the custom font needs to be obtained. This is achieved using the UIFont class and referencing the font name. Select the InterfaceController.swift file and modify the awakeWithContext method as follows to create a UIFont object using the custom font:
override func awakeWithContext(context: AnyObject?) {
    super.awakeWithContext(context)

    if let customFont = UIFont(name:
		"Sofia-Regular", size: 22) {
    } else {
         print("Font not found")
    }
}
The above code attempts to create a font object using the custom Sofia font with a 22pt size and outputs a message in the event that the font could not be found.
The next task is to create a Dictionary object with a key set to NSFontAttributeName and the custom font object as the value. This dictionary is then used to specify the attributes for an NSAttributedString instance containing text which reads “Apple Watch”. This string is then displayed on the Label object via the previously configured outlet connection:
override func awakeWithContext(context: AnyObject?) {
    super.awakeWithContext(context)

    if let customFont = UIFont(name:
		"Sofia-Regular", size: 22) {
        let fontAttributes = [NSFontAttributeName : customFont]

        let attributedText = NSAttributedString(string: "Apple Watch",
               attributes: fontAttributes)

        labelObject.setAttributedText(attributedText)
    } else {
         print("Font not found")
    }
}
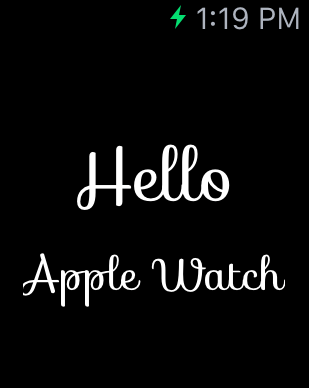
Compile and run the WatchKit app at which point the second label should display the “Apple Watch” text using the custom font at the designated size:
Figure 21-11
Summary
WatchKit includes a set of system fonts which can be used when displaying text within a WatchKit app scene. Additional fonts may be added to a project as custom fonts. This is a process which involves the addition of the font file to the project and the configuration of the Info.plist property files for both the WatchKit app and the extension. Once a custom font has been incorporated into a project it is available both for selection within Interface Builder and as a rendering option from within the code of an interface controller.
When using custom fonts in code, it is necessary to use attributed strings to incorporate the font in the text string being displayed.
<google>BUY_WATCHOS2</google>
| Previous | Table of Contents | Next |
| Working with Fonts and Attributed Strings in watchOS 2 | An Introduction to the watchOS 2 WatchKit WKInterfacePicker Object |
