Working with MapKit Local Search in iOS 8 and Swift
| Previous | Table of Contents | Next |
| Working with Maps on iOS 8 with Swift, MapKit and the MKMapView Class | Using MKDirections to get iOS 8 Map Directions and Routes |
<google>BUY_IOS8</google>
This chapter will explore the use of the iOS MapKit MKLocalSearchRequest class to search for map locations within an iOS 8 application. The example application created in the chapter entitled Working with Maps on iOS 8 with Swift, MapKit and the MKMapView Class will then be extended to demonstrate local search in action.
An Overview of iOS 8 Local Search
Local search is implemented using the MKLocalSearch class. The purpose of this class is to allow users to search for map locations using natural language strings. Once the search has completed, the class returns a list of locations within a specified region that match the search string. A search for “Pizza”, for example, will return a list of locations for any pizza restaurants within a specified area. Search requests are encapsulated in instances of the MKLocalSearchRequest class and results are returned within an MKLocalSearchResponse object which, in turn, contains an MKMapItem object for each matching location (up to a total of 10 matches).
Local searches are performed asynchronously and a completion handler called when the search is complete. It is also important to note that the search is performed remotely on Apple’s servers as opposed to locally on the device. Local search is, therefore, only available when the device has an active internet connection and is able to communicate with the search server.
The following code fragment, for example, searches for pizza locations within the currently displayed region of an MKMapView instance named mapView. Having performed the search, the code iterates through the results and outputs the name and phone number of each matching location to the console:
let request = MKLocalSearchRequest()
request.naturalLanguageQuery = "Pizza"
request.region = mapView.region

let search = MKLocalSearch(request: request)

search.startWithCompletionHandler({(response: MKLocalSearchResponse!,
		error: NSError!) in

    if error != nil {
        println("Error occured in search: \(error.localizedDescription)")
    } else if response.mapItems.count == 0 {
        println("No matches found")
    } else {
        println("Matches found")

        for item in response.mapItems as! [MKMapItems] {
            println("Name = \(item.name)")
            println("Phone = \(item.phoneNumber)")
        }
    }
})
The above code begins by creating an MKLocalSearchRequest request instance initialized with the search string (in this case “Pizza”). The region of the request is then set to the currently displayed region of the map view instance.
let request = MKLocalSearchRequest()
request.naturalLanguageQuery = "Pizza"
request.region = mapView.region
An MKLocalSearch instance is then created and initialized with a reference to the search request instance and the search then initiated via a call to the object’s startWithCompletionHandler method.
search.startWithCompletionHandler({(response: MKLocalSearchResponse!,
		error: NSError!) in
The code in the completion handler checks the response to make sure that matches were found and then accesses the mapItems property of the response which contains an array of mapItem instances for the matching locations. The name and phoneNumber properties of each mapItem instance are then displayed in the console:
if error != nil {
    println("Error occured in search: \(error.localizedDescription)")
} else if response.mapItems.count == 0 {
    println("No matches found")
} else {
    println("Matches found")

    for item in response.mapItems as! [MKMapItems] {
        println("Name = \(item.name)")
        println("Phone = \(item.phoneNumber)")
    }
  }
})
Adding Local Search to the MapSample Application
In the remainder of this chapter, the MapSample application will be extended so that the user can perform a local search. The first step in this process involves adding a text field to the first storyboard scene. Begin by launching Xcode and opening the MapSample project created in the previous chapter.
Adding the Local Search Text Field
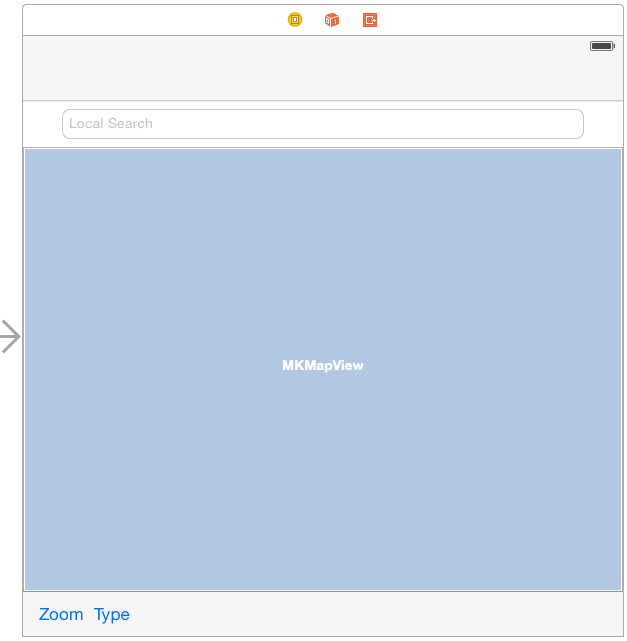
With the project loaded into Xcode, select the Main.storyboard file and modify the user interface to add a Text Field object to the user interface layout (reducing the height of the map view object accordingly to make room for the new field). With the new Text Field selected, display the Attributes Inspector and enter Local Search into the Placeholder property field. When completed, the layout should resemble that of Figure 77 1:
Figure 77-1
<google>BUY_IOS8</google> Select the Map Sample view controller by clicking on the toolbar at the top of the scene so that the scene is highlighted in blue. Select the Resolve Auto Layout Issues menu from the toolbar in the lower right hand corner of the storyboard canvas and select the Clear Constraints menu option.
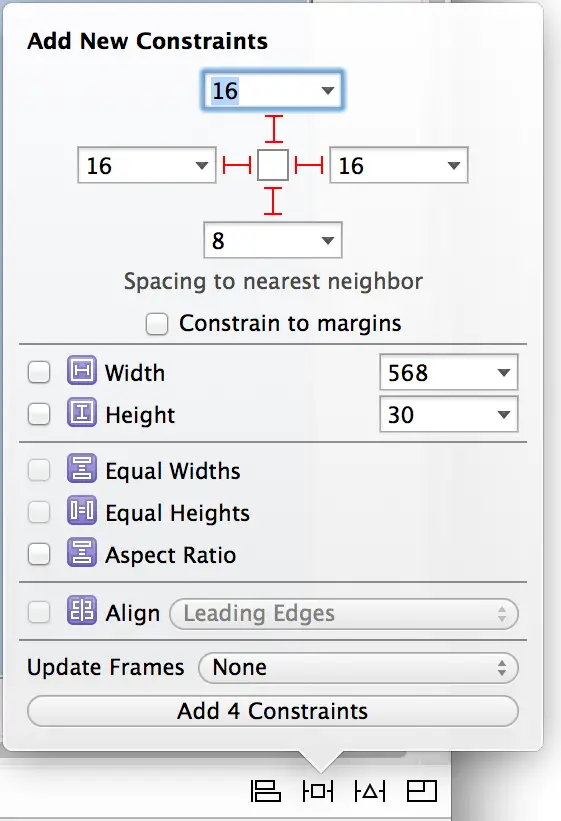
Select the Text Field object and display the Auto Layout Pin menu. Within the Spacing to Nearest Neighbor section, configure constraints on all four sides of the view with the Constrain to margins option disabled and leaving the default settings unchanged as shown in Figure 77-2:
Figure 77-2
Repeat the above steps to apply constraints on the Map View and Toolbar objects.
When the user touches the text field, the keyboard will appear. By default this will display a “Return” key. For the purposes of this application, however, a “Search” key would be more appropriate. To make this modification, select the new Text Field object, display the Attributes Inspector and change the Return Key setting from Default to Search.
Next, display the Assistant Editor panel and make sure that it is displaying the content of the ViewController.swift file. Ctrl-click on the Text Field object and drag the resulting line to the Assistant Editor panel and establish an outlet named searchText.
Repeat the above step, this time setting up an Action for the Text Field to call a method named textFieldReturn for the Did End on Exit event.
The textFieldReturn method will be required to perform three tasks when triggered. In the first instance it will be required to hide the keyboard from view. When matches are found for the search results, an annotation will be added to the map for each location. The second task to be performed by this method is to remove any annotations created as a result of a previous search.
Finally, the textFieldReturn method will initiate the search using the string entered into the text field by the user. Select the ViewController.swift file, locate the template textFieldReturn method and implement it so that it reads as follows:
@IBAction func textFieldReturn(sender: AnyObject) {
    sender.resignFirstResponder()
    mapView.removeAnnotations(mapView.annotations)
    self.performSearch()
}
Performing the Local Search
The next task is to write the code to perform the search. When the user touches the keyboard Search key, the above textFieldReturn method is called which, in turn, has been written such that it makes a call to a method named performSearch. Remaining within the ViewController.swift file, this method may now be implemented as follows:
func performSearch() {

    matchingItems.removeAll()
    let request = MKLocalSearchRequest()
    request.naturalLanguageQuery = searchText.text
    request.region = mapView.region

    let search = MKLocalSearch(request: request)

    search.startWithCompletionHandler({(response:
				MKLocalSearchResponse!,
                			error: NSError!) in

        if error != nil {
            println("Error occured in search: \(error.localizedDescription)")
        } else if response.mapItems.count == 0 {
            println("No matches found")
        } else {
            println("Matches found")

            for item in response.mapItems as! [MKMapItem] {
                println("Name = \(item.name)")
                println("Phone = \(item.phoneNumber)")

                self.matchingItems.append(item as MKMapItem)
                println("Matching items = \(self.matchingItems.count)")

                var annotation = MKPointAnnotation()
                annotation.coordinate = item.placemark.coordinate
                annotation.title = item.name
                self.mapView.addAnnotation(annotation)
            }
        }
     })
}
Next, edit the ViewController.swift file to add the declaration for the matchingItems array referenced in the above method. This array is used to store the current search matches and will be used later in the tutorial:
import UIKit
import MapKit

class ViewController: UIViewController, MKMapViewDelegate {

    @IBOutlet weak var mapView: MKMapView!
    @IBOutlet weak var searchText: UITextField!
    var matchingItems: [MKMapItem] = [MKMapItem]()
.
.
The code in the performSearch method is largely the same as that outlined earlier in the chapter, the major difference being the addition of code to add an annotation to the map for each matching location:
var annotation = MKPointAnnotation()
annotation.coordinate = item.placemark.coordinate
annotation.title = item.name
self.mapView.addAnnotation(annotation)
Annotations are represented by instances of the MKPointAnnotation class and are, by default, represented by red pin markers on the map view (though custom icons may be specified). The coordinates of each match are obtained by accessing the placemark instance within each item. The title of the annotation is also set in the above code using the item’s name property.
Testing the Application
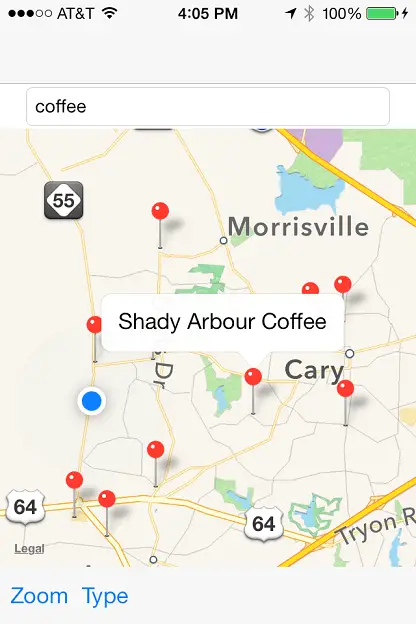
Compile and run the application on an iOS device and, once running, select the zoom button before entering the name of a type of business into the local search field such as “pizza”, “library” or “coffee”. Touch the keyboard “Search” button and, assuming such businesses exist within the currently displayed map region, annotation markers will appear for each matching location. Tapping a location marker will display the name of that location (Figure 77-3):
Figure 77-3
Local searches are not limited to business locations. It can also be used, for example, as an alternative to geocoding for finding local addresses.
Summary
The iOS MapKit Local Search feature allows map searches to be performed using free-form natural language strings. Once initiated, a local search will return a response containing map item objects for up to 10 matching locations within a specified map region.
In this chapter the MapSample application was extended to allow the user to perform local searches and to use annotations to mark matching locations on the map view.
In the next chapter, the example will be further extended to cover the use of the Map Kit directions API, both to generate turn-by-turn directions and to draw the corresponding route on a map view.
<google>BUY_IOS8</google>
| Previous | Table of Contents | Next |
| Working with Maps on iOS 8 with Swift, MapKit and the MKMapView Class | Using MKDirections to get iOS 8 Map Directions and Routes |


