An Android Studio Google Play In-app Billing Tutorial
I n the early days of mobile applications for operating systems such as Android and iOS, the most common method for earning revenue was to charge an upfront fee to download and install the application. Another revenue opportunity was soon introduced in the form of embedding advertising within applications. Perhaps the most common and lucrative option is now to charge the user for purchasing items from within the application after it has been installed. This typically takes the form of access to a higher level in a game, acquiring virtual goods or currency, or subscribing to the digital edition of a magazine or newspaper. Google provides support for the integration of in app purchasing through the Google Play In-App Billing API. The purpose of this chapter is to work through a tutorial that demonstrates the steps involved in implementing basic Google Play based in-app billing within an Android application. 53.1 Installing the Google Play Billing Library A prerequisite to implementing Google Play In-app Billing is that the Google Play Billing Library be installed on the development system. Check whether or not the library is installed by launching the Android SDK Manager by selecting Configure -> SDK Manager from the Android Studio welcome screen, or via the Tools -> Android -> SDK Manager menu of the main window. Once the SDK Manager has loaded, scroll down to the Extras section and check the Status column next to the Google Play Billing Library entry as shown in Figure 53 1:
Figure 53 1 If the library’s status is listed as Not Installed, select the check box next to the library and click on the Install packages… button. Once the download has completed, the SDK will have been installed into the sdk/extras/google/play_billing subfolder of the Android Studio installation directory (the location of which can be found in the SDK Path field at the top of the Android SDK Manager window). Within the above SDK subfolder resides a file named IInAppBillingService.aidl which will need to be included with any projects that require Google Play billing support. The folder also includes a sample application (contained within the samples sub-directory) named TrivialDrive. Part of this sample application is a package containing a set of convenience classes that significantly ease the process of integrating billing into an application. Later in this tutorial, these classes will be imported into our own application project and used to implement in-app billing. 53.2 Creating the Example In-app Billing Project The objective of this tutorial is to create a simple application that uses the Google in-app billing system to allow consumable purchases to be made. The application will consist of two buttons, one of which will be disabled by default. In order to enable the button so that it can be clicked, the user must purchase a “button click” item by clicking on the second button and completing a purchase. The first button will then be enabled for a single click before being disabled again until the user makes another purchase. Create a new Android Studio project, entering InAppBilling into both the Application and Module name fields. Specify a suitable package name or use com.example.inappbilling.inappbilling as a placeholder. Set the minimum SDK, Target and Compilation SDK menus to API 19: Android 4.4 before clicking on the Next button. Continue through the setup process, creating a blank activity named InAppBillingActivity with a corresponding layout named activity_in_app_billing. Click on Finish to initiate the project creation process. 53.3 Adding Billing Permission to the Manifest File Before an application can support in-app billing, a new permission line must be added to the project’s AndroidManifest.xml file. Within the Project tool window, therefore, locate and load the AndroidManifest.xml file for the newly created InAppBilling project and modify it to add the billing permission as follows: <?xml version="1.0" encoding="utf-8"?> <manifest xmlns:android="http://schemas.android.com/apk/res/android"
package="com.ebookfrenzy.inappbilling.inappbilling" >
   <uses-permission android:name="com.android.vending.BILLING" />

   <application
       android:allowBackup="true"
       android:icon="@drawable/ic_launcher"
       android:label="@string/app_name"
       android:theme="@style/AppTheme" >
       <activity
           android:name=".InAppBillingActivity"
           android:label="@string/app_name" >
           <intent-filter>
               <action android:name="android.intent.action.MAIN" />
               <category android:name=
                    "android.intent.category.LAUNCHER" />
           </intent-filter>
       </activity>
   </application>
</manifest> 53.4 Adding the IInAppBillingService.aidl File to the Project The IInAppBillingService.aidl file included as part of the Google Play Billing Library should now be added to the project. This file must be added such that it is contained in a package named com.android.vending.billing located in the src -> main -> aidl folder of the InAppBilling project module. To create the aidl directory, navigate to InAppBilling -> src -> main in the Project tool window and right click on the main node, selecting the New -> Directory menu option as shown in Figure 53 2:
Figure 53 2 In the New Directory dialog, enter aidl into the text field and click on OK. Within the Project tool window the aidl folder should now be listed immediately beneath the main folder. The next step is to create the com.android.vending.billing package. Right click on the aidl folder and select the New -> Package menu item. In the resulting dialog, enter com.android.vending.billing into the text field and click on OK. Using the explorer or finder tool for your operating system, navigate to the <android studio>/sdk/extras/google/play_billing where <android studio> is replaced by the path into which you installed Android Studio. From this location, copy the IInAppBillingService.aidl file, return to Android Studio and paste the file onto the com.android.vending.billing package in the Project tool window. In the Copy dialog, accept the default settings and click on the OK button. At this point the relevant sections of the Project tool window should be organized to match that of Figure 53 3:
Figure 53 3 With the library file installed, the next step is to import the utility classes from the TrivialDrive sample into the project so that these can be utilized within the application code. 53.5 Adding the Utility Classes to the Project The TrivialDrive sample project that was installed into the SDK as part of the Google Play Billing library includes a set of classes intended specifically to make the task of implementing in-app billing easier. Although bundled as part of the TrivialDrive project, these classes are general purpose in nature and are applicable to most application billing requirements. For the purposes of this example, we will create a new package named <package name>.util within our project, where <package name> is the package name you selected when the InAppBilling project was created previously in this chapter (for example com.example.inappbilling.inappbilling.util). To create this package, right-click on the InAppBilling -> src -> main -> java folder in the Project tool window and select the New -> Package menu option. In the resulting dialog, name the package and click on Finish. The next step is to import the TrivialDrive utility class files into the Android Studio project. Returning to the file system explorer window (and assuming it is still positioned in the <android studio>/sdk/extras/google/play_billing directory), navigate further into the file system hierarchy to the following directory: samples/TrivialDrive/src/com/example/android/trivialdrivesample/util Select all nine files in this folder and copy them. Return to Android Studio and paste the files onto the com.example.inappbilling.inappbilling.util package in the Project tool window. Verify that the project hierarchy now matches Figure 53 4:
Figure 53 4 53.6 Designing the User Interface The user interface, as previously outlined, is going to consist of two buttons, the first of which can only be clicked after a purchase has been made via a click performed on the second button. Double-click on the InAppBilling -> src -> main -> res -> layout -> activity_in_app_billing.xml file to load it into the Designer tool and design the user interface so that it resembles that of Figure 53 5:
Figure 53 5 Extract the button text strings to string resources named click_string and buy_string and, with the user interface layout designed, switch the Designer tool to Text mode and name the buttons clickButton and buyButton respectively. Also, set onClick properties to configure the buttons to call methods named buttonClicked and buyClick such that the completed XML layout file reads as follows: <RelativeLayout xmlns:android="http://schemas.android.com/apk/res/android"
   xmlns:tools="http://schemas.android.com/tools"
   android:layout_width="match_parent"
   android:layout_height="match_parent"
   android:paddingLeft="@dimen/activity_horizontal_margin"
   android:paddingRight="@dimen/activity_horizontal_margin"
   android:paddingTop="@dimen/activity_vertical_margin"
   android:paddingBottom="@dimen/activity_vertical_margin"
   tools:context=".InAppBillingActivity">
   <Button
       android:layout_width="wrap_content"
       android:layout_height="wrap_content"
       android:text="@string/buy_string"
       android:id="@+id/buyButton"
       android:layout_centerVertical="true"
       android:layout_centerHorizontal="true"
       android:onClick="buyClick" />
   <Button
       android:layout_width="wrap_content"
       android:layout_height="wrap_content"
       android:text="@string/click_string"
       android:id="@+id/clickButton"
       android:layout_above="@+id/buyButton"
       android:layout_centerHorizontal="true"
       android:layout_marginBottom="83dp"
       android:onClick="buttonClicked"/>
</RelativeLayout> With the user interface design complete, it is time to start writing some Java code to handle the purchasing and consumption of clicks. 53.7 Implementing the “Click Me” Button When the application is initially launched, the “Click Me!” button will be disabled. To make sure that this happens, load the InAppBillingActivity.java file into the editor and modify the onCreate method to obtain a reference to both buttons and then disable the clickButton: package com.ebookfrenzy.inappbilling.inappbilling;
import android.app.Activity; import android.os.Bundle; import android.view.Menu; import android.view.MenuItem; import android.widget.Button;
public class InAppBillingActivity extends Activity {
   private Button clickButton;
   private Button buyButton;
   @Override
   protected void onCreate(Bundle savedInstanceState) {
       super.onCreate(savedInstanceState);
       setContentView(R.layout.activity_in_app_billing);
       buyButton = (Button)findViewById(R.id.buyButton);
       clickButton = (Button)findViewById(R.id.clickButton);
       clickButton.setEnabled(false);
   }
. . . } The buttonClicked method that will be called when the button is clicked by the user now also needs to be implemented. All this method needs to do is to disable the button once again so that the button cannot be clicked until another purchase is made and to enable the buy button so that another click can be purchased. Remaining within the InAppBillingActivity.java file, implement this method as follows: package com.ebookfrenzy.inappbilling.inappbilling;
import android.app.Activity; import android.os.Bundle; import android.view.Menu; import android.view.MenuItem; import android.widget.Button; import android.view.View;
public class InAppBillingActivity extends Activity { . . . public void buttonClicked (View view) { clickButton.setEnabled(false); buyButton.setEnabled(true); } . . } Work on the functionality of the first button is now complete. The next steps are to begin implementing the in-app billing functionality. 53.8 Google Play Developer Console and Google Wallet Accounts Application developers making use of Google Play billing must be identified by a unique public license key. The only way to obtain a public license key is to register an application within the Google Play Developer Console. If you do not already have a Google Play Developer Console account, go to http://play.google.com/apps/publish and follow the steps to register as outlined in the chapter entitled Signing and Preparing an Android Application for Release. Once you are logged in, click on the Settings option (represented by the cog icon on the left hand edge of the web page) and, on the Account details page, scroll down to the Merchant Account section. In order to use in-app billing, your Google Play Developer Console account must have a Google Wallet Merchant account associated with it. If a Google Wallet merchant account is not set up, create a merchant account and register it with your Google Developer Console account before proceeding. 53.9 Obtaining the Public License Key for the Application From the home page of the Google Play Developer Console, click on the Add new application button, specifying the default language and a title of InAppBilling. Once this information has been entered, click on the Upload APK button:
Figure 53 6 It is not necessary to upload the APK file at this point, so once the application has been registered, click on the Services & APIs option to display the Base64-encoded RSA public key for the application as shown in Figure 53 7:
Figure 53-7
Keep this Browser window open for now as this key will need to be included in the application code in the next step of this tutorial.
Setting Up Google Play Billing in the Application
With the public key generated, it is now time to use that key to initialize billing within the application code. For the InAppBilling example project this will be performed in the onCreate method of the InAppBillingActivity.java file and will make use of the IabHelper class from the utilities classes previously added to the project as follows. Note that <your license key here> should be replaced by your own license key generated in the previous section and <your domain> represents the domain you entered for the package name when the project was first created in Android Studio:
package com.ebookfrenzy.inappbilling.inappbilling;

import <your domain>.inappbilling.inappbilling.util.IabHelper;
import <your domain>.inappbilling.inappbilling.util.IabResult;
import <your domain>.inappbilling.inappbilling.util.Inventory;
import <your domain>.inappbilling.inappbilling.util.Purchase;

import android.app.Activity;
import android.os.Bundle;
import android.view.Menu;
import android.view.MenuItem;
import android.widget.Button;
import android.view.View;
import android.content.Intent;
import android.util.Log;

public class InAppBillingActivity extends Activity {

    private static final String TAG =
                 "<your domain>.inappbilling.inappbilling";
    IabHelper mHelper;

    private Button clickButton;
    private Button buyButton;

    @Override
    protected void onCreate(Bundle savedInstanceState) {
        super.onCreate(savedInstanceState);
        setContentView(R.layout.activity_in_app_billing);

        buyButton = (Button)findViewById(R.id.buyButton);
        clickButton = (Button)findViewById(R.id.clickButton);
        clickButton.setEnabled(false);

		String base64EncodedPublicKey =
                                       "<your license key here>";

        	mHelper = new IabHelper(this, base64EncodedPublicKey);

        	mHelper.startSetup(new
			IabHelper.OnIabSetupFinishedListener() {
        	   	 public void onIabSetupFinished(IabResult result)
			 {
        	           if (!result.isSuccess()) {
        	             Log.d(TAG, "In-app Billing setup failed: " +
					result);
        	           } else {
        	      	     Log.d(TAG, "In-app Billing is set up OK");
		           }
        	         }
        	});
    }
.
.
.
}
After implementing the above changes, compile and run the application on a physical Android device (Google Play Billing cannot be tested within an emulator session) and make sure that the “In-app Billing is set up OK” message appears in the LogCat output panel.
Initiating a Google Play In-app Billing Purchase
With access to the billing system initialized, we can now turn our attention to initiating a purchase when the user touches the Buy Click button in the user interface. This was previously configured to trigger a call to a method named buyClick which now needs to be implemented in the InAppBillingActivity.java file. In addition to initiating the purchase process in this method, it will be necessary to implement an onActivityResult method and also a listener method to be called when the purchase has completed.
Begin by editing the InAppBillingActivity.java file and adding the code for the buyClick method so that it reads as follows:
.
.
.
public class InAppBillingActivity extends Activity {

	private static final String TAG = "com.example.inappbilling";
	IabHelper mHelper;
	static final String ITEM_SKU = "android.test.purchased";
.
.
.

	public void buyClick(View view) {
    	     mHelper.launchPurchaseFlow(this, ITEM_SKU, 10001,
     			   mPurchaseFinishedListener, "mypurchasetoken");
	}
.
.
.
}
Clearly, all this method needs to do is make a call to the launchPurchaseFlow method of our mHelper instance. The arguments passed through to the method are as follows:
- A reference to the enclosing Activity instance from which the method is being called.
- The SKU that identifies the product that is being purchased. In this instance we are going to use a standard SKU provided by Google for testing purposes. This SKU, referred to as a static response SKU, will always result in a successful purchase. Other testing SKUs available for use when testing purchasing functionality without making real purchases are android.test.cancelled, android.test.refunded and android.test.item_unavailable.
- The request code which can be any positive integer value. When the purchase has completed, the onActivityResult method will be called and passed this integer along with the purchase response. This allows the method to identify which purchase process is returning and can be useful when the method needs to be able to handle purchasing for different items.
- The listener method to be called when the purchase is complete.
- The developer payload token string. This can be any string value and is used to identify the purchase. For the purposes of this example, this is set to “mypurchasetoken”.
Implementing the onActivityResult Method
When the purchasing process returns, it will call a method on the calling activity named onActivityResult, passing through as arguments the request code passed through to the launchPurchaseFlow method, a result code and intent data containing the purchase response.
This method needs to identify if it was called as a result of an in-app purchase request or some request unrelated to in-app billing. It does this by calling the handleActivityResult method of the mHelper instance and passing through the incoming arguments. If this is a purchase request the mHelper will handle it and return a true value. If this is not the result of a purchase, then the method needs to pass it up to the superclass to be handled. Bringing this together results in the following code:
@Override
protected void onActivityResult(int requestCode, int resultCode,
     Intent data)
{
      if (!mHelper.handleActivityResult(requestCode,
              resultCode, data)) {
    	      super.onActivityResult(requestCode, resultCode, data);
      }
}
In the event that the onActivityResult method was called in response to an in-app billing purchase, a call will then be made to the listener method referenced in the call to the launchPurchaseFlow method (in this case a method named mPurchaseFinishedListener). The next task, therefore, is to implement this method.
Implementing the Purchase Finished Listener
The “purchase finished” listener must perform a number of different tasks. In the first instance, it must check to ensure that the purchase was successful. It then needs to check the SKU of the purchased item to make sure it matches the one specified in the purchase request. In the event of a successful purchase, the method will need to consume the purchase so that the user can purchase it again when another one is needed. If the purchase is not consumed, future attempts to purchase the item will fail stating that the item has already been purchased. Whilst this would be desired behavior if the user only needed to purchase the item once, clearly this is not the behavior required for consumable purchases. Finally, the method needs to enable the “Click Me!” button so that the user can perform the button click that was purchased.
Within the InAppBillingActivity.java file, implement this method as follows:
IabHelper.OnIabPurchaseFinishedListener mPurchaseFinishedListener
	= new IabHelper.OnIabPurchaseFinishedListener() {
	public void onIabPurchaseFinished(IabResult result,
                    Purchase purchase)
	{
	   if (result.isFailure()) {
	      // Handle error
	      return;
	 }
	 else if (purchase.getSku().equals(ITEM_SKU)) {
	     consumeItem();
	    buyButton.setEnabled(false);
	}

   }
};
As can be seen from the above code fragment, in the event that the purchase was successful, a method named consumeItem() will be called. Clearly, the next step is to implement this method.
Consuming the Purchased Item
In the documentation for Google Play In-app Billing, Google recommends that consumable items be consumed before providing the user with access to the purchased item. So far in this tutorial we have performed the purchase of the item but not yet consumed it. In the event of a successful purchase, the mPurchaseFinishedListener implementation has been configured to call a method named consumeItem(). It will be the responsibility of this method to query the billing system to make sure that the purchase has been made. This involves making a call to the queryInventoryAsync() method of the mHelper object. This task is performed asynchronously from the application’s main thread and a listener method called when the task is complete. If the item has been purchased, the listener will consume the item via a call to the consumeAsync() method of the mHelper object. Bringing these requirements together results in the following additions to the InAppBillingActivity.java file:
public void consumeItem() {
	mHelper.queryInventoryAsync(mReceivedInventoryListener);
}

IabHelper.QueryInventoryFinishedListener mReceivedInventoryListener
   = new IabHelper.QueryInventoryFinishedListener() {
	   public void onQueryInventoryFinished(IabResult result,
	      Inventory inventory) {

	      if (result.isFailure()) {
		  // Handle failure
	      } else {
                 mHelper.consumeAsync(inventory.getPurchase(ITEM_SKU),
			mConsumeFinishedListener);
	      }
    }
};
As with the query, the consumption task is also performed asynchronously and, in this case, is configured to call a listener named mConsumeFinishedListener when completed. This listener now needs to be implemented such that it enables the “Click Me!” button after the item has been consumed in the billing system:
IabHelper.OnConsumeFinishedListener mConsumeFinishedListener =
	  new IabHelper.OnConsumeFinishedListener() {
	   public void onConsumeFinished(Purchase purchase,
             IabResult result) {

	 if (result.isSuccess()) {
	   	  clickButton.setEnabled(true);
	 } else {
	         // handle error
	 }
  }
};
Releasing the IabHelper Instance
Throughout this tutorial, much of the work has been performed by calling methods on an instance of the IabHelper utility class named mHelper. Now that the code to handle purchasing and subsequent consumption of a virtual item is complete, the last task is to make sure this object is released when the activity is destroyed. Remaining in the InAppBillingActivity.java, override the onDestroy() activity lifecycle method as follows:
@Override
public void onDestroy() {
	super.onDestroy();
	if (mHelper != null) mHelper.dispose();
	mHelper = null;
}
Modifying the Security.java File
When an application is compiled and installed on a device from within Android Studio, it is built and executed in debug mode. When the application is complete it is then built in release mode and uploaded to the Google Play App Store as described in the chapter entitled Signing and Preparing an Android Application for Release. As the InAppBilling application is currently configured, purchases are being made using the android.test.purchased static response SKU code. It is important to be aware that static response SKUs can only be used when running an application in debug mode. As will be outlined later, new in-app products must be created within the Google Play Developer Console before full testing can be performed in release mode.
The current version of the utility classes provided with the TrivialDrive example application include an added level of security that prevents purchases from being made without a valid signature key being returned from the Google Play billing server. A side effect of this change is that it prevents the code from functioning when using the static response SKU values. Before testing the application in debug mode, therefore, a few extra lines of code need to be added to the verifyPurchase() method in the Security.java file. Within the Android Studio Project tool window, select the Security.java file located in the src -> main -> java -> <package name> -> util folder of the project to load it into the editor. Once loaded, locate and modify the verifyPurchase() method so that it reads as follows:
package com.ebookfrenzy.inappbilling.util;

import android.text.TextUtils;
import android.util.Log;

import org.json.JSONException;
import org.json.JSONObject;

import <your domain>.inappbilling.inappbilling.BuildConfig;

import java.security.InvalidKeyException;
import java.security.KeyFactory;
import java.security.NoSuchAlgorithmException;
import java.security.PublicKey;
import java.security.Signature;
import java.security.SignatureException;
import java.security.spec.InvalidKeySpecException;
import java.security.spec.X509EncodedKeySpec;
.
.
.
    public static boolean verifyPurchase(String base64PublicKey,
          String signedData, String signature) {
        if (TextUtils.isEmpty(signedData) ||
                TextUtils.isEmpty(base64PublicKey) ||
                TextUtils.isEmpty(signature)) {
            Log.e(TAG, "Purchase verification failed: missing data.");
            if (BuildConfig.DEBUG) {
                return true;
            }
            return false;
        }

        PublicKey key = Security.generatePublicKey(base64PublicKey);
        return Security.verify(key, signedData, signature);
    }
This will ensure that when the application is running in debug mode the method does not report an error if the signature is missing when a static response SKU purchase is verified. By checking for debug mode in this code, we ensure that this security check will function as intended when the application is built in release mode.
Testing the In-app Billing Application
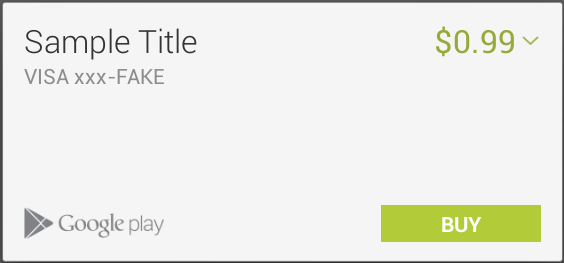
Compile and run the application on a physical Android device with Google Play support and click on the “Buy a Click” button. This should cause the Google Play purchase dialog to appear listing the test item as illustrated in Figure 53-8:
Figure 53-8
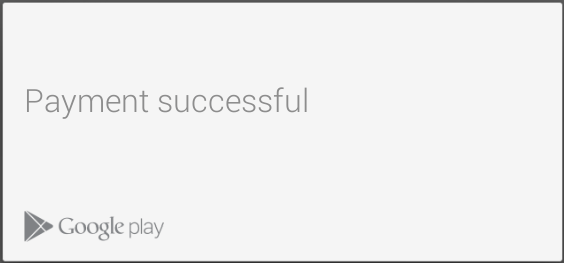
Click on the Buy button to simulate a purchase at which point a Payment Successful message (Figure 53-9) should appear after which it should be possible to click on the “Click Me!” button once.
Figure 53-9
Having consumed the click, it will be necessary to purchase another click in order to once again enable the button.
Building a Release APK
Up until this point the example application created in this chapter has used a static response testing SKU provided by Google for early stage testing of in-app billing. The next step is to create a real in-app billing product SKU code for a virtual item and use this when testing the application. Before creating an in-app billing product, however, the application code needs to be changed slightly so that it uses a real SKU instead of the static response SKU. The product SKU that will be used in the remainder of this chapter will be named com.example.buttonclick, so edit the InAppBillingActivity.java file and modify the SKU reference accordingly:
public class InAppBillingActivity extends Activity {

	private static final String TAG =
              "<your domain>.inappbilling.inappbilling";
	IabHelper mHelper;
	static final String ITEM_SKU = "com.example.buttonclick";

	private Button clickButton;
	private Button buyButton;
.
.
.
Before any products can be created, a release APK file for the application must first be uploaded to the developer console. In order to prepare this release APK file for the InAppBilling application, follow the steps outlined in the chapter entitled Signing and Preparing an Android Application for Release. Once the APK file has been created, select the previously registered application from the list of applications in the Google Play Developer Console and, from the resulting screen, click on the APK link in the left hand panel. When prompted, upload the release APK file to the console.
Creating a New In-app Product
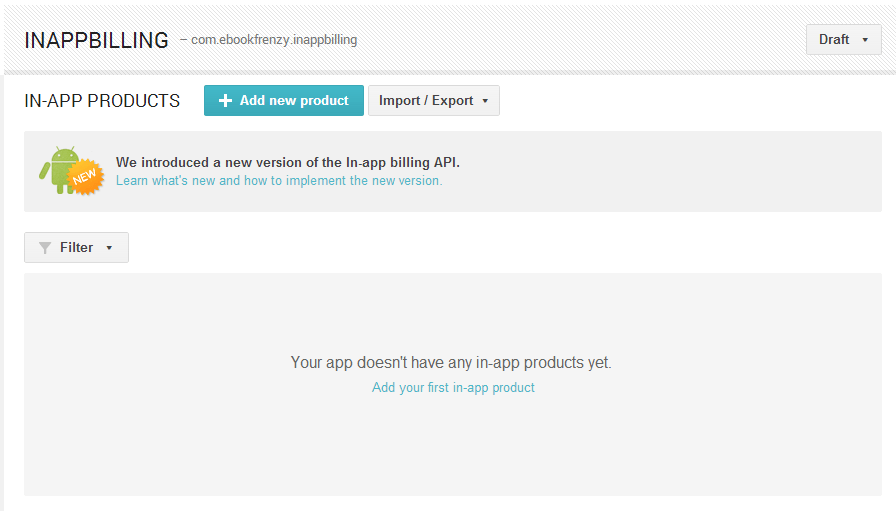
Once the APK file has been uploaded, select the In-app Products menu item from the left hand panel of the developer console to display the screen shown in Figure 53 10:
Figure 53-10
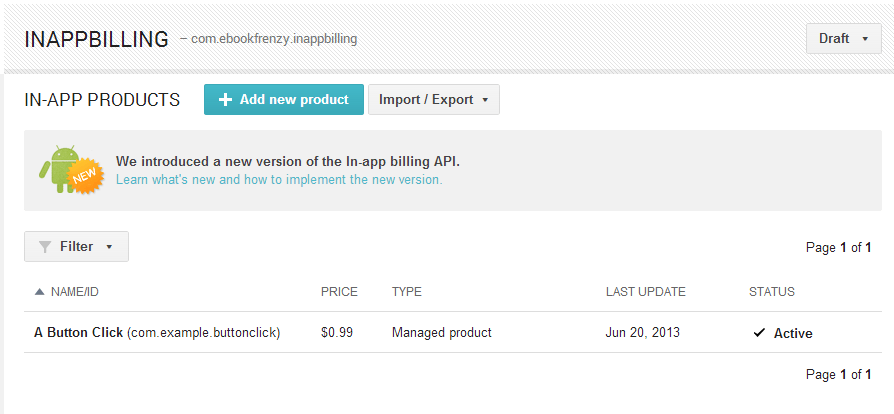
To add a new product, click on the Add new product button and, in the resulting panel, set the product type to Managed product and enter a Product ID (in this case com.example.buttonclick). Click on Continue and in the second screen enter a title, description and price for the item. Change the menu at the top of the page to Activate.
On returning to the In-app Products home screen, the new product should now be listed:
Figure 53-11
Publishing the Application to the Alpha Distribution Channel
The application APK file is currently stored within the Google Play Developer Console in Draft mode. Before it can be used for further testing using real in-app products, the application must be published to either the Alpha or Beta testing distribution channels. These channels make the application available for testing by designated groups of users.
Before an application APK can be submitted to either of the testing channels, the store listing, pricing and distribution information for the application must be completed. To meet this requirement, select the application from the Google Play Developer Console and click on the Store Listing link in the left hand navigation panel. From within this screen, fill out the mandatory information (those areas marked with an asterisk) and upload the necessary images. Once the form is complete, click on the Save button located at the top of the page. To configure the pricing and distribution information, select the Pricing & Distribution option from the side panel and complete the necessary fields.
When the required information has been provided, the application is eligible to be published in the testing distribution channels. Once all the information has been saved, the button in the top right hand corner of the screen should have changed from Draft to Ready to Publish. If the button still reads Draft, click on it and select “Why can’t I publish?” from the menu. This option will list any isues that need to be resolved before the application can be published.
Once any issues have been addressed, click on the Ready to Publish button and select Publish this app from the menu. Note that it can take several hours before the application is actually published to the channel and available to respond to in-app purchase request made by testers.
Adding In-app Billing Test Accounts
Unfortunately, Google will not allow developers to make test purchases using real product SKUs from their own Google accounts. In order to test in-app billing from this point on, it will be necessary to setup other Google accounts as testing accounts. The users of these accounts must load your application onto their devices and make test purchases. To add individual test user accounts, click on the Settings icon located on the left hand side of your Google Play Developer Console home screen and on the account details screen scroll down to the License Testing section. In the corresponding text box, enter the Gmail accounts for the users who will be performing the in-app testing on your behalf before saving the changes.
In the absence of real users willing to test your application, it is also possible to set up a new Google account for testing purposes. Simply create a new Gmail account that is not connected in any way with your existing Google account identity. Once the account has been created and added as a test account in the Google Play Developer Console, open the Settings application on the physical Android device, select Users from the list of options and, on the Users screen, click on the ADD USER button at the top of the screen. Enter the new Gmail account and password information to create the new user on the device. Return to the device lock screen and log into the device as the test user by selecting the appropriate icon at the bottom of the screen. Note that during the test purchase, it will be necessary to enter credit card information for the new user in order to be able to fully test the in-app billing implementation.
Once the user has been added as a test account, the next step is to load the previously generated release APK file onto the device. Begin by enabling the device for USB debugging by following the steps in the chapter entitled Testing Android Studio Apps on a Physical Android Device. Once enabled, attach the device to the development system and remove any previous versions of the application from the device by running the following in a terminal or command prompt window, where <package name> is the full package name of the application (for example <your domain>.inappbilling.inappbilling):
adb uninstall <package name>
Next, upload the release APK created earlier in this chapter by running the following command:
adb –d install /path/to/release/apkfile.apk
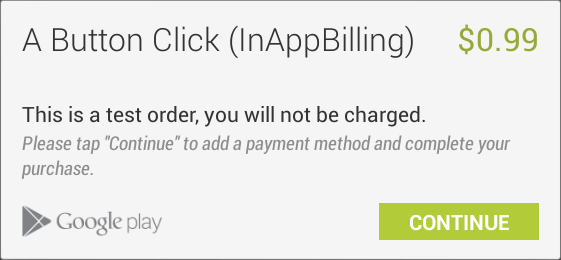
Once the application is installed, locate it among the applications on the device and launch it. As long as the application remains in testing status within the Google Play Developer console no charges will be incurred by the user whilst testing the in-app billing functionality of the application. Note that the Google Play dialog (Figure 53 12) now lists the product title and price as declared for the product in the Google Play Developer Console:
Figure 53-12
Any test purchases made in this way will be listed within the developer’s Google Wallet account but will not be billed to the user performing the testing. Any transactions not cancelled manually within Google Wallet will be cancelled automatically after 14 days.
Configuring Group Testing
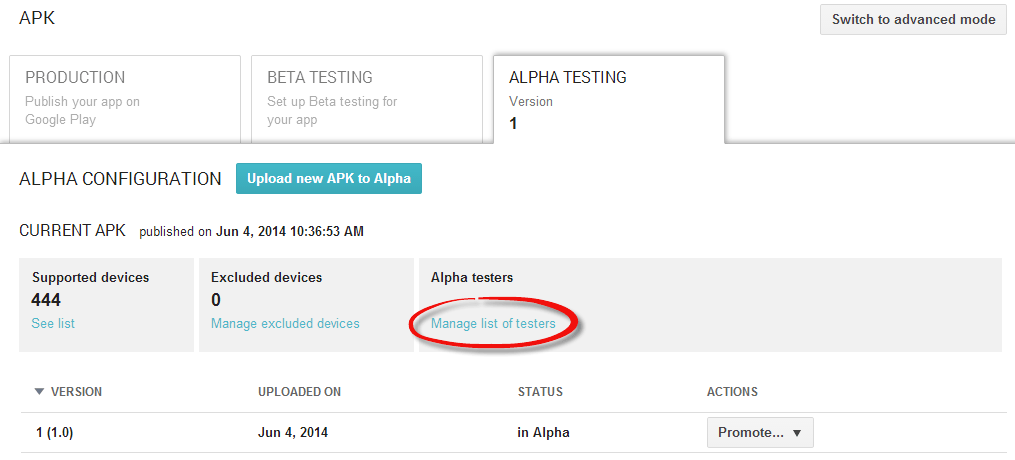
Testing can be expanded beyond the limits of a single test account, thereby allowing larger groups to be involved in the testing of a new application. The only restriction is that the users to be designated as testers be members of a Google Group or Google+ Community to be eligible for inclusion in the testing. To configure such a group, access the application settings within the Google Play Developer Console and select the APK item in the left hand navigation panel. Select either the beta or alpha testing tab (depending on which testing distribution channel you are currently using) and select the Manage list of testers link as highlighted in Figure 53-13:
Figure 53-13
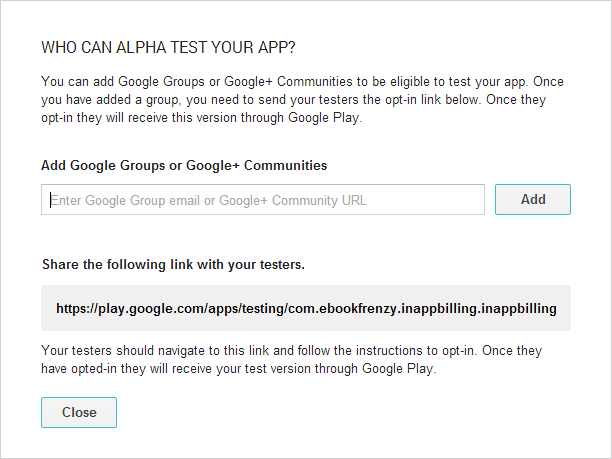
Within the resulting dialog (Figure 53-14), enter the email address of a Google Group or the URL of a Google+ Community that is ready to perform the testing. The dialog also includes the URL of the application within the Google Play store which will need to be sent to your testers so that they can download and install the application.
Figure 53-14
Resolving Problems with In-App Purchasing
Implementation of Google Play in-app purchasing is a multi-step process where even the simplest of mistakes can lead to unsuccessful and confusing results. There are, however, a number of steps that can be taken to identify and resolve issues. It is important to note that Google occasionally changes the mechanism for implementing and testing in-app purchasing. Before spending too much debugging it is always worth checking the Announcements section in the Google Play Developer Console to see if anything has changed since this book was written.
If in-app purchasing is still not working, the next step is to ensure that the license key in the Google Play developer console matches that contained in the application code. If the key is not an exact match, purchase attempts will fail. Also keep in mind that it can take a few hours after an application has been published to a testing distribution channel before it will be available for testing purposes. When testing, it is also important to keep in mind that static response SKU codes only work when the application is running in debug mode. Similarly, real SKU product codes created in the developer console can only be purchased from within a release version of the application running under an account that has been authorized from within the developer console. This account must not be the same as that of the application developer registered with the Google Play developer console.
If problems persist, check the output on the Android Studio LogCat panel while the application is running in debug mode. The in-app purchase utility classes provide useful feedback in most failure situations. The level of diagnostic detail can be increased by adding the following line of code to the in-app billing initialization sequence:
mHelper.enableDebugLogging(true, TAG);
For example:
mHelper.startSetup(new
	IabHelper.OnIabSetupFinishedListener() {
      	  public void onIabSetupFinished(IabResult result)
	  {
    	       if (!result.isSuccess()) {
    	          Log.d(TAG, "In-app Billing setup failed: " +
				result);
         } else {
    	      	    Log.d(TAG, "In-app Billing is set up OK");
    	      	    mHelper.enableDebugLogging(true, TAG);
	  }
   }
  });
}
Finally, it is not unusual for the developer to find that code that worked in debug mode using static responses fails when in release mode with real SKU values. In this situation, the LogCat output from the running release mode application can be viewed in real-time by connecting the device to the development computer and running the following adb command in a terminal or command prompt window:
adb logcat
Generally, the diagnostic messages will provide a good starting point to identify potential causes of most failures.
Summary
The Google Play In-app Billing API provides a mechanism by which users can be charged for virtual goods or services from within applications. In-app products can be configured to be subscription based, one-time purchase only, or consumable (in that the item needs to re-purchased after it is used within the application).
This chapter worked through the steps involved in preparing for and implementing Google Play in-app billing within an Android application.
