Installing Xcode and Compiling Objective-C on Mac OS X
| Previous | Table of Contents | Next |
| The History of Objective-C | Installing and using GNUstep and Objective-C on Windows |
<google>BUY_OBJC</google>
In later chapters we will look at how to install and use Objective-C on Windows and Linux systems for those that do not have access to Mac OS X. If you are planning to develop iPhone applications (or Mac OS X applications for that matter), however, you are going to need to use an Intel based Mac OS X system at some point in the future.
Perhaps the biggest advantage of using Mac OS X as your Objective-C learning platform (aside from the ability to develop iPhone and Mac OS X applications) is the fact that you get to use Apple's Xcode development tool. Xcode is a powerful and easy to use development environment that is available free of charge to anyone fortunate enough to own an Apple computer running Mac OS X.
In this chapter we will cover the steps involved in installing Xcode and writing and compiling a simple Objective-C program in this environment. For those readers that prefer to do their coding and compiling at the command prompt we will then cover use of Objective-C in a terminal window.
Installing Xcode on Mac OS X
Xcode may or may not be pre-installed on your Mac OS X system. To find out if you already have it, open the Finder and look for it in the Developer subfolder of the Applications folder. If the Developer folder does not exist, or does not contain Xcode then you will need to install it.
The best way to obtain Xcode is to download it from the Apple web site. It can also be installed from the Developer Tools installation disk if you happen to have one, but most Mac systems do not ship with this. The URL to download Xcode is http://developer.apple.com/technology/xcode.html.
In order to download Xcode 4.3 with the iOS 5 SDK, you will either need to be a member of the iOS Developer programs or obtain a copy from the Mac App Store. The download is over 3.5GB in size and may take a number of hours to complete depending on the speed of your internet connection.
Starting Xcode
Having successfully installed the SDK and Xcode, the next step is to launch it so that we can write and then compile a sample Objective-C application. To start up Xcode, open the Finder, click the Macintosh HD device in the left had panel then double click on the Developer folder, followed by the Applications folder. Within this folder you should see an icon for Xcode. Double click on this icon to launch the tool. Once Xcode has loaded, and assuming this is the first time you have used Xcode on this system, you will be presented with the Welcome screen. On this screen, click on the option to Create your first Cocoa application to proceed to the developer documentation screen.
Starting a New Project
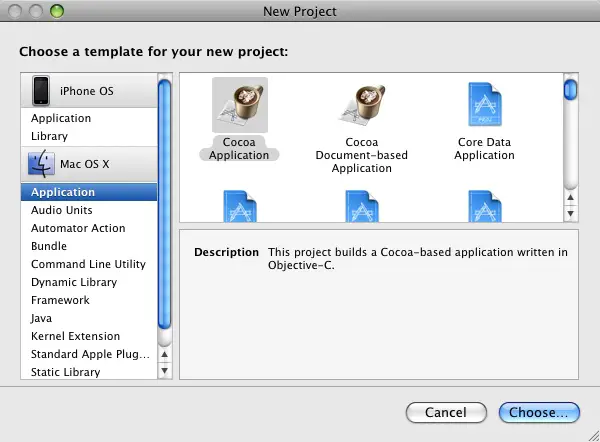
Each application created in Xcode is contained within a project. The first step in developing an application, therefore, is to create a new project. This is achieved by selecting the File -> New Project... menu option. The New Project window provides a range of different types of Mac OS applications that can be created. If you downloaded and installed the iPhone version of the SDK, options are also provided to create a new iPhone application:
To configure the project type, perform the following steps:
- Under the Mac OS X section, scroll down the list and select Command Line Utility.
- In the main panel, choose Foundation Tool then click on the Choose.. button.
- In the resulting panel, enter sampleApp in the Save As: field.
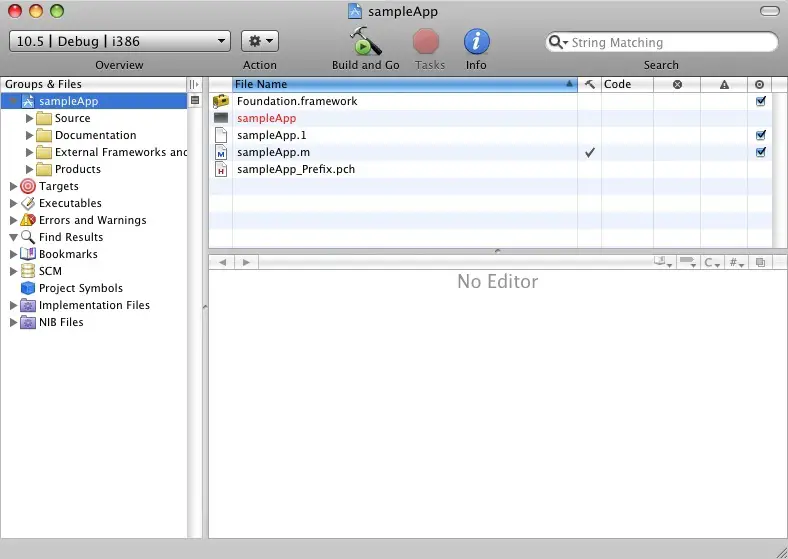
By default, Xcode will put the project files in your Documents folder so be sure to create or specify a specific folder for your Objective-C development work before proceeding. Once you have defined a name and location for your project click the Save button to continue. Xcode will subsequently create the new project and open the main Xcode window:
Writing an Objective-C Application with Xcode
Xcode will create skeleton versions of the files needed to build a command-line based Objective-C application. Objective-C source files are identified by the .m filename extension. In the case of our example, Xcode has pre-created a main source file named sampleApp.m and populated it with some basic code ready for us to edit. To view the code, select sampleApp.m from the list of files so that the code appears in the editor area beneath the list. The skeleton code reads as follows:
#import <Foundation/Foundation.h>

int main (int argc, const char * argv[]) {
    NSAutoreleasePool * pool = [[NSAutoreleasePool alloc] init];

    // insert code here...
    NSLog(@"Hello, World!");
    [pool drain];
    return 0;
}
Modify the NSLog line so that it reads:
NSLog(@"This is my first Objective-C App!");
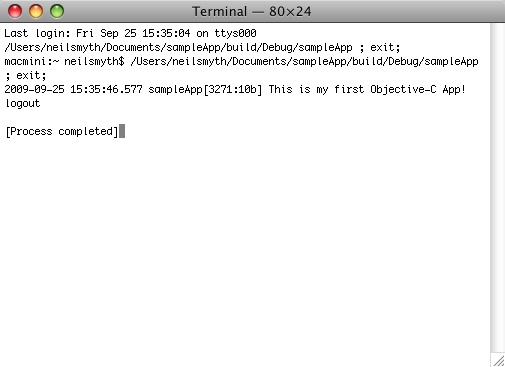
With the change made, the next step is to compile and run the application by selecting the Build and Run option located in the Xcode Build menu. Once this option has been selected, Xcode will compile the sources and run the application within a terminal window:
<google>ADSDAQBOX_FLOW</google>

Compiling Objective-C from the Command Line
While Xcode provides a powerful environment that will prove invaluable for larger scale projects, for compiling a running such a simple application as the one we have been working with in this chapter it is a little bit of overkill. It is also a fact that some developers feel that development environments like Xcode just get in the way and prefer to use a basic editor and command line tools to develop applications. After all, in the days before integrated development environments came into favor, this was how all applications were developed. Whilst I'm not suggesting that everyone abandon Xcode in favor of the vi editor and GNU compiler, it is useful to know that the option to work from the command line is available.
Using your favorite text or programming editor, create a file named hello.m containing the following Objective-C code:
#import <Foundation/Foundation.h>

int main (int argc, const char * argv[])
{
        NSAutoreleasePool * pool = [[NSAutoreleasePool alloc] init];

        NSLog (@"hello world");
        [pool drain];
        return 0;
}
Save the file and then open a Terminal window (if you aren't already working in one), change directory to the folder containing the source file and compile the application with the following command:
gcc -framework Foundation hello.m -o hello
Assuming the code compiles without error it can be run as follows:
./hello
2009-09-25 15:51:11.528 hello[3371:10b] hello world
Compared to using Xcode that seems much simpler, but keep in mind that the power of Xcode really becomes evident when you start developing larger scale projects.
Before moving on to learning the basics of the Objective-C programming language, we will cover the installation and use of Objective-C on non-Mac OS X systems.
<google>BUY_OBJC_BOTTOM</google>
| Previous | Table of Contents | Next |
| The History of Objective-C | Installing and using GNUstep and Objective-C on Windows |


