Working with Fonts and Attributed Strings in WatchKit
| Previous | Table of Contents | Next |
| A WatchKit Animated Image Tutorial | A WatchKit App Custom Font Tutorial |
| Purchase the fully updated watchOS 2/Swift 2 edition of this book in eBook ($12.99) or Print ($27.99) format watchOS 2 App Development Essentials Print and eBook (ePub/PDF/Kindle) editions contain 35 chapters. |
Fonts are an important part of making a WatchKit app visually appealing and accessible to the user. WatchKit provides three options when making choices about the fonts to use within the scene of an app. These options consist of text style fonts, system fonts and custom fonts. The subject of custom fonts will be covered in detail in the next chapter entitled A WatchKit App Custom Font Tutorial. This chapter, however, will introduce the concepts of text styles and system fonts and outline how these can be used both from within Interface Builder and, through the use of attributed strings, via the code of an interface controller class.
Dynamic Text and Text Style Fonts
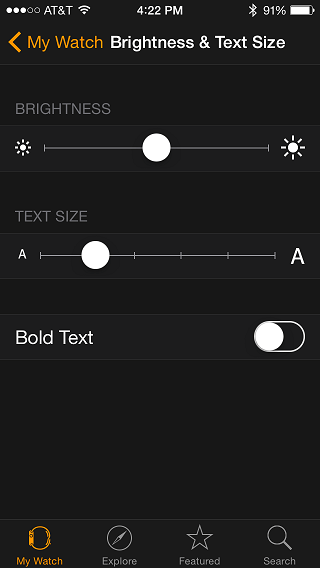
Apple Watch users are able to specify a preferred text size which WatchKit apps are expected to adopt when displaying text (also referred to as the preferred content size). The current text size can be configured via the Apple Watch app on the paired iPhone device. To access this setting, launch the Apple Watch app, select the My Watch tab followed by the Brightness & Text Size option. As shown in Figure 23 1, options are provided on this screen to adjust the font size and use bold text.
Figure 23-1
Almost without exception, the built-in WatchKit apps adopt the font size setting selected by the user when displaying text. Apple also recommends that third-party apps conform to the user’s text size selection wherever possible. WatchKit specifies a variety of different preferred text styles for this purpose including headings, sub-headings, body, captions and footnotes. The text style used by an interface object in a scene can be configured either using Interface Builder or in code.
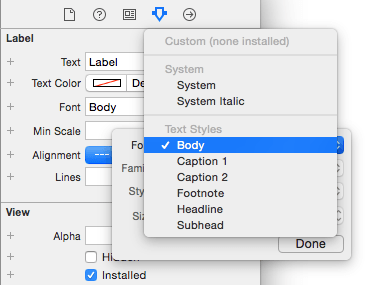
To configure the text style of an interface object in Interface Builder, select the interface object to which the style is to be applied, display the Attributes Inspector and click on the “T” button in the Font setting field. From the drop-down menu click on the Font menu button and select an item from the options listed under the Text Styles heading:
Figure 23-2
When the app is run, the text on the interface object on which the font setting was made will be displayed using the font for the selected text style and sized according to the user’s preferred content size category setting.
Behind the scenes, the text style selections are translated to fonts from Apple’s San Francisco Font Family. The Headline text style, for example, is displayed using the San Francisco Text font.
Using Text Style Fonts in Code
A text style font may be retrieved and used from within the code of an interface controller class using the preferredFontForTextStyle method of the UIFont class, passing through one of the following pre-configured text style values:
- UIFontTextStyleHeadline
- UIFontTextStyleSubheadline
- UIFontTextStyleBody
- UIFontTextStyleFootnote
- UIFontTextStyleCaption1
- UIFontTextStyleCaption2
The following code, for example, retrieves a Headline text style font object:
let headlineFont =
      UIFont.preferredFontForTextStyle(UIFontTextStyleHeadline)
When executed, the above code will request the preferred headline style font from the system. The method call will return a UIFont object configured with the headline font sized to match the user’s current preferred content size category setting.
Having obtained the preferred font, the next step is to use the font to render the text displayed on a Label or Button interface object. As will be outlined in the next section, this involves the use of attributed strings.
Understanding Attributed Strings
To display text within a WatchKit app using a particular font it is necessary to use an attributed string. Attributed strings are represented using the NSAttributedString and NSMutableAttributedString classes and allow text to be combined with attributes such as fonts and colors.
Having obtained a font object as outlined in the previous section, the next task is to create a Dictionary object with a key set to NSFontAttributeName and the font object as the value. This dictionary is then used to specify the attributes for an NSAttributedString instance. The following code, for example, obtains a font object for the headline text style and uses it to create an attributed string that reads “Apple Watch”:
let headlineFont =
	UIFont.preferredFontForTextStyle(UIFontTextStyleHeadline)

let fontAttribute = [NSFontAttributeName : headlineFont]

let attributedString = NSAttributedString(string: "Apple Watch",
		attributes: fontAttribute)
Once an attributed string has been created, it can be applied to Button and Label interface objects using the setAttributedTitle and setAttributedText methods respectively. The following code, for example, displays the attributedString text from the above example on a Label object:
myLabel.setAttributedText(attributedString)
When executed, text which reads “Apple Watch” will be rendered on the label referenced by the myLabel outlet using the headline font style sized according to the user’s preferred content size setting as shown in Figure 23-3:
Figure 23-3
The above example uses an attributed string to set one attribute for the entire text string. In practice, attributed strings can contain multiple attributes covering different ranges of characters within the string. Multiple attributes within an attributed string require the use of the NSMutableAttributedString class. Once an instance of this class has been created and initialized with a string, the addAttribute method may be called to add attributes for ranges of characters in the string. For the purposes of the example project, this approach will be used to change the colors used to render the words “Apple” and “Watch” in the label in Figure 23 3. The code to achieve this reads as follows:
| Purchase the fully updated watchOS 2/Swift 2 edition of this book in eBook ($12.99) or Print ($27.99) format watchOS 2 App Development Essentials Print and eBook (ePub/PDF/Kindle) editions contain 35 chapters. |
let headlineFont =
	UIFont.preferredFontForTextStyle(UIFontTextStyleHeadline)

let fontAttribute = [NSFontAttributeName : headlineFont]

let attributedText = NSMutableAttributedString(
			string: "Apple Watch",
                      attributes: fontAttribute)

let firstRange = NSRange(location: 0, length: 5)
let secondRange = NSRange(location: 6, length: 5)

attributedText.addAttribute(
			NSForegroundColorAttributeName,
			value: UIColor.greenColor(),
			range: firstRange)

attributedText.addAttribute(
			NSForegroundColorAttributeName,
			value: UIColor.redColor(),
			range: secondRange)

myLabel.setAttributedText(attributedText)
The above code creates a mutable attributed string using the headline text style font. Two range objects are then created and initialized to encompass the first and second words of the “Apple Watch” text. These ranges are then used when adding color attributes to the string.
When the example is now run, the words displayed on the label will be rendered in green and red.
Using System Fonts
The system fonts use the same Apple San Francisco font family as the text style font options outlined earlier in this chapter. Unlike text styles, however, system fonts allow attributes such as point size and style (italic, bold etc) to be selected. System font sizes, however, are not subject to the prevailing preferred content size category setting and should be used only when the required results cannot be achieved using text style fonts. As with text style fonts, system fonts may be selected at design-time within Interface Builder, or specified dynamically in the code of an interface controller.
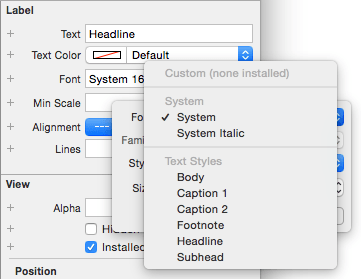
To select a system font in Interface Builder, select the interface object to which the font is to be applied, display the Attributes Inspector and click on the “T” button in the Font setting field. From the drop-down menu, click on the Font menu button and select either the System or System Italic option from the options listed under the System heading as shown in Figure 23-4:
Figure 23-4
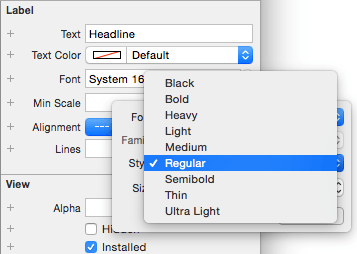
Once a system font setting has been selected, a variety of options are available to configure the size and appearance of the font when used to render text. In Figure 23-5, for example, the range of style selections is displayed in the Attribute Inspector font menu:
Figure 23-5
As with text style fonts, system font objects can be obtained by making calls to methods of the UIFont class, specifying as a parameter the required point size of the font. Among the system font methods supported by the UIFont class are methods to obtain regular, bold and italic font objects of a specified point size:
// Returns a regular 12 pt system font
let regularFont = UIFont.systemFontOfSize(12)

// Returns an italic 14 pt system font
let italicFont = UIFont.italicSystemFontOfSize(14)

// Returns a bold 16 pt system font
let boldFont = UIFont.boldSystemFontOfSize(16)
As with text style fonts, a system font object can be used when rendering text within a WatchKit app scene through the use of attributed strings.
Summary
WatchKit provides support for text style, system and custom fonts. Text style fonts are referenced by style (body, headline, sub-heading etc) and are tailored automatically by the UIFont class to match the user’s preferred content size category setting.
System fonts, on the other hand, use the same font family as text style fonts but allow the selection of style and point size attributes. System fonts are not subject to the user’s preferred content size setting and, as such, should be used only when the desired results cannot be achieved using text styles.
When using fonts in WatchKit app code, it is necessary to use attributed strings to incorporate the font in the text string being displayed. The use of mutable attributed strings allows multiple attributes such as fonts and colors to be included in a single string.
| Purchase the fully updated watchOS 2/Swift 2 edition of this book in eBook ($12.99) or Print ($27.99) format watchOS 2 App Development Essentials Print and eBook (ePub/PDF/Kindle) editions contain 35 chapters. |
| Previous | Table of Contents | Next |
| A WatchKit Animated Image Tutorial | A WatchKit App Custom Font Tutorial |
