Configuring Windows Server 2008 NAP DHCP Enforcement
(Redirected from Windows Server 2008 NAP Enforcement for DHCP)| Previous | Table of Contents | Next |
| Managing a Windows Server 2008 DHCP Server from the Command Line | Setting Up a Windows Server 2008 Print Server |
| Purchase and download the full PDF and ePub versions of this eBook only $9.99 |
Network Access Protection (NAP) is a system designed to protect networks from clients which are not deemed to be secure or healthy (to use Microsoft's terminology). When NAP is implemented, clients without the required level of "health" are directed to a remediation server where the necessary updates may be obtained to bring the system into compliance with the Network Access policy of the network. In addition, the user may also be directed to a web page providing details of why access to the network has been declined and outlining the steps necessary to remedy the problem.
One way to implement NAP is to integrate it with DHCP so that the NAP policies can be enforced whenever a client attempts to lease or renew an IP address. One point to note before implementing such a configuration is that NAP enforcement will only take place for clients which obtain an IP address via DHCP. Clients with static IP addresses will not be subject to NAP enforcement.
The subject of Network Access Protection is large, and as such, much of the detail is beyond the scope of this chapter. In fact entire books could, and probably will, be written on the subject. The objective of this chapter, therefore, is to focus solely on the integration of NAP into DHCP. Once the steps outlined in this chapter are complete it will be necessary to either configure the Windows Security Health Validator (WSHV), or to install and configure other suitable system health agents (SHAs) and system health validators (SHVs).
NAP Enforcement for DHCP involves a DHCP Network Access Protection (NAP) enforcement server component, a DHCP enforcement client component, and Network Policy Server (NPS).
Installing the Network Policy Server
The first step in integrating DHCP and NAP is to install the Network Policy Server role on the system. This is achieved by starting the Server Manager, selecting Roles from the left hand pane and clicking on Add Roles. In the Add Roles wizard select the check box next to Network Policy and Access Services and then click Install to continue the installation process.
Alternatively, the role may be installed from the command prompt using the servermanagercmd tool as follows:
servermanagercmd -install npas
Configuring NAP in the NAP console
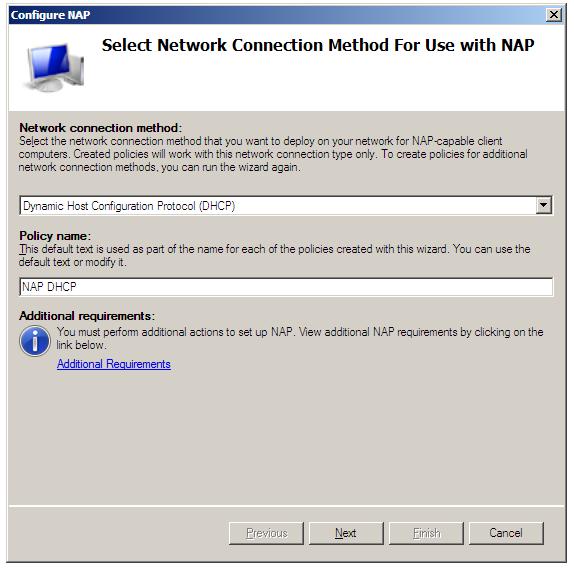
With the Network Policy Server role installed the next step is to configure NAP. Begin by launching the Network Policy console (Start -> All Programs -> Administration Tools -> Network Policy Server). Once loaded, select Dynamic Host Configuration Protocol as the Network connection method and either accept the default policy name of NAP DHCP, or enter a new name for the policy:
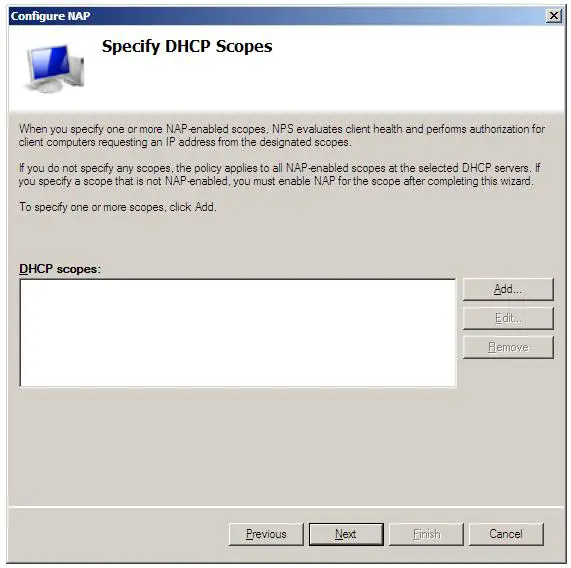
With these settings configured, click Next to display the NAP Enforcement Servers screen. If the DHCP Server is running on the local computer this screen can be skipped. On the other hand, the DHCP servers are running on one or more remote servers, they must each have the Network Policy Server role installed and be configured as a RADIUS proxy to forward connection requests to the local NPS server. Click the Add... button and enter the name and IP address of the remote DHCP Server and either manually enter or generate a shared secret, which will need to be entered into the NAP DHCP policy of any remote DHCP servers. Repeat this process for each remote DHCP server before clicking on Next to proceed to the DHCP Scopes screen:

If network client health is to be enforced for all IP addresses allocated by the DHCP server then no scopes need to be defined here. If, on the other hand, NAP enforcement is only required for certain IP address ranges, define the scopes here.
On the next screen enter specific machines and users which are to be granted or denied access. The NAP Remediation Server settings page allows the addresses of Remediation Servers to be specified, where clients may obtain the necessary updates to reach NAP compliance. It is also possible to specify a web page URL which displays information to the user about how to bring their computers into compliance with the defined policy. When the appropriate information has been entered, click Finish to complete this phase of the configuration.
Configuring DHCP Server NAP Settings
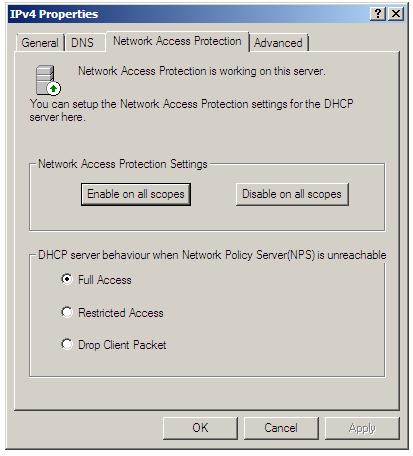
<google>WIN28BOX</google> The NAP settings associated with a DHCP sever can be configured either on a server-wide (global) or per-scope basis. To configure global settings for a DHCP server, open the DHCP console (Start -> All Programs -> Administration Tools -> DHCP) and unfold the tree in the left panel for the required DHCP server. Right click on IPv4, select Properties and select the Network Access Protection tab as illustrated in the following figure:
Within this screen, Network Access Protection settings on all scopes can be enabled or disabled using the two buttons. Further, the default behavior of the DHCP server when the Network Policy Server (NPS) is unreachable may also be configured. In Full Access mode, all DHCP clients are given full and unrestricted access to the network (essentially behaving as though NAP enforcement is not implemented). Restricted Access allows clients to access resources only on the server to which they are connected. The rest of the network is off limits until the NPS server comes back online. Finally, Drop Client Packet prevents all client access to the network.
Configuring NAP Settings for Scopes
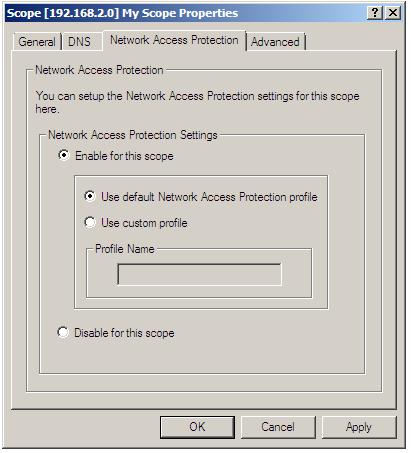
The NAP settings for specific scopes can also be accessed and modified using the DHCP console. Once the DHCP console is running (as outlined in the preceding section), unfold the required server from the left hand panel then unfold the IPv4 entry so that currently configured scopes are listed. Right click on the required scope entry, select Properties and click on the Network Access Protection tab:
Enable or disable NAP for the select scope using the appropriate selections in the property panel. If NAP is to be enabled for the scope, either elect to use the default NAP profile, or specify the name of a pre-existing custom profile. Once the settings are configured, click OK.
| Purchase and download the full PDF and ePub versions of this eBook only $9.99 |


