Testing and Customizing FirebaseUI Auth Authentication
| Previous | Table of Contents | Next |
| Email/Password Authentication using FirebaseUI Auth | Google Sign-In Authentication using FirebaseUI Auth |
The previous chapter worked through the development of an Android app that uses the FirebaseUI Auth API to implement email/password based user authentication. At the end of that chapter, the app was largely complete and ready to be tested. This chapter will work through the testing of the app and, in doing so, demonstrate both the account creation and sign-in features of FirebaseUI Auth and the user account management options within the Firebase console.
Once testing of the app is complete, this chapter will also introduce some of the options that are available to customize the appearance and behavior of the FirebaseUI Auth interface.
Authentication Testing Environment
The Firebase authentication features can be tested on either a physical device or a suitably configured emulator. In particular, the emulator must be running a version of Android that includes the Google APIs.
Firebase Console User Management
Before testing the FirebaseAuth app it is worth gaining some familiarity with the user management features located in the Authentication section of the Firebase console.
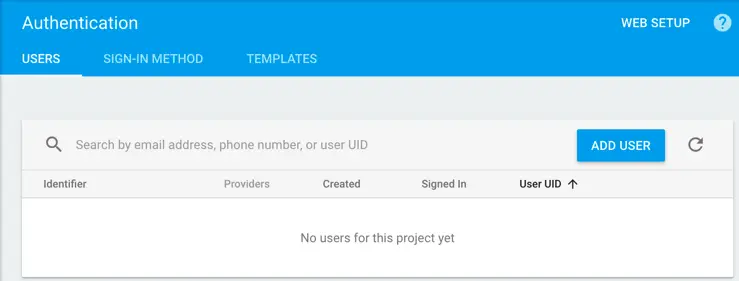
Log into the Firebase console and select the Firebase Examples project followed by the Authentication option located in the left-hand navigation panel. Within the Authentication screen, select the Users tab as illustrated in Figure 5-1:
Figure 5-1
Note that there are currently no users associated with this project. As users are added from within the app, they will be listed within this panel. A button is also provided for the manual addition of users. The list may be refreshed at any time by clicking on the reload button located to the right of the Add User button.
Testing the FirebaseAuth App
Compile and run the FirebaseAuth app, either on a physical device or a simulator session. Once the app has loaded, it will immediately prompt for the user to enter an email address as shown in Figure 5-2:
Figure 5-2
Start by entering an invalid email address (for example one containing spaces) and selecting the Next button. Note that the Firebase authentication system reports that the email address is not correctly formatted.
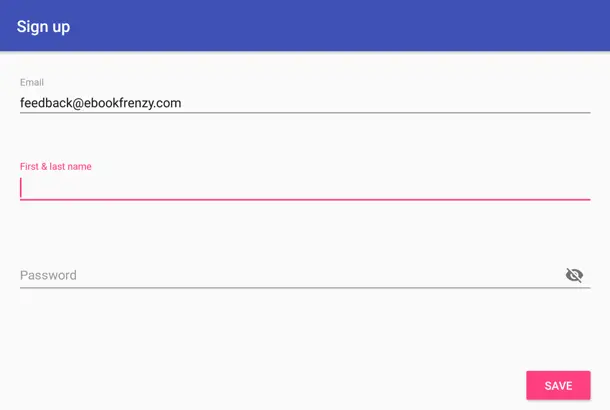
Enter your email address into the Email field and tap the Next button. When a valid email address is entered, the authentication process contacts Firebase to find out if the email address is already stored in the list of users for the Firebase Examples project. Since the email address is not yet associated with any existing users, the account creation screen (Figure 5 3) is displayed:
Figure 5-3
Enter your name and specify a password to be associated with the account before tapping the Save button. The account creation screen will insist on a password of at least 6 characters in length and provides the option to display the password by tapping the eye icon in the far right of the password field.
Once the name and password information have been saved, the account will be created and the user signed in, causing the SignedInActivity screen to appear displaying the email address and name associated with the newly created account.
Return to the browser window displaying the list of authenticated users and click on the refresh button. Once the list has updated the newly added account should be listed. This entry in the list will include the email address, an envelope icon indicating that this is an email address/password based account, the creation and last sign-in date and the user’s unique identifier (UID). Moving the mouse pointer over the list entry will cause additional options to appear. The button containing three vertically arranged dots will, when clicked, present a menu of account management options as illustrated in Figure 5-4:
Figure 5-4
A deleted account cannot be subsequently restored, though a disabled account can be re-enabled at any time using the same menu. Requesting a password reset will result in a password reset email containing a link allowing the user to reset the password being sent to the email address associated with the account.
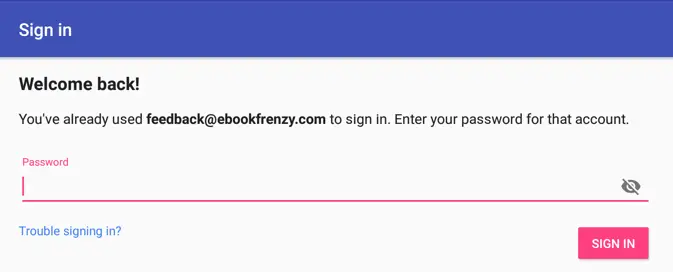
Within the running FirebaseAuth app, tap the Sign Out button to return to the original sign-in screen and enter the same email address before tapping the Next button. This time, Firebase will discover that an account associated with the email address exists and request the corresponding password:
Figure 5-5
As can be seen in Figure 5-5 above, the password screen includes a Trouble signing in? link which, when selected will provide the user with the option to receive the same password reset email as that sent from within the Firebase console.
Enter the password for your account and wait to be logged into the SignedInActivity screen.
Customizing the Password Reset Email Message
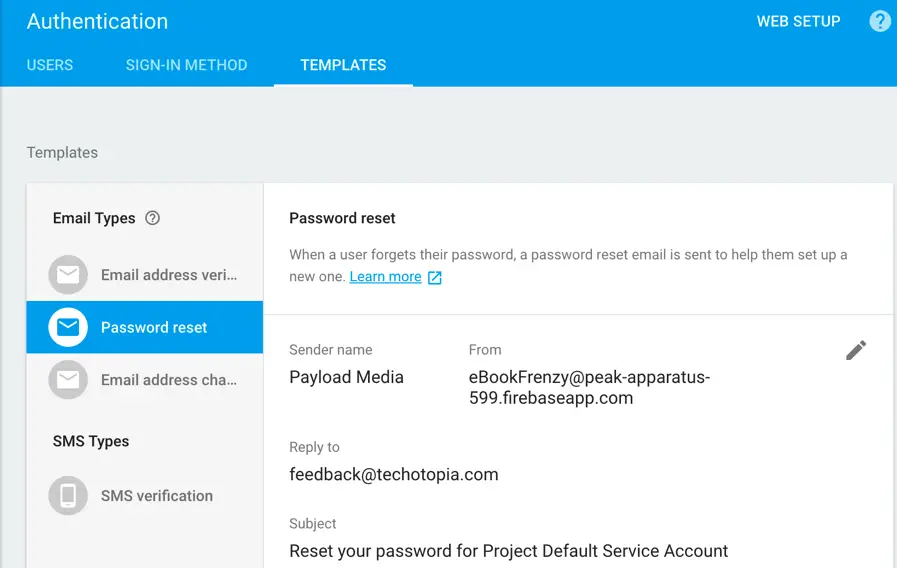
Firebase provides three email templates for messages that will be sent to users for email address verification, password reset and email address change. These templates are customizable and accessible from the Templates tab within the Authentication screen of the Firebase console. Figure 5 6, for example, shows the standard message template that is sent when a user requests a password reset email:
Figure 5-6
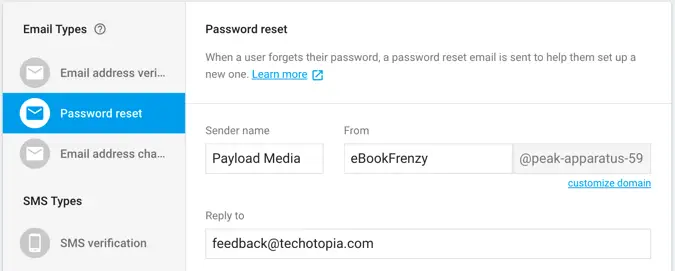
Click on the pencil icon to edit the settings for the message. By default, the email message will use the specified subject and title text. There will be no reply-to email address, no sender name and the message will appear to have been sent by noreply@<app-identifier>.firebaseapp.com. The email address settings can be changed within the top section of the template editing screen shown in Figure 5-7:
Figure 5-7
To change the domain containing the from email address it will be necessary to prove ownership of the domain. Click on the customize domain link, enter the URL of your web site domain, click on the Continue and edit the settings for the domain’s DNS records as instructed. After the changes have been made click on the Verify button. It may take up to 48 hours before the DNS settings take effect and the domain is successfully verified.
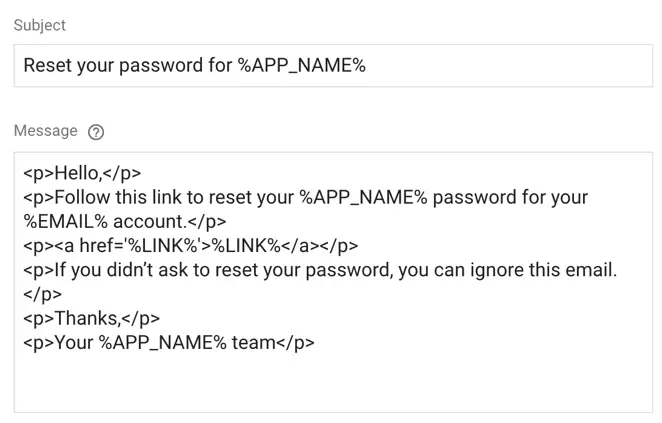
The middle section of the screen allows the subject and message content to be customized:
Figure 5-8
Both the subject and message content allow the use of the following placeholder variables which are automatically replaced by the corresponding values when the message is sent to the user:
• %DISPLAY_NAME% - The user’s first name.
• %APP_NAME% - The name of the app for which the user is requesting a password reset.
• %LINK% - The link on which the user clicks to initiate the password change.
• %EMAIL% - The user’s email address.
• %NEW_EMAIL% - Used only when the user is performing an email address change, this is replaced by the new email address.
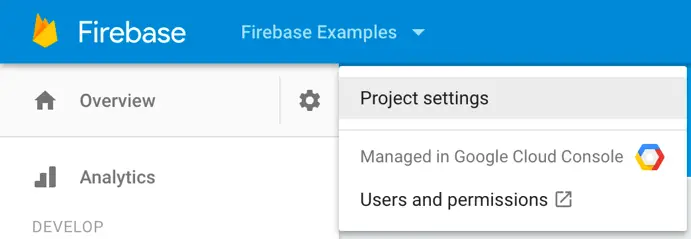
The name used to replace the %APP_NAME% placeholder is set by default to “Project Default Service Account”. To change this, click on the cog icon to the right of the Firebase Examples project name in the upper left-hand corner of the Firebase console and select the Project Settings option (highlighted in Figure 5 9):
Figure 5-9
On the General screen of the Settings panel, click on the pencil icon to the right of the Public-facing name value, enter the new name into the resulting dialog and click Save to commit the change:
Figure 5-10
The final customization option (Figure 5 11) allows the password URL to be changed (also referred to as the action URL) to reference your own server instead of letting Firebase handle the password change. When a custom URL has been specified, this URL will be substituted for the %LINK% placeholder within the email message, with two additional parameters (mode and oobCode) appended to the end:
Figure 5-11
Testing the Password Reset
Take some time to customize the password reset email template, then return to the running FirebaseAuth app. Tap the Sign Out button to return to the sign-in screen, re-enter your email address and click Next. On the password screen, select the Trouble signing in? link and follow the steps to send a password reset email. When the email arrives in your inbox, review it to make sure it matches the changes before clicking on the provided link to change the password. The reset link may only be clicked once and expires shortly after the email has been sent to the user.
Enabling Smart Lock for Passwords
So far, the example app has not made use of Smart Lock for Passwords. Smart Lock is the technology behind the Google Chrome browser feature that remembers login and password information for the web sites visited by a user. This feature, when enabled, is also available to Android apps using Firebase authentication.
Smart Lock for Passwords allows the authentication system to present a list of credentials previously stored on the device by the user using Smart Lock. The user simply selects a previously stored identity to sign into or sign up for access to the app.
Smart Lock is enabled when calling the createSignInIntentBuilder() method on the AuthUI instance. To enable Smart Lock for the FirebaseAuth project, edit the FirebaseAuthActivity.java file, locate the authenticateUser() method and modify the setIsSmartLockEnabled() method to pass through a true value:
private void authenticateUser() {
    startActivityForResult(
            AuthUI.getInstance().createSignInIntentBuilder()
                    .setAvailableProviders(getProviderList())
                    .setIsSmartLockEnabled(true)
                    .build(),
            REQUEST_CODE);
}
When the app is run on a device, the user will be presented with a list of identities that have been previously saved to the user’s Google account:
Figure 5-12
If an identity is selected from the list for which an account has already been created for the Firebase project, and for which Smart Lock has been used to save the password, the user will be directly logged into the device. If no account yet exists, the user will be required to create an account before proceeding.
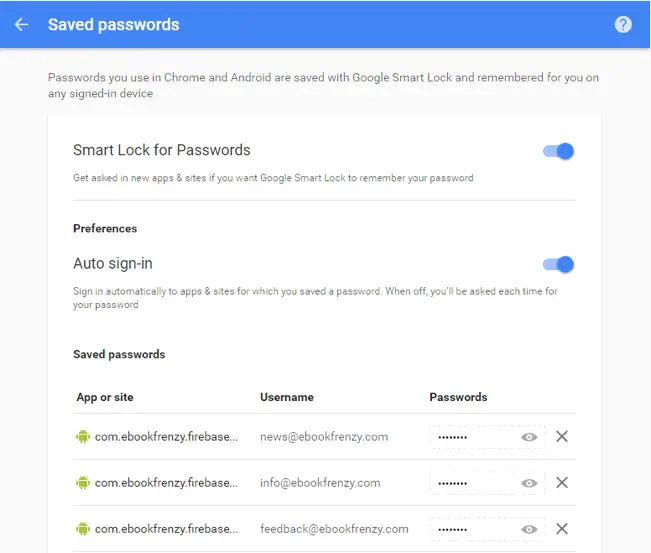
The identities associated with the user’s Google account may be reviewed and edited at any time by visiting the following URL:
Figure 5-13, for example, shows the Google Smart Lock entries for the FirebaseAuth app as stored by Google Smart Lock for passwords:
Figure 5-13
Color Customization
A different color theme may be specified for the FirebaseUI Auth account creation and sign-in screens. This is particularly useful when the screens are required to match the overall branding or color theme of the app. Where possible, it is recommended that the color selections chosen conform to the Material design guidelines.
Material design was created by the Android team at Google and dictates that the elements that make up the user interface of Android and the apps that run on it appear and behave in a certain way in terms of behavior, shadowing, animation and style. Details on Material color styles, color palettes and schemes can be found online at the following URL:
https://material.google.com/style/color.html
The referenced web page also includes a palette of colors that have been chosen to work together within the theme of an Android app.
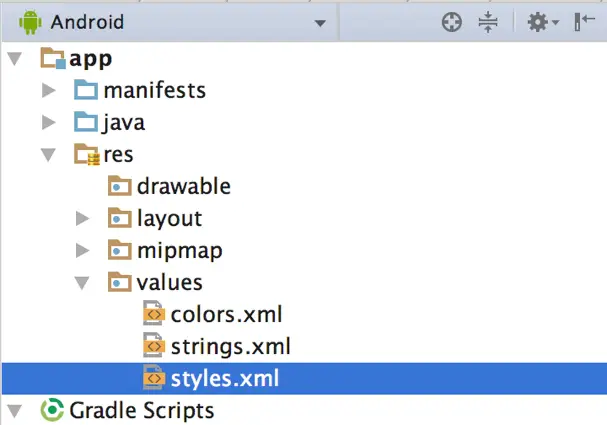
Declaring a custom theme for the Firebase authentication UI is a two-step process which begins with adding a new style to the project’s styles.xml file located under app -> res -> values within the project tool window:
Figure 5-14
Within the FirebaseAuth project, edit this styles.xml file and add the following custom theme entry:
<style name="CustomTheme" parent="FirebaseUI">
    <item name="colorPrimary">@color/material_green_600</item>
    <item name="colorPrimaryDark">@color/material_green_700</item>
    <item name="colorAccent">@color/material_purple_a700</item>
    <item name="colorControlNormal">@color/material_green_500</item>
    <item name="colorControlActivated">@color/material_lime_a800</item>
    <item name="colorControlHighlight">@color/material_green_a200</item>
    <item name="android:windowBackground">@color/material_lime_50</item>
    <item name="colorButtonNormal">@color/material_purple_500</item>
</style>
The color values referenced above were all taken from the Material color palette. The next step is to declare the colors referenced in the above style. These need to be declared in colors.xml file located under app -> res -> values. Edit this file and add the following color entries:
<color name="material_green_600">#43A047</color>
<color name="material_green_500">#4CAF50</color>
<color name="material_green_700">#388E3C</color>
<color name="material_green_a200">#69F0AE</color>
<color name="material_lime_a800">#AFB42B</color>
<color name="material_lime_50">#F9FBE7</color>
<color name="material_purple_a700">#AA00FF</color>
<color name="material_purple_500">#9C27B0</color>
Once the style and colors have been declared, the new theme needs to be referenced during the building of the sign-in intend via a call to the setTheme() method. Edit the FirebaseAuthActivity.java file, locate the authenticateUser() method and modify it to change the theme:
private void authenticateUser() {
    startActivityForResult(
            AuthUI.getInstance().createSignInIntentBuilder()
                    .setTheme(R.style.CustomTheme)
                    .setAvailableProviders(getProviderList())
                    .setIsSmartLockEnabled(true)
                    .build(),
            REQUEST_CODE);
}
Compile and run the app and verify that the sign-in and account creation screens have adopted the specified theme. To gain a familiarity with the different color settings, experiment with different colors within the theme using the Material color palette as a guideline.
Specifying a Logo
In addition to changing the color theme, FirebaseUI Auth also allows a logo to be specified for presentation during the sign-in process. For this example, the firelogo.png image file contained within the project_images folder of the sample code download will be used. If you have not already downloaded the code samples, the archive can be downloaded using the following link:
http://www.ebookfrenzy.com/print/firebase_android
Locate the firelogo.png image in the file system navigator for your operating system and copy the image file. Right-click on the app -> res -> drawable entry in the Project tool window and select Paste from the menu to add the file to the folder. When the copy dialog appears, click on OK to accept the default settings:
Figure 5-15
With the logo added to the project, all that remains is to include it when the sign-in intent is constructed. In this case, the logo is added via a call to the setLogo() method as outlined in the following listing:
private void authenticateUser() {
    startActivityForResult(
            AuthUI.getInstance().createSignInIntentBuilder()
                    .setTheme(R.style.CustomTheme)
                    .setLogo(R.drawable.firelogo)
                    .setAvailableProviders(getProviderList())
                    .setIsSmartLockEnabled(true)
                    .build(),
            REQUEST_CODE);
}
Although the logo has been included in the activity, it would not be visible were the app to be run now. This is because the logo only appears when the authentication provider selection screen is displayed. Since the app is currently configured to use only one provider in the form of email and password authentication, this screen is not yet used. The logo will, however, become visible during the next chapter (entitled Google Sign-In Authentication using FirebaseUI Auth) when another authentication provider is added to the project.
Deleting the Test Account
The final area to test is the deletion of the user’s account. The SignedInActivity screen contains a button configured to delete the current user from the list of registered users. Verify that the account deletion code works by launching the FirebaseAuth app and signing in using the previously registered account credentials. Once the SignedInActivity screen appears, tap the Delete Account button. The user will be signed out of the app and the account deleted. Open the Firebase console in a browser window, navigate to the Authentication page for the Firebase Examples project and verify that the account is no longer listed on the Users screen.
Summary
In the previous chapter, an example project was created that used the FirebaseUI Auth system to implement email and password based authentication. This chapter has performed a sequence of tests intended not only to verify that the code works but also to outline many of the features that are provided by default when using Firebase Authentication. This chapter has also explored the various ways in which the Firebase authentication process can be configured and customized, including the use of Smart Lock, customizing the password reset email message, changing color themes and adding a logo.
| Previous | Table of Contents | Next |
| Email/Password Authentication using FirebaseUI Auth | Google Sign-In Authentication using FirebaseUI Auth |
