A WatchKit Page-based Navigation Tutorial
| Previous | Table of Contents | Next |
| WatchKit Page-based User Interfaces and Modal Interface Controllers | WatchKit App and Parent iOS App Communication |
| Purchase the fully updated watchOS 2/Swift 2 edition of this book in eBook ($12.99) or Print ($27.99) format watchOS 2 App Development Essentials Print and eBook (ePub/PDF/Kindle) editions contain 35 chapters. |
This chapter will work through the creation of an example that makes use of both page-based navigation and modal interface controller presentation within a WatchKit app.
The project created in this chapter will involve a variation on the fitness app created in the chapter entitled A WatchKit Table Tutorial. In this case, the user interface will consist of a sequence of scenes within a page-based interface, each containing a fitness exercise image and a button. When selected by the user, the button will cause a modal interface controller to appear containing a Timer object which will show the user how much time is left to perform the corresponding workout step. When the countdown reaches zero, the app extension will play an alert sound to notify the user that the time has expired.
Contents
-
Creating the Page Example Project
-
Adding the WatchKit App Target
-
Adding the Image Files to the Project
-
Designing the First Interface Controller Scene
-
Adding More Interface Controllers
-
Establishing the Segues
-
Assigning Interface Controllers
-
Adding the Timer Interface Controller
-
Adding the Modal Segues
-
Configuring the Context Data
-
Configuring the Timer
-
Playing the Alert Sound
-
Summary
Creating the Page Example Project
Start Xcode and create a new iOS project. On the template screen choose the Application option located under iOS in the left hand panel and select Single View Application. Click Next, set the product name to PageDemoApp, enter your company identifier and make sure that the Devices menu is set to Universal. Before clicking Next, change the Language menu to Swift. On the final screen, choose a location in which to store the project files and click on Create to proceed to the main Xcode project window.
Adding the WatchKit App Target
For the purposes of this example we will, once again, assume that the iOS app has already been implemented. The next step, therefore, is to add the WatchKit app target to the project. Within Xcode, select the File -> New -> Target… menu option. In the target template dialog, select the Apple Watch option listed beneath the iOS heading. In the main panel, select the WatchKit App icon and click on Next. On the subsequent screen turn off the Include Glance Scene and Include Notification Scene options before clicking on the Finish button. As soon as the extension target has been created, a new panel will appear requesting permission to activate the new scheme for the extension target. Activate this scheme now by clicking on the Activate button in the request panel.
Adding the Image Files to the Project
Before designing the interface controller scene, some image files need to be added to the project. These are contained within the following ZIP file:
http://www.ebookfrenzy.com/watchkit/fitness_icons_large.zip
Within the code Project Navigator panel, select the Images.xcassets entry listed under the PageDemoApp WatchKit App Extension folder so that the asset catalog panel appears. Ctrl-click in the left hand panel of the asset catalog and select the Import… option from the resulting menu.
In the file import selection panel, navigate to and select the fitness_icons_large folder before clicking on the Open button. The images will be imported into the asset catalog as an image set named fitness_icons_large.
Designing the First Interface Controller Scene
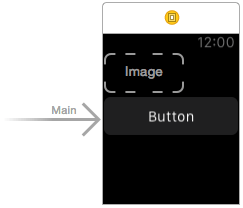
The user interface for the app is going to consist of three scenes, each containing an Image object and a Button. Select the Interface.storyboard file located under PageDemoApp WatchKit App in the Project Navigator panel, locate the main scene in the Interface Builder tool and add an Image and a Button object to the scene so that it appears as shown in Figure 10-1:
Figure 10-1
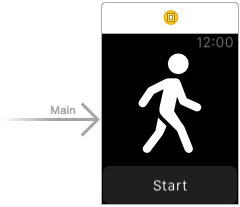
Select the Image object in the scene, display the Attributes Inspector and select the walking image from the Image menu. With the image object still selected and remaining in the Attributes Inspector, change the Mode setting to Aspect Fit and the Horizontal position attribute to Center.
Double click on the Button object and change the text so it reads “Start”. Keep the Button object selected and change the Vertical position property in the Attributes Inspector to Bottom. On completion of these settings the layout should match that shown in Figure 10-2:
Figure 10-2
Adding More Interface Controllers
This phase of the project requires that an additional two interface controllers be added to the storyboard file. Locate the Interface Controller item in the Object Library panel and drag and drop two instances onto the storyboard canvas so that the objects are positioned to the right of the main controller (Figure 10-3):
Figure 10-3
Since the user interface design for the remaining two scenes will be similar to that of the first, a quicker option than manually designing the scenes is to cut and paste the objects from the first scene. Hold down the Shift key and click on the Image and Button objects in the main scene. Press Cmd-C to copy the objects, select the second interface controller scene and use Cmd-V to paste the objects into the scene. Select the third scene and perform the paste operation once again.
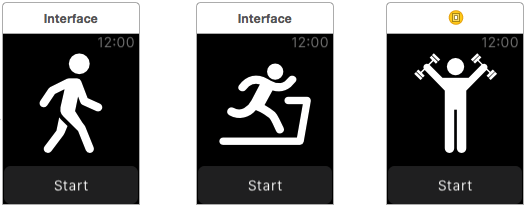
Select the Image object in the second scene, display the Attributes Inspector and change the image value to the treadmill image. Repeat this step to change the image in the third scene to weights. On completion of these steps, the three interface controller scenes should appear as shown in Figure 10-4:
Figure 10-4
Establishing the Segues
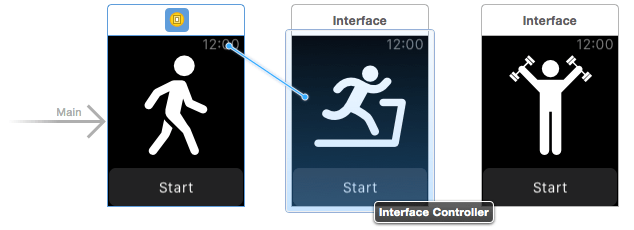
For the three interface controllers to work within a page-based navigation interface, the controllers must be connected using next page segues. To achieve this, Ctrl-click on the title bar of the first scene (the title bar is the area which currently shows a time of 12:00). Drag the resulting line to the second interface controller until it highlights (Figure 10-5) and release the line. In the segue relationship menu select the next page option.
Figure 10-5
Repeat the above steps to establish a segue between the second and third interface controllers so that the storyboard matches that of Figure 10-6:
Figure 10-6
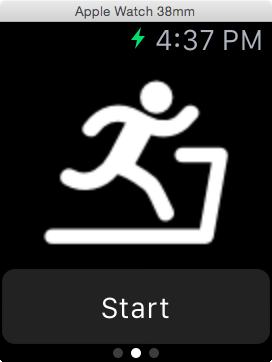
Run the app and test that the three scenes can now be navigated by making swiping motions on the display:
Figure 10-7
Assigning Interface Controllers
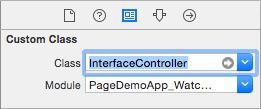
The scene now consists of three scenes but at the moment only the first scene has an Interface Controller associated with it. One approach to take at this point might be to add two new interface controller classes to the project, one for each of the two remaining scenes in the page-based navigation set. Since all three scenes essentially perform the same task, however, a more efficient approach is to use the same interface controller class for all three. The first scene is already assigned to the InterfaceController class, so select the second scene so that it is highlighted in blue, display the Identity Inspector panel and change the Class menu setting to InterfaceController (Figure 10-8). Repeat these steps with the third interface controller selected.
Figure 10-8
In each case, make sure that the Module menu is set to PageDemoApp_WatchKit_Extension.
Adding the Timer Interface Controller
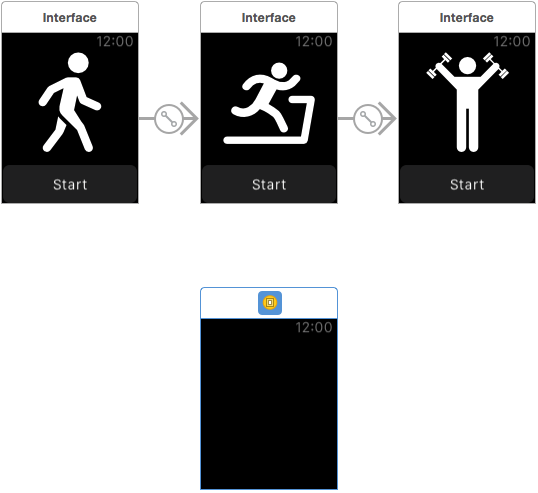
When the Start button is tapped on any of the paged controller scenes an additional scene will be modally displayed to the user. This scene will contain a single object in the form of a WKInterfaceTimer instance. Start by dragging and dropping an Interface Controller object from the Object Library panel so that it is positioned beneath the three existing scenes in the storyboard:
Figure 10-9
Drag and drop a Timer object from the Object Library onto the newly added scene. With the Timer object selected, display the Attributes Inspector panel and set the Horizontal and Vertical position attributes to Center.
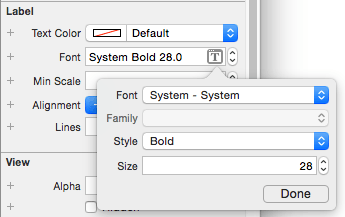
Click on the “T” button within the Font text field, select System from the popup panel, Bold from the Style menu and set the Size setting to 28 as shown in Figure 10-10:
Figure 10-10
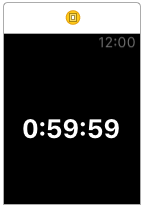
On completion of these steps the scene should match that illustrated in Figure 10-11:
Figure 10-11
By default, the Timer object displays hours, minutes and seconds as numbers (referred to as positional format). A range of other configuration alternatives is available within the Attributes Inspector for changing both what is displayed on the timer and how it is displayed. It is, for example, possible to also display month, week, day and year values. It is also possible to change the way in which this information is displayed, including fully spelling out the time and date in words instead of numbers. Although this example will use the default setting, it is worth reviewing the options in the Attributes Inspector panel for future reference.
Locate and select the PageDemoApp WatchKit Extension entry in the Xcode Project Navigator panel, Ctrl-click on it and select the New File… menu option. Create a new iOS Cocoa Touch Class named TimerInterfaceController subclassed from WKInterfaceController and proceed with the steps to generate the class source file into the PageDemoApp WatchKit Extension project folder.
Return to the Interface.storyboard file, select the timer scene so that it is highlighted in blue and, using the Identity Inspector panel change the Class menu to TimerInterfaceController. Switch to the Attributes Inspector panel and enter TimerInterfaceController into the Identifier field.
Select the Timer object in the timer scene, display the Assistant Editor panel and verify that it is displaying the source code for the TimerInterfaceController.swift file. Ctrl-click on the Timer object and drag the resulting line to a position immediately after the class declaration line in the Assistant Editor panel. Release the line and establish an outlet named workoutTimer. On completion of these steps the start of the TimerInterfaceController.swift file should read as follows:
import WatchKit
import Foundation

class TimerInterfaceController: WKInterfaceController {

    @IBOutlet weak var workoutTimer: WKInterfaceTimer!

    override func awakeWithContext(context: AnyObject?) {
        super.awakeWithContext(context)

        // Configure interface objects here.
    }
.
.
.
}
With the timer interface controller added and configured, the next step is to implement the modal segues so that the interface controller is presented when the Start buttons are tapped.
Adding the Modal Segues
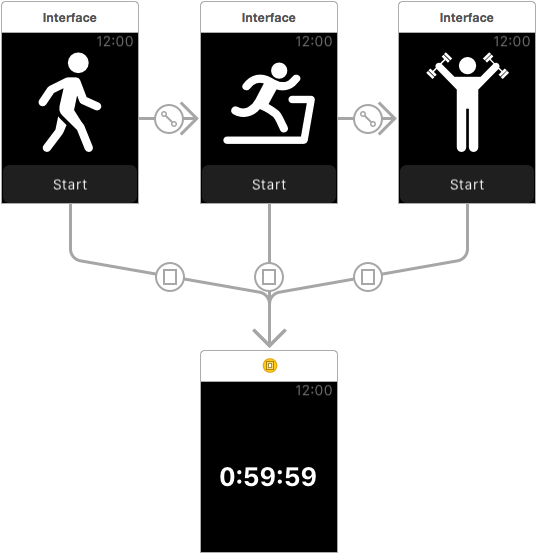
When the buttons on the three paged scenes are tapped by the user, the timer scene will need to be displayed modally. Establish the first segue by Ctrl-clicking on the Button object in the first scene and dragging to the timer scene. Release the line and select the modal option from the Action Segue menu. Repeat these steps for the Button objects on the remaining two scenes so that the storyboard resembles Figure 10-12:
Figure 10-12
Compile and run the app and verify that tapping the button on each of the scenes causes the scene for the timer interface controller to appear. Note that a Cancel option is provided on the timer scene to return to the original scene.
| Purchase the fully updated watchOS 2/Swift 2 edition of this book in eBook ($12.99) or Print ($27.99) format watchOS 2 App Development Essentials Print and eBook (ePub/PDF/Kindle) editions contain 35 chapters. |
Configuring the Context Data
When the timer interface controller is presented it will need to be initialized with a countdown time. The amount of time will vary depending on the scene from which the timer was launched. This means that we will need to find a way to identify which of the three modal segues triggered the appearance of the timer interface controller and, based on that information, pass the appropriate time duration through as context data.
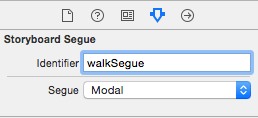
The first step in this process is to establish a way to distinguish one segue from another by assigning identifiers. Begin by selecting the segue line from the left most scene to the timer scene and displaying the Attributes Inspector panel. Within the panel, enter walkSegue into the Identifier field as shown in Figure 10-13:
Figure 10-13
Follow the same steps to assign identifiers to the two remaining modal segues named runSegue and weightsSegue respectively.
As explained in the chapter entitled WatchKit Page Based User Interfaces and Modal Interface Controllers, context data can be passed during a modal segue transition by implementing the contextForSegueWithIdentifier method within the originating interface controller. Passed as a parameter to this method is the identifier of the segue that triggered the call, allowing us to configure the context data according to the segue.
Select the InterfaceController.swift file and implement the contextForSegueWithIdentifier method so that it reads as follows:
override func contextForSegueWithIdentifier(segueIdentifier: String) -> AnyObject? {

    var contextValue: NSTimeInterval?

    switch (segueIdentifier) {
        case "walkSegue":
            contextValue = 10
        case "runSegue":
            contextValue = 20
        case "weightsSegue":
            contextValue = 30
        default:
            break
    }
    return(contextValue)
}
The code in the above method declares a variable in which to store the countdown time before using a switch construct to identify the current segue and select a time value which is then returned. The duration value will then be passed by the WatchKit framework to the destination interface controller via the awakeWithContext method of that class. For testing purposes, the duration values are set to seconds rather than minutes.
Configuring the Timer
When the timer interface controller is now displayed it will be passed a time duration value via the awakeWithContext lifecycle method. This time duration will subsequently need to be assigned to the Timer object in the scene and the countdown started. The WatchKit Timer object is initialized by passing through an NSDate object configured to the current time, a time in the future or a time in the past. Passing through the current time and date will cause the timer to begin counting upwards from 0:00. Passing through a date and time in the future will cause the timer to begin counting down towards that time and date. Specifying a date and time in the past, on the other hand, will start the timer at that date and time and begin counting upwards from that point.
Select the TimerInterfaceController.swift file, locate the awakeWithContext method and modify it so that it reads as follows:
override func awakeWithContext(context: AnyObject?) {
    super.awakeWithContext(context)

    if let duration: AnyObject = context {
        let date = NSDate(timeIntervalSinceNow:
				duration as! NSTimeInterval)
        workoutTimer.setDate(date)
        workoutTimer.start()
    }
}
The code verifies that a time value was passed through as the context object and uses that value to create an NSDate object configured to a time point in the future. The configured NSDate object is then used to initialize the Timer object using the previously configured outlet before the countdown is started.
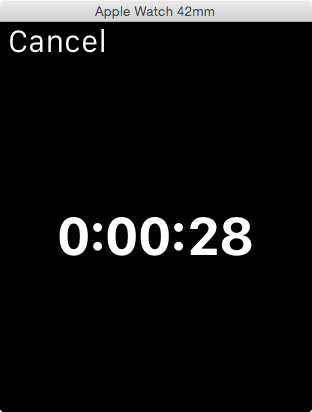
Run the application and note that the timer is now initialized and begins counting down when the timer scene is presented. The time duration should also differ depending on which scene triggers the segue as defined in the earlier switch statement:
Figure 10-14
Playing the Alert Sound
The final feature to be added to the project is to set up an alert sound to play to notify the user that the timer has reached zero. The problem that arises in implementing this behavior is that the WatchKit Timer object does not trigger an action when it reaches zero. The solution is to initialize an NSTimer instance to run for the same amount of time as the WatchKit Timer object and configured to call a selector method when the time has elapsed. The code to set up the NSTimer object needs to be added to the awakeWithContext method as follows:
override func awakeWithContext(context: AnyObject?) {
    super.awakeWithContext(context)

    if let duration: AnyObject = context {

        var timer = NSTimer.scheduledTimerWithTimeInterval(
		duration as NSTimeInterval,
		target: self,
		selector: Selector("playAlert"),
		userInfo: nil,
		repeats: false)

        let date = NSDate(timeIntervalSinceNow:
			duration as NSTimeInterval)
        workoutTimer.setDate(date)
        workoutTimer.start()
    }
}
The NSTimer object is configured to call a selector method named playAlert when the designated time has elapsed. The code in this method will require that the AVFoundation framework be imported and that an AVAudioPlayer variable be declared within the TimerInterfaceController.swift file as follows:
import WatchKit
import Foundation
import AVFoundation

class TimerInterfaceController: WKInterfaceController {

    @IBOutlet weak var workoutTimer: WKInterfaceTimer!

    var audioPlayer: AVAudioPlayer?
.
.
.
With these changes made, the next step is to add the playAlert method to the class:
func playAlert() {

    let url = NSURL.fileURLWithPath(
        NSBundle.mainBundle().pathForResource("alert_sound",
            ofType: "mp3")!)

    var error: NSError?

    audioPlayer = AVAudioPlayer(contentsOfURL: url, error: &error)

    if let err = error {
        println("audioPlayer error \(err.localizedDescription)")
    } else {
        audioPlayer?.prepareToPlay()
        audioPlayer?.play()
    }
}
The code creates a URL that references an audio file named alert_sound.mp3, initializes an AVAudioPlayer instance with the URL and assigns it to the audioPlayer variable declared at the top of the class file. Assuming no errors are detected, the audio player is instructed to begin playing the sound.
All that remains before testing the app again is to add the audio file to the project. The audio file can be downloaded using the following link:
http://www.ebookfrenzy.com/watchkit/audio_files.zip
Once located, drag and drop the alert_sound.mp3 file onto the Supporting Files folder located under PageDemoApp WatchKit Extension in the Xcode Project Navigator panel.
With the audio file added to the project, compile and run the app and test that the alert sound plays when the countdown reaches zero in the timer interface controller scene.
Summary
This chapter has worked through the design and implementation of an example WatchKit app containing a page-based scene navigation interface. The example also highlighted the steps involved in implementing modal interface controller presentation and the passing of context during segue transitions. The chapter also introduced the WatchKit Timer object and explored the use of an NSTimer instance in parallel with a Timer object to receive notification of the timer reaching zero.
| Purchase the fully updated watchOS 2/Swift 2 edition of this book in eBook ($12.99) or Print ($27.99) format watchOS 2 App Development Essentials Print and eBook (ePub/PDF/Kindle) editions contain 35 chapters. |
| Previous | Table of Contents | Next |
| WatchKit Page-based User Interfaces and Modal Interface Controllers | WatchKit App and Parent iOS App Communication |
