A Firebase Analytics Tutorial
| Previous | Table of Contents | Next |
| An Overview of the Firebase Analytics Screens | Firebase Test Lab |
Now that the basics of Firebase Analytics have been covered in some detail in the preceding chapters, this chapter will step through the creation of a simple Android application project that demonstrates some of the key features of both the Firebase Analytics library and the screens within the Firebase console. The tutorial will also make use of both the logcat and DebugView debug modes for viewing events and user parameter changes in real-time.
Contents
-
Creating the Firebase Analytics Project
-
Designing the User Interface
-
Adding Firebase Analytics Support to the Project
-
Performing the App Initialization
-
Adding the orderItem() Method
-
Enabling Debugging Modes
-
Adding the User Property in the Firebase Console
-
Testing the App
-
Creating an Audience
-
Summary
Creating the Firebase Analytics Project
The app created in this chapter will use Firebase Analytics to demonstrate the use of events, user properties and audiences.
Begin by starting Android Studio and selecting the Start a new Android Studio project quick start option from the welcome screen.
Within the new project dialog, enter Analytics into the Application name field and your domain as the Company Domain setting before clicking on the Next button.
On the form factors screen, enable the Phone and Tablet option and set the minimum SDK to API 16: Android 4.1 (Jellybean). Proceed through the screens, requesting the creation of an Empty Activity named AnalyticsActivity with a corresponding layout named activity_analytics.
Designing the User Interface
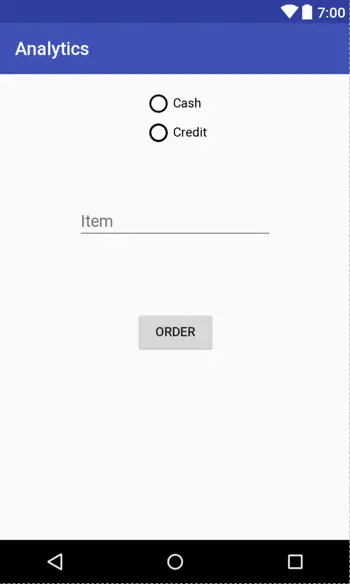
The user interfaced for the app consists of a simple layout containing an EditText view, two buttons and a RadioGroup containing two RadioButtons as illustrated in Figure 41‑1 below:
Figure 41‑1
Open the activity_analytics.xml file in the layout editor and select and delete the default TextView. From the Containers section of the widget palette, locate the RadioGroup object and drag and drop it into position on the layout canvas. Switch the palette to the Widgets category, then drag and drop two RadioButton instances onto the RadioGroup entry in the Component Tree panel as outlined in Figure 41‑2:
Figure 41‑2
Using the Properties panel, change the text displayed on the two RadioButtons to read “Cash” and “Credit” with IDs set to cashRadio and creditRadio respectively.
Next, drag and drop the EditText and Button views onto the layout. Delete the text property for the EditText view, set the hint property to “Item” and change the ID to itemText. Change the text property of the Button to “Order” and configure an onClick method named orderItem.
Finally, select all of the widgets in the layout, right-click on the Button and select the Center Horizontally menu option. Repeat this a second time, this time selecting the Center Vertically option.
Adding Firebase Analytics Support to the Project
Within Android Studio, select the Tools -> Firebase menu option to display the Firebase assistant panel. Within the assistant, unfold the Analytics section, click on the Log an Analytics event link and connect the project to Firebase using the existing Firebase Examples project.
Once the project has connected to Firebase, click on the Add Analytics to your app button and accept the proposed changes in the resulting dialog.
Performing the App Initialization
Before adding the code to log Analytics events, some steps must first be taken to obtain a reference to the FirebaseAnalytics instance and to add a listener to the RadioGroup container to detect changes to the user’s payment method selection. Edit the AnalyticsActivity.java file and make the following modifications to add import directives, declare variables and perform initialization tasks in the onCreate() method:
package com.ebookfrenzy.analytics;

import android.support.v7.app.AppCompatActivity;
import android.os.Bundle;
import android.view.View;
import android.widget.EditText;
import android.widget.RadioButton;
import android.widget.RadioGroup;

import com.google.firebase.analytics.FirebaseAnalytics;

public class AnalyticsActivity extends AppCompatActivity {

    private String paymentMethod = "Cash";
    private FirebaseAnalytics fbAnalytics;

    @Override
    protected void onCreate(Bundle savedInstanceState) {
        super.onCreate(savedInstanceState);
        setContentView(R.layout.activity_analytics);

        fbAnalytics = FirebaseAnalytics.getInstance(this);

        RadioGroup radioGroup = (RadioGroup) findViewById(R.id.radioGroup);
        radioGroup.check(R.id.cashRadio);

        radioGroup.setOnCheckedChangeListener(
			new RadioGroup.OnCheckedChangeListener() {
            @Override
            public void onCheckedChanged(RadioGroup group, int checkedId) {
                RadioButton radioButton =
			(RadioButton) group.findViewById(checkedId);
                if (radioButton != null && checkedId > -1) {
                    paymentMethod = radioButton.getText().toString();
                }
            }
        });
    }
.
.
}
Adding the orderItem() Method
The Button widget within the user interface layout is configured to call a method named orderItem() when clicked by the user. The code within the method will identify whether the customer is paying by cash or credit card and extract the ordered item from the EditText widget. An event named item_ordered will then be logged with parameters containing the ordered item and the user’s payment method. A user property named last_ordered will then be used to record the last item ordered by the user.
Edit the AnalyticsActivity.java file and add code for the orderItem() method as follows:
public void orderItem(View view) {

    EditText itemText = (EditText) findViewById(R.id.itemText);

    String item = itemText.getText().toString();
    fbAnalytics.setUserProperty("last_ordered", item);

    Bundle event = new Bundle();
    event.putString("item", item);
    event.putString("payment_method", paymentMethod);

    fbAnalytics.logEvent("item_ordered", event);
}
Enabling Debugging Modes
Before testing the app built in this chapter, both the logcat and DebugView debugging modes need to be enabled so that the event logging can be viewed in realtime.
Connect a device to the system on which Android Studio is running or launch an emulator. In a command prompt or terminal window, enable logcat debug mode by running the following command:
adb shell setprop log.tag.FA VERBOSE
adb shell setprop log.tag.FA-SVC VERBOSE
Next, enable DebugView mode using the following command, where <package name> is replaced by the package name used when the project was created:
adb shell setprop debug.firebase.analytics.app <package_name>
Adding the User Property in the Firebase Console
User properties are only visible within the Firebase console if they are first declared within the User Properties screen. Navigate to the Firebase console in a browser window, select the Firebase Examples project and, within that project, the Analytics app created in this chapter. If the app is not yet listed, it may be necessary to wait for a few hours before it appears.
Once the app has been selected, click on the Analytics link in the left-hand navigation panel so that the Analytics Dashboard screen appears. Click on the User Properties tab in the toolbar at the top of the dashboard screen followed by the New User Property button. In the new property panel, enter last_ordered into the user property name field and a brief description into the description field before clicking on the Create button. The property should then be listed as illustrated in Figure 41‑3:
Figure 41‑3
Testing the App
Compile and run the app on the device or emulator on which the two event debugging modes were enabled. Navigate to the DebugView within the Firebase console Analytics screens and display the logcat panel within the Android Monitor tool window within Android Studio. Once both are visible, enter an item name (for example pizza) into the EditText view and tap the Order button.
Within the logcat panel, both the event log and the user property creation should appear in the output as follows:
Logging event (FE): item_ordered, Bundle[{payment_method=Cash, _o=app, _sc=AnalyticsActivity, _si=3794813512415499826, item=}]
After logging the event, the setting of the user property will be reported:
Setting user property (FE): last_ordered, pizza
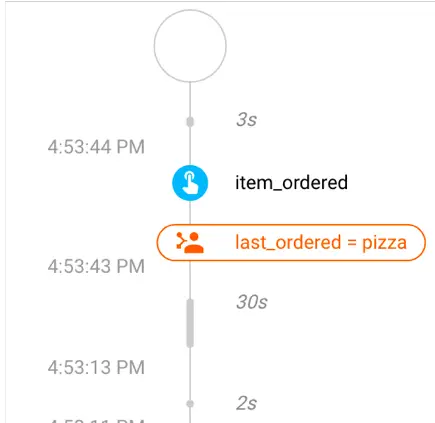
Assuming that the events are appearing in the log output, refer to the DebugView on the browser window and make sure the device or emulator is selected from the menu in the top left-hand corner and that the current Analytics app project is selected. Each time the Order button is clicked, both the event and the change to the user property should appear in the seconds stream as shown in Figure 41‑4:
Figure 41‑4
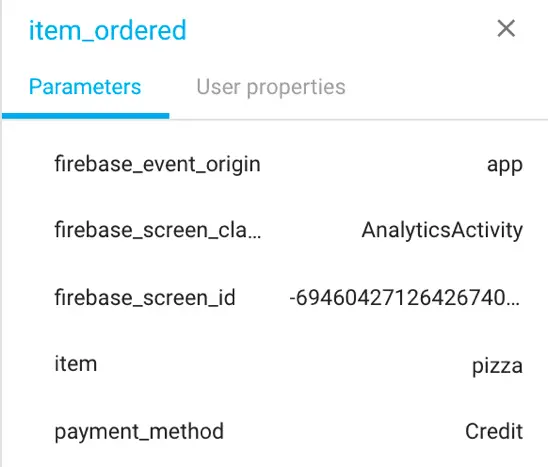
Clicking on the item_ordered event in the stream will display additional information about the event, including the payment method and item parameters:
Figure 41‑5
Spend some time interacting with the app, for example moving it between background and foreground and entering different text into the text field. Note that within the DebugView the stream begins to register user_engagement events. This is one of the event types recorded automatically by Firebase Analytics.
It can take up to 24 hours for the other screens to begin displaying event information. It should be possible, however, to create an audience using the user property.
Creating an Audience
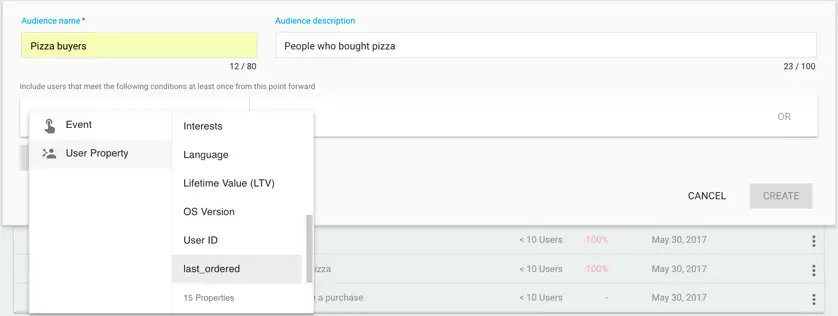
Within the Firebase console, select the Audiences tab and click on the New Audience button when the audiences screen is displayed. The objective here is to create an audience of users who have previously ordered pizza. Within the audience creation panel, enter a name for the audience (for example pizza buyers) and a brief description of the audience. Next, click on the Select Event or User Property menu and choose User Property followed by the last_ordered property as shown in Figure 41‑6:
Figure 41‑6
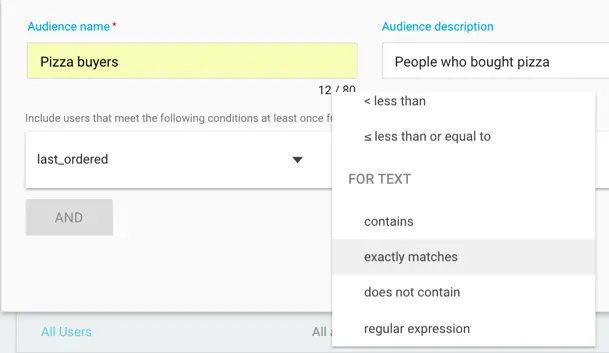
In the next column select the exactly matches condition listed under the For Text category:
Figure 41‑7
Finally, enter pizza into the last field and press the Enter key. The completed condition should now read as shown in Figure 41‑8:
Figure 41‑8
Once created, the audience is available for use when filtering results within the Firebase Analytics screens, and also when targeting users using the Firebase Notifications and Remote Config services.
It is also possible to create audiences based on events and parameters (for example an audience could be created containing all users who logged an item_ordered event with the payment method set to cash). Although user properties are available for use with audience creation, it can take up to 24 hours for a custom event type to appear as an option in the audience creation menus.
Summary
This chapter has demonstrated the use of Firebase Analytics to track events within an Android app. This included the use of custom events and user parameters. The chapter also created an example audience based on a combination of events and user parameters.
| Previous | Table of Contents | Next |
| An Overview of the Firebase Analytics Screens | Firebase Test Lab |
