A Basic Firebase Realtime Database Tutorial
| Previous | Table of Contents | Next |
| Working with Firebase Realtime Database Lists | A Firebase Realtime Database List Data Tutorial |
With the basics of the Firebase Realtime Database covered in the previous chapters, this chapter will step through the creation of an Android Studio project that makes use of the realtime database to store data. The app created in this chapter will demonstrate the key elements of the Firebase Realtime Database, including reading and writing data, implementing database rules, adding a data change listener and the separation of user data using Firebase user ids as node keys.
About the Realtime Database Project
The example app created in this chapter will require the user to sign in using Firebase email/password based authentication. Once authenticated, the user will be able to enter text into an EditText field and store that text in a realtime database tree. Database rules will also be declared to ensure that the data is readable by all users but writable only by the owner, and to validate certain aspects of the user’s input.
Creating the Realtime Database Project
Launch Android Studio and select the Start a new Android Studio project quick start option from the welcome screen. Within the new project dialog, enter RealtimeDB into the Application name field and your domain as the Company Domain setting before clicking on the Next button.
On the form factors screen, enable the Phone and Tablet option and set the minimum SDK to API 16: Android 4.1 (Jellybean). Continue to proceed through the screens, requesting the creation of an Empty Activity named RealtimeDBActivity with a corresponding layout named activity_realtime_db.
Adding User Authentication
As previously outlined, access to the data stored by this app will only be available to authenticated users. Though only email/password authentication will be used in this project, the mechanism for accessing the user’s data are the same regardless of choice of authentication provider. Begin the authentication implementation process by opening the Firebase console in a browser window and selecting the Firebase Examples project created at the beginning of the book. Navigate to the Authentication screen, select the Sign-In Method tab and enable the Email/Password provider if it is currently disabled.
Return to the project in Android Studio and select the Tools -> Firebase menu option. When the Firebase assistant panel appears, locate and select the Authentication section and click on the Email and password authentication link.
In the resulting panel, click on the Connect to Firebase button to display the Firebase connection dialog. Choose the option to store the app in an existing Firebase project and select the Firebase Examples project before clicking on the Connect to Firebase button.
With the project’s Firebase connection established, refer to the Firebase assistant panel once again, this time clicking on the Add Firebase Authentication to your app button. A dialog will appear outlining the changes that will be made to the project build configuration to enable Firebase authentication. Click on the Accept Changes button to implement the changes to the project configuration. Since this project is going to make use of the FirebaseUI Auth API, two more dependencies need to be added to the module level build.gradle file for the project. Within the Project tool window, locate and double-click on the build.gradle (Module: app) file so that it loads into the editor.
Once the Gradle file has loaded, modify the dependencies section to include the firebase-ui and firebase-ui-auth libraries (note that more recent versions of these libraries may have been released since this book was published):
dependencies {
    compile fileTree(dir: 'libs', include: ['*.jar'])
    androidTestCompile('com.android.support.test.espresso:espresso-core:2.2.2', {
        exclude group: 'com.android.support', module: 'support-annotations'
    })
    compile 'com.android.support:appcompat-v7:25.3.1'
    compile 'com.android.support.constraint:constraint-layout:1.0.2'
    compile 'com.google.firebase:firebase-auth:11.0.1'
    compile 'com.firebaseui:firebase-ui:2.0.1'
    compile 'com.firebaseui:firebase-ui-auth:2.0.1'
    testCompile 'junit:junit:4.12'
}
Adding the Second Activity
The RealtimeDBActivity class will be used to authenticate the user. Once the user has signed in to the app, a second activity will be launched to present the user interface within which the user will enter text and save it to the database.
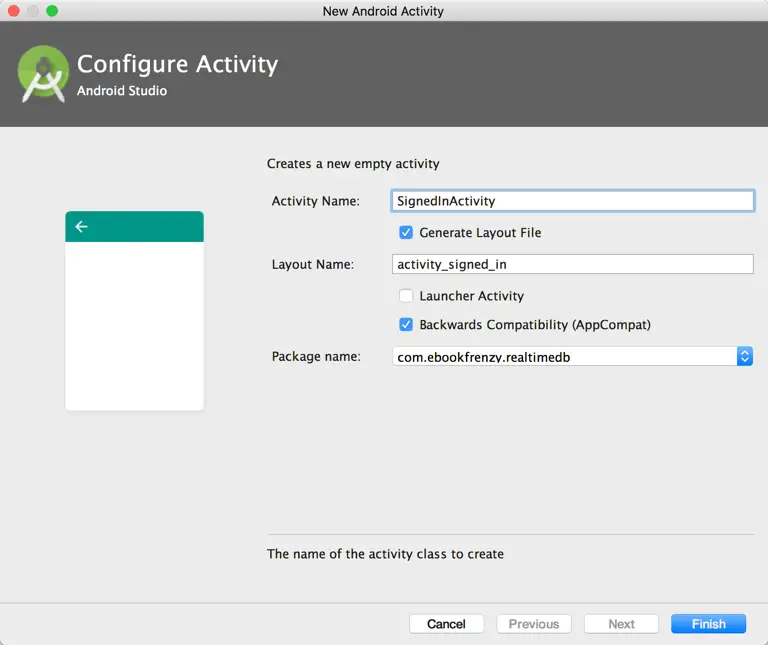
Add this second activity to the project now by locating the app -> java -> <yourdomain>.realtimedb entry into the project tool window and right-clicking on it. When the menu appears, select the New -> Activity -> Empty Activity menu option. In the New Android Activity dialog (Figure 24-1), name the activity SignedInActivity:
Figure 24-1
Before clicking on the Finish button, make sure that the Generate Layout File option is enabled and the Launcher Activity option disabled.
Designing the SignedInActivity User Interface
The user interface for the second activity is going to consist of the Plain Text EditText view into which the user will enter text together with two Button objects. Locate the activity_signed_in.xml file, load it into the layout editor and turn off Autoconnect mode.
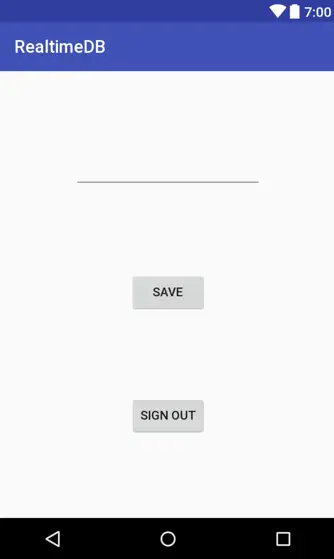
With Autoconnect mode disabled, drag and drop the three components from the palette onto the layout canvas so that the layout resembles Figure 24-2. Note that the text properties on the two buttons have been changed to “Save” and “Sign Out” and that the text property on the EditText view has been modified to remove the default “Name” string.
Figure 24-2
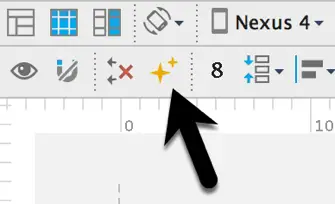
With the views positioned and configured, click on the Infer Constraints button (indicated in Figure 24-3) to apply appropriate constraints to the layout.
Figure 24-3
Edit the onClick properties for the two buttons to call methods named saveData() and signOut() when clicked by the user. Finally, select the EditText view and change the ID to userText.
Configuring the Project for Realtime Database Access
Before code can be written to make use of the realtime database some library dependencies need to be added to the build configuration.
To add Firebase realtime database support, select the Tools -> Firebase menu option and click on the Realtime Database entry in the resulting Firebase assistant panel. Once selected, click on the Save and retrieve data link. In the next panel, click on the Add the Realtime Database to your app button.
A dialog will appear listing the changes that will be made to the project build files to add realtime database support to the project. Review these changes before clicking on the Accept Changes button.
Performing the Authentication
With the project suitably configured to make use of Firebase Authentication and the realtime database, code can now be added to the project to perform the user authentication. Edit the RealtimeDBActivity.java file and modify it as follows to initiate the authentication process:
package com.ebookfrenzy.realtimedb;

import android.content.Intent;
import android.support.v7.app.AppCompatActivity;
import android.os.Bundle;

import com.firebase.ui.auth.ErrorCodes;
import com.firebase.ui.auth.IdpResponse;
import com.firebase.ui.auth.ResultCodes;
import com.firebase.ui.auth.AuthUI;
import com.google.firebase.auth.FirebaseAuth;

import java.util.ArrayList;
import java.util.List;

public class RealtimeDBActivity extends AppCompatActivity {

    FirebaseAuth auth;
    private static final int REQUEST_CODE = 101;

   @Override
    protected void onCreate(Bundle savedInstanceState) {
        super.onCreate(savedInstanceState);
        setContentView(R.layout.activity_realtime_db);

        auth = FirebaseAuth.getInstance();

        if (auth.getCurrentUser() != null) {
            startActivity(new Intent(this, SignedInActivity.class));
            finish();
        } else {
            authenticateUser();
        }

    }
.
.
}
As in the example covered in the chapter entitled Email/Password Authentication using FirebaseUI Auth, the code added above will call a method named authenticateUser() if the current user is not already signed in. The next step is to add this method:
private void authenticateUser() {

    List<AuthUI.IdpConfig> providers = new ArrayList<>();

    providers.add(
            new AuthUI.IdpConfig.Builder(AuthUI.EMAIL_PROVIDER).build());


    startActivityForResult(
            AuthUI.getInstance().createSignInIntentBuilder()
                    .setAvailableProviders(providers)
                    .setIsSmartLockEnabled(false)
                    .build(),
            REQUEST_CODE);
}
When the authentication activity is completed, the onActivityResult() method will be called. Implement this method now to launch the SignedInActivity on a successful authentication:
@Override
protected void onActivityResult(int requestCode, int resultCode, Intent data) {
    super.onActivityResult(requestCode, resultCode, data);

    IdpResponse response = IdpResponse.fromResultIntent(data);

    if (requestCode == REQUEST_CODE) {
        if (resultCode == ResultCodes.OK) {
            startActivity(new Intent(this, SignedInActivity.class));
            return;
        }
    } else {
        if (response == null) {
            // User cancelled Sign-in
            return;
        }

        if (response.getErrorCode() == ErrorCodes.NO_NETWORK) {
            // Device has no network connection
            return;
        }

        if (response.getErrorCode() == ErrorCodes.UNKNOWN_ERROR) {
            // Unknown error occurred
            return;
        }
    }
}
Accessing the Database
Code now needs to be added to the SignedInActivity class to obtain both a database reference and the uid of the current user. Load the SignedInActivity.java file into the editor and modify it as follows:
package com.ebookfrenzy.realtimedb;

import android.content.Intent;
import android.support.annotation.NonNull;

import android.support.v7.app.AppCompatActivity;
import android.os.Bundle;
import android.view.View;
import android.widget.EditText;
import android.widget.Toast;

import com.firebase.ui.auth.AuthUI;
import com.google.android.gms.tasks.OnCompleteListener;
import com.google.android.gms.tasks.Task;
import com.google.firebase.auth.FirebaseAuth;
import com.google.firebase.auth.FirebaseUser;
import com.google.firebase.database.DataSnapshot;
import com.google.firebase.database.DatabaseError;
import com.google.firebase.database.DatabaseReference;
import com.google.firebase.database.FirebaseDatabase;
import com.google.firebase.database.ValueEventListener;

public class SignedInActivity extends AppCompatActivity {

    private static FirebaseUser currentUser;
    private static final String TAG = "RealtimeDB";
    private FirebaseDatabase database;
    private DatabaseReference dbRef;
    private EditText userText;
.
.
}
Next, locate and edit the onCreate() method to identify the current user and to obtain the database reference:
@Override
protected void onCreate(Bundle savedInstanceState) {
    super.onCreate(savedInstanceState);
    setContentView(R.layout.activity_signed_in);

    userText = (EditText) findViewById(R.id.userText);

    currentUser =
            FirebaseAuth.getInstance().getCurrentUser();

    if (currentUser == null) {
        startActivity(new Intent(this, RealtimeDBActivity.class));
        finish();
        return;
    }

    database = FirebaseDatabase.getInstance();
    dbRef = database.getReference("/data");
    dbRef.addValueEventListener(changeListener);
}
The above code also adds the value event listener to the database reference so that the app will receive notification when changes occur to the data stored in the database. Remaining within the RealtimeDBActivity.java file, add this listener now:
ValueEventListener changeListener = new ValueEventListener() {

    @Override
    public void onDataChange(DataSnapshot dataSnapshot) {

        String change = dataSnapshot.child(
		currentUser.getUid()).child("message")
				.getValue(String.class);

        userText.setText(change);
    }

    @Override
    public void onCancelled(DatabaseError databaseError) {
        notifyUser("Database error: " + databaseError.toException());
    }
};
The onDataChange() listener method will be called when the data stored at /data within the database tree changes and is passed a DataSnapshot instance containing the data. The code within this method extracts the String object from the DataSnapshot instance located at the <user id>/message node. This string is then assigned to the EditText field so that it is visible to the user.
The onCancelled() listener method notifies the user of any errors that have occurred using a method named notifyUser() which also needs to be added to the SignedInActivity class:
private void notifyUser(String message) {
    Toast.makeText(SignedInActivity.this, message,
            Toast.LENGTH_SHORT).show();
}
Writing to the Database
When the user interface layout for the SignedInActivity class was designed, the Save button was configured to call a method named saveData() when clicked. This method now needs to be implemented to save the text entered by the user to the database. Edit the RealtimeDBActivity.java file once again to implement this method:
public void saveData(View view) {
    dbRef.child(currentUser.getUid()).child("message")
		.setValue(userText.getText().toString(), completionListener);
}
In the onCreate() method, the database reference was initialized with the /data path. The above code adds to this path using the user’s ID and a node with the key set to “message” and the value based on the current text in the EditText view. This will result in the text being saved at the following location in the database tree (where <user id> is replaced by the Firebase uid of the current user):
/data/<user id>/message
Note also that the setValue() method call is passed a reference to a completion listener which now needs to be implemented:
DatabaseReference.CompletionListener completionListener =
			new DatabaseReference.CompletionListener() {
    @Override
    public void onComplete(DatabaseError databaseError,
			DatabaseReference databaseReference) {

        if (databaseError != null) {
            notifyUser(databaseError.getMessage());
        }
    }
};
Signing Out
The final method to be added to the SignedInActivity class is the signOut() method which is configured to be called when the user clicks the Sign Out button. This method needs to sign the user out of the app using the signOut() method of the AuthUI instance:
public void signOut(View view) {
    AuthUI.getInstance()
            .signOut(this)
            .addOnCompleteListener(new OnCompleteListener<Void>() {
                @Override
                public void onComplete(@NonNull Task<Void> task) {
                    if (task.isSuccessful()) {
                        startActivity(new Intent(
                                SignedInActivity.this,
                                RealtimeDBActivity.class));
                        finish();
                    } else {
                        // Report error to user
                    }
                }
            });
}
Configuring the Database Rules
With coding work complete, the next step is to configure the database rules. The requirements for this app are that any user can read another user’s message text, but only the owner of the message can write to it.
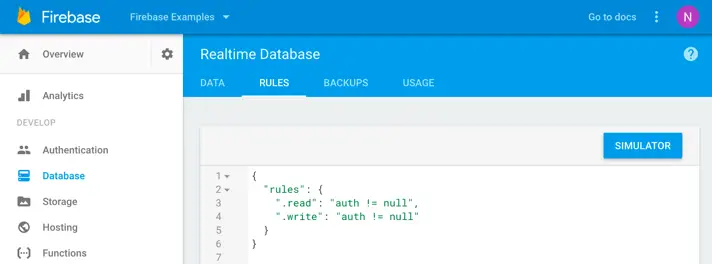
Load the Firebase console into a browser window and select the Firebase Examples project. Choose the Database option in the navigation panel and select the Rules tab:
Figure 24-4
Edit the rules to read as follows before clicking on the Publish button to commit the changes:
{
  "rules": {
    "data" : {
        ".read" : true,
          "$uid" : {
             ".write" : "auth != null && auth.uid == $uid"
           }
      }
  }
}
As declared, the /data node of the tree (and all of its descendants) is readable by any user. A second rule is then declared for the user ID node allowing only the owner of the data to perform write operations on this or any child nodes.
Remaining in the console window, select the Data tab to display the database tree for the project.
Testing the App
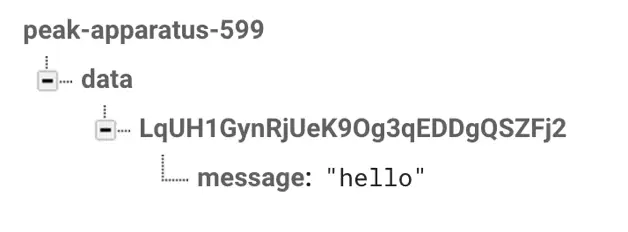
Compile and run the app on a physical device, create a test account and sign in so that the SignedInActivity screen appears. With the Data page of the Firebase console visible in the browser window, enter some text into text field of the app and click the Save button. In realtime the Firebase console should update the database tree to reflect the newly added data nodes as shown in Figure 24-5:
Figure 24-5
Launch a second instance of the app on a simulator session and sign in using the same account credentials created above. Change the text in the text field, click the Save button and note that the instance of the app running on the device changes instantly to reflect the new text.
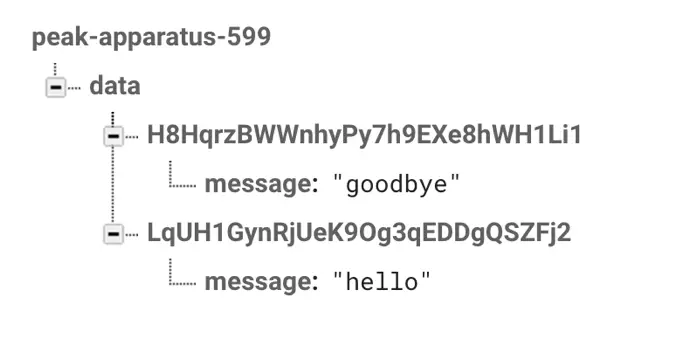
Sign out of one of the instances of the app and create a second test account. Once signed in with the new account, enter some text and save the data. Refer to the Firebase console and note that a new branch has been created within the database tree using the uid of the second account:
Figure 24-6
Try changing the text within the two instances of the app and verify that a text change in one app is not reflected in the other app indicating that the data is now separated based on user ids.
Adding a Validation Rule
The final step is to implement a validation rule to verify that the data being saved to /data/<userid>/message is a string containing no more than nine characters. Within the Rules screen of the Firebase console, modify the database rules to include a .validate declaration as follows:
{
  "rules": {
    "data" : {
        ".read" : true,
          "$uid" : {
             ".write" : "auth != null && auth.uid == $uid",
               "message" : {
                 ".validate" : "newData.isString() &&
					newData.val().length < 10"
               }
           }
      }
  }
}
With the changes made, click on the Publish button within the Firebase console to activate the rule changes and then test the app once again. When attempting to save a string that exceeds nine characters in length, a message should now appear indicating that permission has been denied.
Summary
This chapter has demonstrated the combination of the Firebase authentication and realtime database features to store and access data assigned to a specific user. This includes the integration of database and authentication support into the Android Studio project and the implementation of code to store data and receive realtime notifications of data changes. The example project also made use of Firebase database rules to restrict data access and perform data validation.
| Previous | Table of Contents | Next |
| Working with Firebase Realtime Database Lists | A Firebase Realtime Database List Data Tutorial |
