Email/Password Authentication using the Firebase SDK
| Previous | Table of Contents | Next |
| Phone Number Sign-in Authentication using FirebaseUI Auth | Managing User Accounts using the Firebase SDK |
There are many advantages to using the FirebaseUI Auth mechanism of user authentication, not the least of which being that all of the work involved in presenting the authentication user interface, verifying the validity of user input such as email addresses and handling email reset and account recovery is performed automatically.
That being said, situations may arise where an app needs complete control over the appearance and behavior of the authentication process. For such situations, authentication may also be implemented by making direct calls to the Firebase SDK.
As with FirebaseUI Auth, the exact steps to implementing authentication using this approach vary between authentication providers. This chapter, therefore, will begin by focusing on email/password based authentication before moving on to other providers in later chapters.
Creating the PasswordAuth Project
The first step in this exercise is to create the new project. Begin by launching Android Studio and, if necessary, closing any currently open projects using the File -> Close Project menu option so that the Welcome screen appears.
Select the Start a new Android Studio project quick start option from the welcome screen and, within the new project dialog, enter PasswordAuth into the Application name field and your domain as the Company Domain setting before clicking on the Next button.
On the form factors screen, enable the Phone and Tablet option and set the minimum SDK to API 16: Android 4.1 (Jellybean). Continue to proceed through the screens, requesting the creation of an Empty Activity named PasswordAuthActivity with a corresponding layout named activity_password_auth.
Enabling Authentication Providers
The steps in this chapter and the subsequent authentication chapters assume that the necessary sign-in methods have been enabled in the Firebase console for the Firebase Examples project.
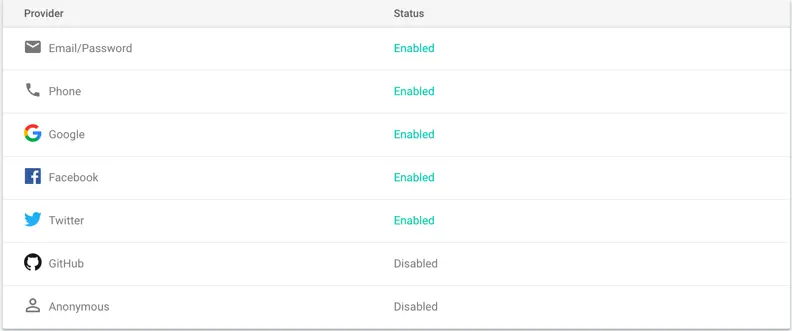
Verify the current configuration by opening the Firebase console in a browser window, selecting the Firebase Examples project and navigating to the Sign-in Methods page of the Authentication screen. Review the current settings and enable the Email/Password, Phone, Google, Facebook and Twitter sign-in methods as outlined in Figure 10-1:
Figure 10-1
Connecting the Project to Firebase
Once the project has been created, use the Tools -> Firebase menu to display the Firebase assistant panel, locate and click on the Authentication category, select the Email and password authentication link and then click on the Connect to Firebase button to display the Firebase connection dialog.
Choose the option to store the app in an existing Firebase project and select the Firebase Examples project created in the beginning of the book.
With the project’s Firebase connection established, refer to the Firebase assistant panel once again, this time clicking on the Add Firebase Authentication to your app button. A dialog will appear outlining the changes that will be made to the project build configuration to enable Firebase authentication. Click on the Accept Changes button to commit the changes to the project configuration.
Designing the User Interface Layout
Locate the app -> res -> layout -> password_auth_sdk.xml file and load it into the layout editor.
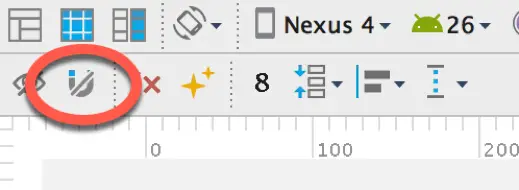
Select and delete the “Hello World!” TextView object and, in the layout editor toolbar, make sure that the Autoconnect feature (Figure 10-2) is switched off.
Figure 10-2
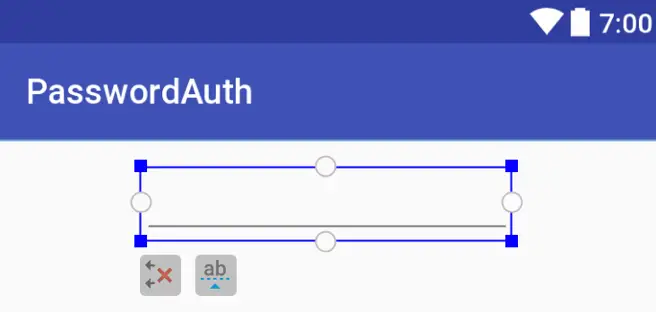
With a blank layout, locate the E-mail EditText widget from Text category of the palette and drag and drop it so that it is positioned near the top of the layout canvas and centered horizontally. Using the Properties tool window, set the ID of the widget to emailText.
Figure 10-3
Drag and drop a Password EditText widget so that it is positioned beneath the email field and set the ID property to passwordText.
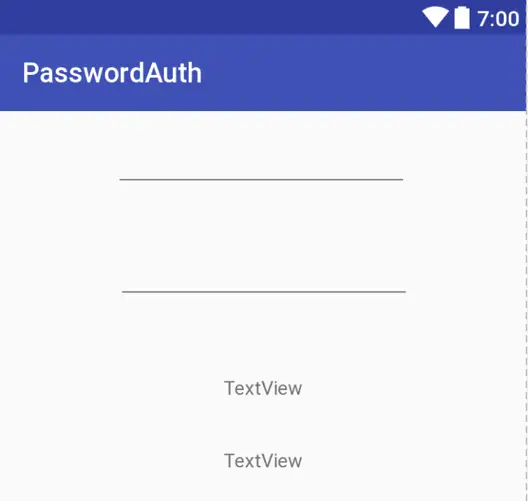
Next, drag and drop two TextView objects from the widget palette Text category positioned in a vertical arrangement beneath the bottom EditText object:
Figure 10-4
Starting with the top TextView widget, set the ID property on the views to userText and statusText respectively.
Repeat these steps to add two Button widgets positioned vertically beneath the TextView widgets. Using the Properties tool window, change the text on the buttons to read Sign In, and Sign Out.
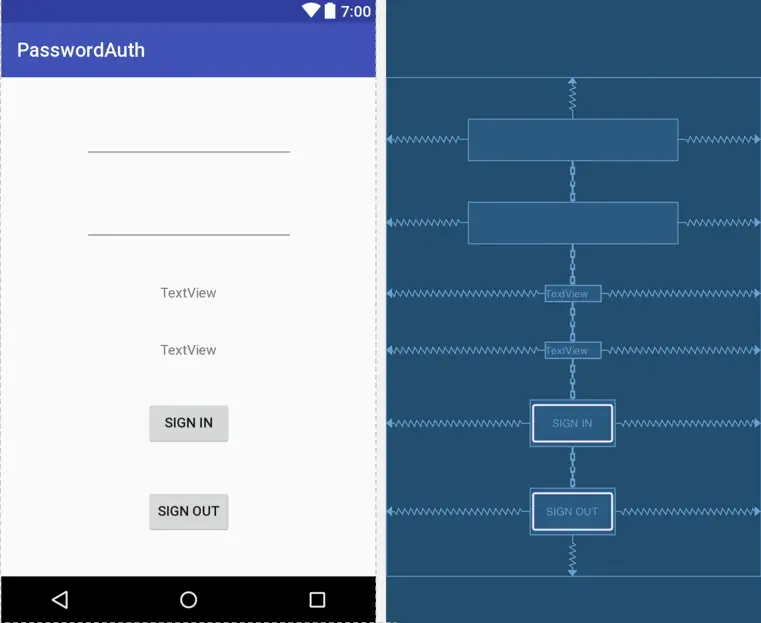
Click in the upper left corner of the layout canvas and drag the resulting selection rectangle so that it encompasses all of the widgets added to the layout. Release the mouse button and verify that all of the widgets are currently selected. Right-click on the uppermost of the EditText fields and select the Center Horizontally menu option. Right click on the widget once again, this time selecting the Center Vertically menu option. On completion of these steps, the layout should resemble that illustrated in Figure 10-5:
Figure 10-5
Two more Button objects are required to complete the user interface layout for the project.
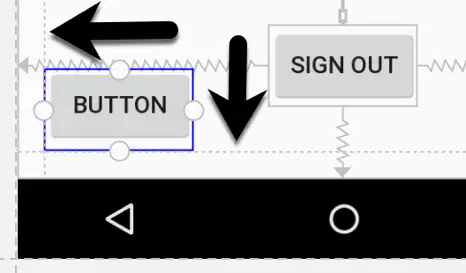
Begin by re-enabling Autoconnect mode, then drag a Button object from the palette and position it in the bottom left-hand corner of the layout canvas. Before dropping the button into place, make sure that it is positioned so that the dashed lines indicating the left and bottom margins appear indicated by the black arrows in Figure 10-6:
Figure 10-6
On releasing the Button widget, Autoconnect will establish constraints on the left and bottom edges of the button view.
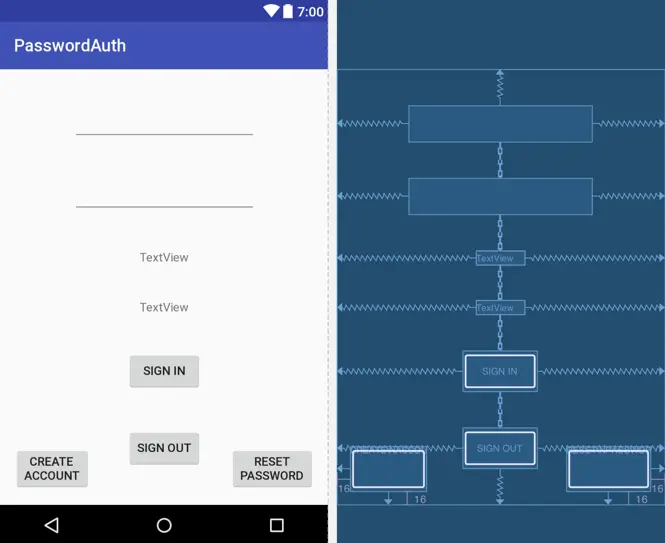
Repeat these steps to position a Button widget in the lower right-hand corner of the layout aligned with reference to the right-hand and bottom margin guidelines. Using the properties tool window, change the text on these buttons to read Create\nAccount and Reset\nPassword. On completion of these steps, the layout should resemble that of Figure 10-7:
Figure 10-7
Select the Sign In button and, using the properties panel, configure the onClick property to call a method named signIn. Configure the appropriate onClick properties for the remaining buttons to call methods named signOut, createAccount and resetPassword.
Getting View Object References
Later in this chapter, the code will need access to some of the view objects declared within the user interface layout. In preparation for this, some variables and code need to be added to the PasswordAuthActivity.java class file. Locate this class within the project tool window, load it into the code editing tool and modify it so that it reads as follows:
package com.ebookfrenzy.passwordauth;

import android.support.v7.app.AppCompatActivity;
import android.os.Bundle;
import android.view.View;
import android.widget.EditText;
import android.widget.TextView;

public class PasswordAuthActivity extends AppCompatActivity {

    private TextView userText;
    private TextView statusText;
    private EditText emailText;
    private EditText passwordText;

    @Override
    protected void onCreate(Bundle savedInstanceState) {
        super.onCreate(savedInstanceState);
        setContentView(R.layout.activity_password_auth);

        userText = (TextView) findViewById(R.id.userText);
        statusText = (TextView) findViewById(R.id.statusText);
        emailText = (EditText) findViewById(R.id.emailText);
        passwordText = (EditText) findViewById(R.id.passwordText);
        	userText.setText("");
	statusText.setText("Signed Out");
    }
.
.
}
Adding a User Notification Method
At various points within this project it will be necessary to convey information to the user in the form of short Toast messages. In order to avoid code repetition a convenience method needs to be added to the main activity class. This method will be named notifyUser() and will construct and display a Toast message based on the string passed through as an argument when the method is called. Implement this method as follows in the PasswordAuthActivity.java file:
import android.widget.Toast;
.
.
.
private void notifyUser(String message) {
    Toast.makeText(PasswordAuthActivity.this, message,
            Toast.LENGTH_SHORT).show();
}
Accessing the FirebaseAuth Instance
The two key components of Firebase SDK based authentication are the FirebaseAuth instance and the authentication state listener. The first step in implementing Firebase authentication is to obtain a reference to the FirebaseAuth instance. Within Android Studio, edit the PasswordAuthActivity.java file to obtain a reference to the FirebaseAuth instance:
package com.ebookfrenzy.passwordauth;
.
.
.
import android.support.annotation.NonNull;

import com.google.android.gms.tasks.OnCompleteListener;
import com.google.android.gms.tasks.Task;
import com.google.firebase.auth.AuthResult;
import com.google.firebase.auth.FirebaseAuth;
import com.google.firebase.auth.FirebaseUser;

public class PasswordAuthActivity extends AppCompatActivity {

    private TextView userText;
    private TextView statusText;
    private EditText emailText;
    private EditText passwordText;

    private FirebaseAuth fbAuth;
    private FirebaseAuth.AuthStateListener authListener;

    @Override
    protected void onCreate(Bundle savedInstanceState) {
        super.onCreate(savedInstanceState);
        setContentView(R.layout.activity_password_auth);

        userText = (TextView) findViewById(R.id.userText);
        statusText = (TextView) findViewById(R.id.statusText);
        emailText = (EditText) findViewById(R.id.emailText);
        passwordText = (EditText) findViewById(R.id.passwordText);
        userText.setText("");
        statusText.setText("Signed Out");

        fbAuth = FirebaseAuth.getInstance();
.
.
}
Adding the Authentication State Listener
The authentication state listener is the mechanism by which the app receives notification of the changes to the status of the sign-in process. The listener takes the form of a method that is attached to the FirebaseAuth object and is called each time one of the following events occurs:
• The authentication listener has just been registered
• A user has signed in
• The current user has signed out
• The current user changes
• A change is detected to the current user's token
With the PasswordAuthActivity.java file still open in the Android Studio code editor, further modify the onCreate() method to declare the authentication state listener method:
@Override
protected void onCreate(Bundle savedInstanceState) {
    super.onCreate(savedInstanceState);
    setContentView(R.layout.activity_password_auth);

    userText = (TextView) findViewById(R.id.userText);
    statusText = (TextView) findViewById(R.id.statusText);
    emailText = (EditText) findViewById(R.id.emailText);
    passwordText = (EditText) findViewById(R.id.passwordText);
    userText.setText("");
    statusText.setText("Signed Out");

    fbAuth = FirebaseAuth.getInstance();

    authListener = new FirebaseAuth.AuthStateListener() {
        @Override
        public void onAuthStateChanged(@NonNull FirebaseAuth firebaseAuth) {

            FirebaseUser user = firebaseAuth.getCurrentUser();

            if (user != null) {
                userText.setText(user.getEmail());
                statusText.setText("Signed In");

            } else {
                userText.setText("");
                statusText.setText("Signed Out");
            }
        }
    };

}
The listener method begins by getting a reference to the FirebaseUser object for the current user. If the user object is not null then the code assumes that a user has just successfully signed into the app. The user’s email address is accessed and displayed on the userText TextView object. The text displayed on the statusText object is then changed to indicate that the user is currently signed in.
A null value assigned to the user object, on the other hand, indicates the authentication change involved the user signing out of the app. The email address is removed from the email text view and the status text is updated to reflect that the user has signed out.
Adding and Removing the Listener
At this point, the authentication state listener has been declared but has not yet been added to the FirebaseAuth instance. Without this vital step, the method will never be called in response to changes in the authentication state. For the purposes of this example, the standard onStart() Android lifecycle method will be overridden and used to add the listener. The onStart() method is called immediately after the call to the onCreate() method and before the activity is to become visible to the user. Within the FirebaseAuthActivity.java file, add this method so that it reads as follows:
@Override
public void onStart() {
    super.onStart();
    fbAuth.addAuthStateListener(authListener);
}
In addition to adding the listener, it is equally important to remove the listener when it is no longer needed. To achieve this, the onStop() method will be used:
@Override
public void onStop() {
    super.onStop();
    if (authListener != null) {
        fbAuth.removeAuthStateListener(authListener);
    }
}
Creating the User Account
The user will create an account for the app by entering an email address and a password into the two EditText fields and tapping on the Create Account button. Within the user interface layout, this button was configured to call a method named createAccount() when clicked. Add this method to the main activity class file now so that it reads as follows:
public void createAccount(View view) {
    String email = emailText.getText().toString();
    String password = passwordText.getText().toString();

    if (email.length() == 0) {
        emailText.setError("Enter an email address");
        return;
    }

    if (password.length() < 6) {
        passwordText.setError("Password must be at least 6 characters");
        return;
    }

    fbAuth.createUserWithEmailAndPassword(email, password)
            .addOnCompleteListener(this,
			new OnCompleteListener<AuthResult>() {
                @Override
                public void onComplete(@NonNull Task<AuthResult> task) {

                    if (!task.isSuccessful()) {
                        notifyUser("Account creation failed");
                    }
                }
            });

}
The method begins by obtaining the email address and password entered by the user. When using the Firebase SDK to authenticate users, and unlike the FirebaseUI Auth approach to authentication, it is the responsibility of the app to verify that a valid email address has been entered and that the password meets general security guidelines. For the purposes of this example, however, it will suffice to ensure something has been entered into the email address field and that the password selected by the user exceeds 5 characters. If either of these requirements are not met, the setError() method of the EditText class is called to prompt the user to correct the issue before the method returns.
The user account creation process is then initiated via a call to the createUserWithEmailAndPassword() method of the FirebaseAuth instance, passing through the email address and password string as arguments. The account creation process is performed asynchronously, requiring that a completion handler be provided to be called when the process completes. In this case, the completion handler checks that the task was complete and displays a Toast message in the case of a failure. The attempt to create the account (successfully or otherwise) will result in a call to the authentication listener implemented earlier in the chapter where a check for a valid current user will be performed and the user interface updated accordingly to indicate that the account has been created and that the new user is signed in.
Implementing the Sign-In Method
When the user interface layout was designed, the onClick property of the Sign-in button was configured to call a method named signIn(). This method now needs to be added to the PasswordAuthActivity.java class file as follows:
public void signIn(View view) {

    String email = emailText.getText().toString();
    String password = passwordText.getText().toString();

    if (email.length() == 0) {
        emailText.setError("Enter an email address");
        return;
    }

    if (password.length() < 6) {
        passwordText.setError("Password must be at least 6 characters");
        return;
    }

    fbAuth.signInWithEmailAndPassword(email, password)
            .addOnCompleteListener(this,
                    new OnCompleteListener<AuthResult>() {
                        @Override
                        public void onComplete(@NonNull
					Task<AuthResult> task) {

                            if (!task.isSuccessful()) {
                                notifyUser("Authentication failed");
                            }
                        }
                    });

}
After performing some rudimentary validation on the email and password entered by the user, email and password based authentication is then initiated by a call to the signInWithEmailAndPassword() method of the FirebaseAuth instance, passing through the email address and password strings as arguments. The sign-in process is performed asynchronously, requiring the addition of a completion handler to be called when the process is completed. In the event that the sign-in failed, the user is notified via a Toast message.
The attempt to sign-in, whether successful or not, will also trigger a call to the authentication state listener method. As designed, the listener will check if the user is signed in and update the user interface accordingly.
Signing Out
Now that the user account creation and sign-in functionality of the app is complete, the user now needs a way to sign out of the app. This requires the implementation of the signOut() method which has been configured to be called when the user clicks on the Sign Out button:
public void signOut(View view) {
    fbAuth.signOut();
}
All that this method needs to do is call the signOut() method of the FirebaseAuth object. The signing out process will subsequently trigger a call to the authentication listener which will, in turn, identify that there is no current user and update the TextViews in the user interface layout accordingly.
Implementing the Password Reset Option
When using FirebaseUI Auth, a password reset option was provided automatically as part of the authentication user interface flow. When using Firebase SDK authentication this feature has to be added manually. The user interface layout already contains a button titled Reset Password with the onClick property set to call a method named resetPassword(). The last task in this phase of the project is to implement this method. The method will need to extract the email address entered by the user before passing that address as an argument to the sendPasswordResetEmail() method of the FirebaseAuth instance. A completion handler may also be specified to check that the email has been sent. Remaining in the PasswordAuthActivity.java file, add the following method:
public void resetPassword(View view) {

    String email = emailText.getText().toString();

    if (email.length() == 0) {
        emailText.setError("Enter an email address");
        return;
    }

    fbAuth.sendPasswordResetEmail(email)
            .addOnCompleteListener(new OnCompleteListener<Void>() {
                @Override
                public void onComplete(@NonNull Task<Void> task) {
                    if (task.isSuccessful()) {
                        notifyUser("Reset email sent");
                    }
                }
            });
}
Testing the Project
Before testing the project, log into the Firebase console, select the Firebase Examples project and display the Users panel on the Authentication page. If user accounts already exist from earlier chapters of this book, take the time to delete these accounts to avoid account creation conflicts while testing this latest project.
Compile and run the app, either on a physical Android device, or an emulator session. Enter an email address to which you have inbox access (a password reset email will be sent to this address later) and password into the two text fields and click on the Create Account button. After a short delay the TextView objects should update to reflect that the account has been created and the user signed in.
Click on the Sign Out button and verify that the app responds appropriately by clearing the TextView displaying the user’s email address and displaying a “Signed Out” message on the status TextView.
Next, try signing in with an unregistered email address and password and verify that the failed authentication message appears.
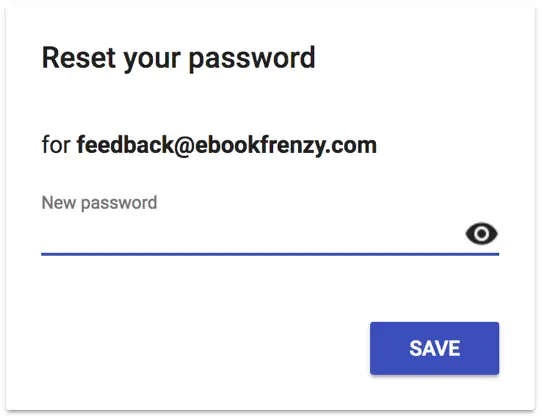
Sign in with the correct credentials, then click the password reset button. Check the email inbox for the email address and use the provided link to reset the password to a different string:
Figure 10-8
Summary
The FirebaseUI Auth approach to user authentication automates much of the work involved in allowing users to create accounts and sign-in to gain access to restricted areas of functionality and content within an Android app. An alternative to this approach is to make use of the classes and methods contained within the Firebase SDK to implement user authentication. This chapter has focused on the use of the Firebase SDK to implement email and password authentication. This involves designing the user interface for handling the authentication, implementing an authentication state listener and writing code to verify user input, create and sign into user accounts.
Although later chapters will address the use of the Firebase SDK to perform user authentication using other providers, the next chapters will outline some of the other user account management features available with the Firebase SDK and introduce Firebase authentication error handling techniques.
| Previous | Table of Contents | Next |
| Phone Number Sign-in Authentication using FirebaseUI Auth | Managing User Accounts using the Firebase SDK |
