A WatchKit Custom Notification Tutorial
| Previous | Table of Contents | |
| A WatchKit Notification Tutorial |
| Purchase the fully updated watchOS 2/Swift 2 edition of this book in eBook ($12.99) or Print ($27.99) format watchOS 2 App Development Essentials Print and eBook (ePub/PDF/Kindle) editions contain 35 chapters. |
The previous chapter demonstrated the steps involved in adding action buttons to the default long-look notification scene within a WatchKit app. Although the addition of action notifications provided some additional functionality to the notification, the information displayed to the user was still limited to the alert title and body text. In order to provide a richer experience in terms of presenting information to the user in a notification it is necessary to use a custom notification. This chapter will add to the overview of custom notifications provided in the chapter entitled An Overview of Notifications in WatchKit by providing a tutorial based example of the implementation of a custom notification within a WatchKit app.
About the WatchKit Custom Notification Example
The project created in this chapter will consist of an iOS app with a companion WatchKit app. The iOS app will consist of two buttons which, when selected, will initiate local notifications configured to trigger after a 5 second delay. The WatchKit app that accompanies the iOS app will contain a custom notification which dynamically displays a different image depending on which of the two buttons was used to initiate the notification.
Creating the Custom Notification Project
Start Xcode and create a new iOS project. On the template screen choose the Application option located under iOS in the left hand panel and select Single View Application. Click Next, set the product name to CustomNotifyApp, enter your organization identifier and make sure that the Devices menu is set to Universal. Before clicking Next, change the Language menu to Swift. On the final screen, choose a location in which to store the project files and click on Create to proceed to the main Xcode project window.
Designing the iOS App User Interface
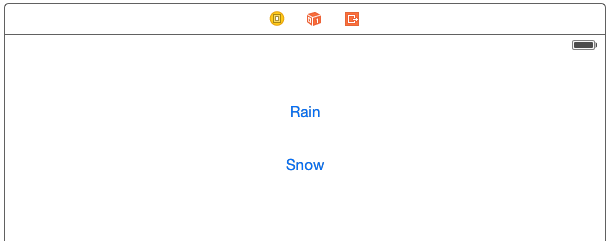
The user interface for the parent iOS app will consist of two Button objects. Select the Main.Storyboard file and add these objects to the storyboard canvas so that the layout matches that illustrated in Figure 29-1, making sure to position the objects in the horizontal center of the layout:
Figure 29-1
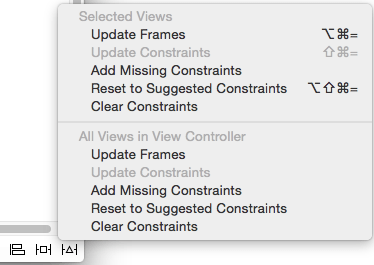
Display the Resolve Auto Layout Issues menu (Figure 29-2) and select the Reset to Suggested Constraints menu option listed under All Views in View Controller to establish sensible layout constraints on the view objects:
Figure 29-2
With the Main.storyboard file still loaded into Interface Builder, display the Assistant Editor and establish action connections from the Rain and Snow button objects to methods named rainAlert and snowAlert respectively.
Registering and Setting the Notifications
Select the AppDelegate.swift file and modify the didFinishLaunchingWithOptions method to register the notification settings for the app. These settings will ensure that the user is prompted by the app the first time it runs to enable access to the notifications system:
func application(application: UIApplication, didFinishLaunchingWithOptions launchOptions: [NSObject: AnyObject]?)
-> Bool {

   let notificationSettings = UIUserNotificationSettings(forTypes:
        UIUserNotificationType.Alert |
        UIUserNotificationType.Sound,
        categories: nil)

   application.registerUserNotificationSettings(notificationSettings)
   return true
}
Next, select the ViewController.swift file and add a variable referencing the application context and the code for the two action methods to configure the notifications:
import UIKit

class ViewController: UIViewController {

    let app = UIApplication.sharedApplication()

    override func viewDidLoad() {
        super.viewDidLoad()
        // Do any additional setup after loading the view, typically from a nib.
    }

    @IBAction func rainAlert(sender: AnyObject) {
        let alertTime = NSDate().dateByAddingTimeInterval(5)

        let notifyAlarm = UILocalNotification()

        notifyAlarm.fireDate = alertTime
        notifyAlarm.timeZone = NSTimeZone.defaultTimeZone()
        notifyAlarm.soundName = UILocalNotificationDefaultSoundName
        notifyAlarm.category = "WEATHER_CATEGORY"
        notifyAlarm.alertTitle = "Rain"
        notifyAlarm.alertBody = "It is going to rain"
        app.scheduleLocalNotification(notifyAlarm)
    }

    @IBAction func snowAlert(sender: AnyObject) {
        let alertTime = NSDate().dateByAddingTimeInterval(5)

        let notifyAlarm = UILocalNotification()

        notifyAlarm.fireDate = alertTime
        notifyAlarm.timeZone = NSTimeZone.defaultTimeZone()
        notifyAlarm.soundName = UILocalNotificationDefaultSoundName
        notifyAlarm.category = "WEATHER_CATEGORY"
        notifyAlarm.alertTitle = "Snow"
        notifyAlarm.alertBody = "It is going to snow"
        app.scheduleLocalNotification(notifyAlarm)
    }
.
.
.
}
Note that both of the notifications have been configured with a category of “WEATHER_CATEGORY”. It is essential that this category be referenced in the custom notification on the WatchKit app later in the tutorial.
Compile and run the app on an iPhone device and click on “Allow” when the system requests access to notifications. Once access has been allowed, tap on the Rain button and lock the device. After 5 seconds the alert should appear on the lock screen. Repeat these steps to test that the Snow button notification also works.
Adding the WatchKit App to the Project
Now that work on the iOS app is complete, the next task is to add the WatchKit app to the project.
Within Xcode, select the File -> New -> Target… menu option. In the target template dialog, select the Apple Watch option listed beneath the iOS heading. In the main panel, select the WatchKit App icon and click on Next.
On the subsequent screen switch the Include Notification Scene on and Include Glance Scene option off before clicking on the Finish button (the Notification Scene option is now required since we are working with custom notifications).
As soon as the extension target has been created, a new panel will appear requesting permission to activate the new scheme for the extension target. Activate this scheme now by clicking on the Activate button in the request panel.
| Purchase the fully updated watchOS 2/Swift 2 edition of this book in eBook ($12.99) or Print ($27.99) format watchOS 2 App Development Essentials Print and eBook (ePub/PDF/Kindle) editions contain 35 chapters. |
Configuring the Custom Notification
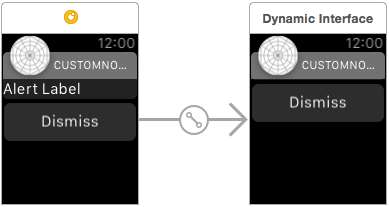
Within the Project Navigator panel, select the Interface.storyboard file and locate the notification scenes as illustrated in Figure 29-3:
Figure 29-3
The left hand scene is the static scene. By default this is configured with a Label object which will display the content of the alert body text when a notification arrives. For the purposes of this example, no other static content is required on the static notification scene. Before designing the dynamic notification scene, the notification category for the custom notification needs to be changed to match that referenced when the notifications were setup in the iOS View Controller.
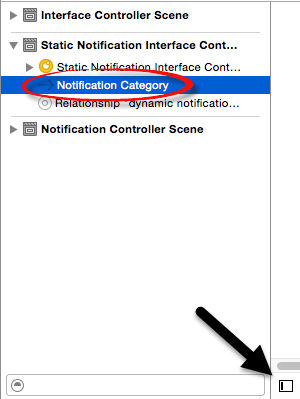
Display the Document Outline panel using the button indicated by the arrow in Figure 29 4 and unfold the section entitled Static Notification Interface Controller. Within this section of the panel select the Notification Category entry and, within the Attributes Inspector, change the Name field to WEATHER_CATEGORY:
Figure 29-4
Designing the Dynamic Notification Scene
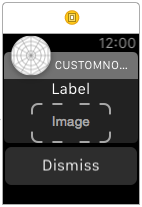
Remaining within the storyboard, drag a Label object from the Object Library and drop it above the Dismiss button in the Dynamic Interface scene. Select the Label object and, using the Attributes Inspector panel, set both the Alignment and Horizontal position properties to the center setting.
Drag and drop an Image object so that it is positioned beneath the Label object and set the Mode property to Aspect Fit and the Horizontal position property to Center. On completion of these steps the layout of the Dynamic Interface scene should match Figure 29-5:
Figure 29-5
Display the Assistant Editor, verify that it is displaying the NotificationController.swift file and establish an outlet connection from the Label object named notificationAlertLabel.
Establish a second outlet, this time connected to the Image object and named notificationImage. On completion of these steps the top of the NotificationController.swift file should read as follows:
class NotificationController: WKUserNotificationInterfaceController {

    @IBOutlet weak var notificationAlertLabel: WKInterfaceLabel!
    @IBOutlet weak var notificationImage: WKInterfaceImage!

    override init() {
        // Initialize variables here.
        super.init()

        // Configure interface objects here.
    }
.
.
}
Configuring the didReceiveLocalNotification method
When a notification alert arrives, the didReceiveLocalNotification method of the notification interface controller instance will be called and passed a UILocalNotification object containing details of the alert. A template for this method has already been added by Xcode to the NotificationController.swift file but is currently commented out. Open the NotificationController.swift file (located in the Project Navigator panel under CustomNotifyApp WatchKit Extension), locate this method and remove the /* and */ comment markers positioned before and after the method.
With the method uncommented, implement code as follows to identify whether a rain or snow alert has been triggered and to display a different image on the Image object depending on the alert type:
override func didReceiveLocalNotification(localNotification: UILocalNotification, withCompletion completionHandler: ((WKUserNotificationInterfaceType) -> Void)) {

    if localNotification.alertTitle == "Rain" {
        notificationAlertLabel.setText("Rain")
        notificationImage.setImageNamed("rain_image")
    }

    if localNotification.alertTitle == "Snow" {
        notificationAlertLabel.setText("Snow")
        notificationImage.setImageNamed("snow_image")
    }

    completionHandler(.Custom)
}
Note the completion handler call at the end of the method. This notifies the system that the dynamic scene is ready to be displayed. If the completion handler does not get called or the code to configure the scene takes too long to complete, the system will revert to and display the static notification scene.
Adding the Images to the WatchKit App Bundle
The two images referenced in the didReceiveLocalNotification method now need to be added to the project. When configuring a dynamic notification scene, speed is essential to avoid the static notification scene appearing. In order to provide the app with quick access to the image files they will be added to the WatchKit app bundle as named images. The images used in this tutorial reside in the weather_images folder of the following download:
http://www.ebookfrenzy.comwatchkit/weather_images.zip
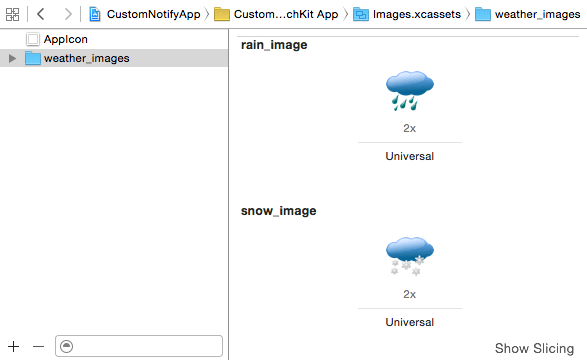
Within the Xcode Project Navigator panel locate the Images.xcassets entry listed under CustomNotifyApp WatchKit App so that the image catalog loads into the main panel. Ctrl-click in the left hand panel beneath the AppIcon entry and select Import… from the resulting menu. In the file selection panel, navigate to and select the weather_images folder before clicking on the Open button. Once imported, the images should appear in the image set as shown in Figure 29-6:
Figure 29-6
Testing the Custom Notification
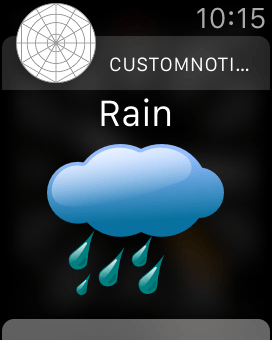
If the run target in the Xcode toolbar is currently set to CustomNotifyApp WatchKit App, change it back to the CustomNotifyApp setting and run the iOS app on an iPhone device with which an Apple Watch is paired. When the iOS app main screen appears tap the Rain button and lock the device. Pick up the paired Apple Watch so that the screen activates and wait for the notification to appear, at which point it should display the rain cloud image as shown in Figure 29-7:
Figure 29-7
Scroll down within the notification scene and tap the Dismiss button to close the notification. Repeat the above steps, this time selecting the Snow button. This time the notification should appear on the Apple Watch using the snow cloud image. The app is now successfully using a dynamic custom notification.
Summary
Custom notifications provide a considerable amount of control over the content contained within a notification when it appears on an Apple Watch device. This chapter has worked through the creation of an example application that makes use of a custom notification to configure and present dynamic content to the user within a notification alert.
| Purchase the fully updated watchOS 2/Swift 2 edition of this book in eBook ($12.99) or Print ($27.99) format watchOS 2 App Development Essentials Print and eBook (ePub/PDF/Kindle) editions contain 35 chapters. |
| Previous | Table of Contents | |
| A WatchKit Notification Tutorial |
