An Overview of WatchKit Tables
| Previous | Table of Contents | Next |
| An Example Interactive WatchKit App using Actions and Outlets | A WatchKit Table Tutorial |
| Purchase the fully updated watchOS 2/Swift 2 edition of this book in eBook ($12.99) or Print ($27.99) format watchOS 2 App Development Essentials Print and eBook (ePub/PDF/Kindle) editions contain 35 chapters. |
The WatchKit Table object allows content to be displayed within a WatchKit app scene in the form of a single vertical column of rows. Tables can be used purely as a mechanism for displaying lists of information, or used to implement navigation whereby the selection of a particular row within a table triggers a transition to another scene within the storyboard.
This chapter will provide an overview of tables in WatchKit, exploring how tables are structured and explaining areas such as the WKInterfaceTable class, row controllers, row controller classes, row controller types and the steps necessary to initialize a WatchKit table at runtime. The next chapter, entitled A WatchKit Table Tutorial, will then work through the creation of an example WatchKit table scene. Table based navigation will then be explored in the A WatchKit Table Navigation Tutorial chapter of the book.
The WatchKit Table
WatchKit tables provide a way to display information to the user in the form of a single column of rows. If a table has too many rows to fit within the watch display the user can scroll up and down within the table using the touch screen or the digital crown. The individual rows in a table may also be configured to call action methods when tapped by the user. Tables are represented by the WatchKit WKInterfaceTable class, with each row displayed within the table represented by a table row controller instance.
Table Row Controller
There are two parts to the table row controller. The first is the visual representation of the row within the table. This essentially defines which user interface objects are to be displayed in the row (for example a row might consist of an Image and a Label object).
The second component of a table row is a corresponding row controller class which resides within the WatchKit app extension. This class is created as a subclass of the NSObject class and, at a minimum, contains outlets to the user interface objects contained in the row controller. Once declared, these outlets are used by the scene’s interface controller to configure the content displayed within each row. If the row controller in the scene contained two Label objects, for example, the outlets could be used to set the text on those labels for each row in the table.
Row Controller Type
The user interface objects defined within a row controller in the scene combined with the corresponding row controller class in the extension define the row controller type. A single table can consist of multiple row controller types. One row controller might, for example, contain a label and an image while another might contain two labels. The type of row controller used for each row within the table is controlled by the interface controller during the table row initialization process.
Table Row Initialization
When a scene containing a table is displayed within a WatchKit app, the table object will need a row controller instance for each row to be displayed to the user. The interface controller is responsible for performing the following initialization tasks:
1. Calculate the number of rows to be displayed in the table. 2. Request the creation of a row controller instance of a particular row controller type for each row in the table. 3. Configure the appearance of the user interface objects in each row using the outlets declared in the row controller class.
Implementing a Table in a WatchKit App Scene
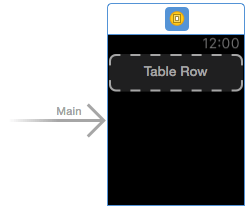
A Table is added to a WatchKit scene by dragging and dropping a Table object from the Object Library onto the storyboard scene. By default, the table instance will contain a single row controller instance containing a Group object. A Group object is a single user interface element that can contain one or more interface objects in a horizontal or vertical arrangement. Figure 6 1 shows a scene with a newly added table with the default row controller:
Figure 6-1
The hierarchical structure of the table and table row controller can be viewed within the Xcode Document Outline panel. This panel appears by default to the left of the Interface Builder panel and is controlled by the small button in the bottom left hand corner (indicated by the arrow in Figure 6-2) of the Interface Builder panel.
Figure 6-2
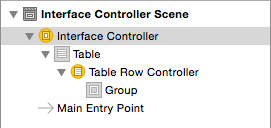
When displayed, the document outline shows a hierarchical overview of the elements that make up a user interface layout. This enables us, for example, to see that a scene consists of a Table, Table Row Controller and a Group object:
Figure 6-3
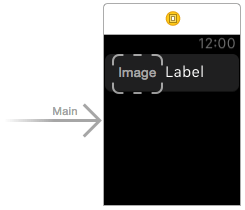
The row controller within the table is a template for the row controllers that will be created within the interface controller. To design the row, simply drag and drop user interface objects from the Object Library onto the row and resize the items to achieve the desired layout. In Figure 6-4, for example, the template row controller contains an image and label:
Figure 6-4
It is important to be aware that the appearance of the visual elements in a row is generally defined at runtime by the interface controller using the outlines declared in the row controller class. Any attributes set within the storyboard will serve as the default attributes for the visual elements and will appear in the app at runtime unless overridden in the interface controller.
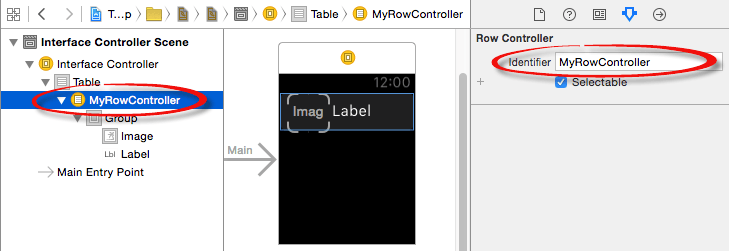
The row controller template must also be assigned an identifier which will be referenced in the interface controller code when instances of that row type are created during initialization. The identifier is configured by selecting the row controller item in the Document Outline panel and entering a suitable identifier name into the Identifier field of the Attributes Inspector panel:
Figure 6-5
Adding the Row Controller Class to the Extension
As previously outlined, each row controller type must have a corresponding row controller class file within the app extension. This must be a subclass of NSObject and can be created using the following steps:
1. Locate the WatchKit Extension folder within the Project Navigator panel and Ctrl-click on it. 2. From the resulting menu select the New File… menu option. 3. In the new file template panel, select Source listed under iOS in the left hand panel and Cocoa Touch Class from the main panel before clicking Next. 4. Enter a name for the class into the Class field and select NSObject from the Subclass of: menu before clicking Next. 5. Click Finish to add the new class to the extension.
Associating a Row Controller with a Row Controller Class
Before the table can be displayed, the row controller in the scene needs to be associated with the corresponding row controller class residing within the extension. This is achieved by selecting the row controller in the Document Outline panel, displaying the Identity Inspector (View -> Utilities -> Show Identity Inspector) and selecting the row controller class name from the Class menu.
Creating Table Rows at Runtime
The interface controller class for the scene containing the table is responsible for configuring the table and creating the rows during the initialization phase of the WatchKit app launch process. The interface controller will need an outlet connected to the table instance in the scene on which it will call either the setNumberOfRows(_:withRowType:) or setRowTypes(_:) methods:
- setNumberOfRows – Used when all of the rows to be created in the table are of the same row type. This method takes as parameters the number of rows to be created and the Identifier string for the row controller type as defined in the Attributes Inspector.
- setRowTypes – Called when the table is to comprise rows of different types. This method takes as a parameter an array containing the Identifiers of the row controller types (as defined in the Attributes Inspector) in the order in which they are to appear in the table.
When the above methods are called they remove any existing rows from the table and create new rows based on the parameters provided. The methods also create an internal array containing an instance of the row controller class for each of the rows displayed in the table. These instances can then be accessed by calling the rowControllerAtIndex method of the table object. Once a reference to a row controller class instance has been obtained, the outlets declared in that instance can be used to set the attributes of the user interface objects in the row controller.
| Purchase the fully updated watchOS 2/Swift 2 edition of this book in eBook ($12.99) or Print ($27.99) format watchOS 2 App Development Essentials Print and eBook (ePub/PDF/Kindle) editions contain 35 chapters. |
import WatchKit
import Foundation

class InterfaceController: WKInterfaceController {

    // The outlet to the Table object in the scene
    @IBOutlet weak var myTable: WKInterfaceTable!

    // The data array
    let colorNames = ["Red", "Green", "Blue", "Yellow"]

    override init() {
        super.init()
        loadTable() // Call to initialize the table rows
    }

    func loadTable() {
        // Create the table row controller instances
        // based on the number of items in colorNames array
        myTable.setNumberOfRows(colorNames.count,
		withRowType: "MyTableRowController")

        // Iterate through each of the table row controller
        // class instances.
        for (index, labelText) in enumerate(colorNames)
        {
            // Get a reference to the current instance
            let row = myTable.rowControllerAtIndex(index)
			as MyRowController
            // Set the text using the outlet in the row controller
            // class instance.
            row.myLabel.setText(labelText)
        }
    }
.
.
}
This approach is not restricted to the initialization phase of a table. The same technique can be used to dynamically change the properties of the user interface objects in a table row at any point when a table is displayed during the lifecycle of an app. The following action method, for example, dynamically changes the text displayed on the label in row zero of the table initialized in the above code:
@IBAction func buttonTap() {
    let row = myTable.rowControllerAtIndex(0) as MyRowController
    row.myLabel.setText("Hello")
}
Inserting Table Rows
Additional rows may be added to a table at runtime using the insertRowsAtTableIndexes method of the table instance. This method takes as parameters an index set indicating the positions at which the rows are to be inserted and the identifier of the row controller type to be used. The following code, for example, inserts new rows of type “MyImageRowController” at row index positions 0, 2 and 4:
let indexSet = NSMutableIndexSet()
indexSet.addIndex(0)
indexSet.addIndex(2)
indexSet.addIndex(4)

myTable.insertRowsAtIndexes(indexSet,
    withRowType: "MyImageRowController")
Removing Table Rows
Similarly, rows may be removed from a table using the removeRowsAtIndexes method of the table instance, once again passing through as a parameter an index set containing the rows to be removed. The following code, for example, removes the rows inserted in the above code fragment:
let indexSet = NSMutableIndexSet()
indexSet.addIndex(0)
indexSet.addIndex(2)
indexSet.addIndex(4)

myTable.removeRowsAtIndexes(indexSet)
Scrolling to a Specific Table Row
The table can be made to scroll to a specific row programmatically using the scrollToRowAtIndex method of the table instance, passing through as a parameter an integer value representing the index position of the destination row:
myTable.scrollToRowAtIndex(1)
A negative index value will scroll to the top of the table, while a value greater than the last index position will scroll to the end.
Summary
Tables are created in WatchKit using the WKInterfaceTable class which allows content to be presented to the user in the form of a single column of rows. Each row within a table is represented visually within a storyboard scene by a row controller which, in turn, has a corresponding row controller class residing in the app extension. A single table can display multiple row controller types so that individual rows in a table can comprise different user interface objects. Initialization and runtime configuration of the row controller instances is the responsibility of the interface controller for the scene in which the table appears. A variety of methods are available on the table class to dynamically insert and remove rows while the table is displayed to the user.
| Purchase the fully updated watchOS 2/Swift 2 edition of this book in eBook ($12.99) or Print ($27.99) format watchOS 2 App Development Essentials Print and eBook (ePub/PDF/Kindle) editions contain 35 chapters. |
| Previous | Table of Contents | Next |
| An Example Interactive WatchKit App using Actions and Outlets | A WatchKit Table Tutorial |
