A WatchKit openParentApplication Example Project
| Previous | Table of Contents | Next |
| WatchKit App and Parent iOS App Communication | Handling User Input in a WatchKit App |
| Purchase the fully updated watchOS 2/Swift 2 edition of this book in eBook ($12.99) or Print ($27.99) format watchOS 2 App Development Essentials Print and eBook (ePub/PDF/Kindle) editions contain 35 chapters. |
The previous chapter explored the use of the openParentApplication method to enable a WatchKit app to communicate with the containing iOS application with which it is bundled. The tutorial outlined in this chapter will make use of this technique to play audio on the iPhone device under the control of a WatchKit app.
About the Project
The project created in this chapter will consist of two parts. The first is an iOS application that allows the user to playback music and to adjust the volume level from an iPhone device. The second part of the project involves the creation of a WatchKit app which also allows the user the same level of music playback control from the paired Apple Watch device. The communication back and forth between the WatchKit and iOS apps will be implemented entirely using the openParentApplication method.
Creating the Project
Start Xcode and create a new iOS project. On the template screen choose the Application option located under iOS in the left hand panel and select Single View Application. Click Next, set the product name to OpenParentApp, enter your company identifier and make sure that the Devices menu is set to Universal. Before clicking Next, change the Language menu to Swift. On the final screen, choose a location in which to store the project files and click on Create to proceed to the main Xcode project window.
Enabling Audio Background Mode
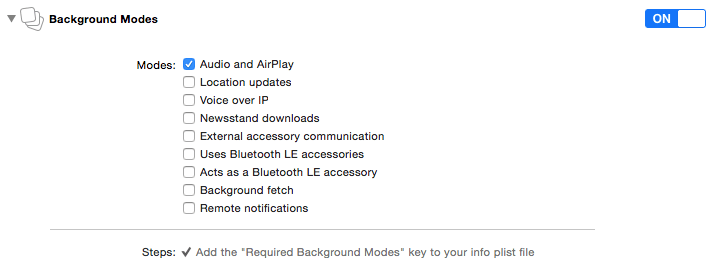
When the user begins audio playback it should not stop until the user taps the stop button, or the end of the track is reached. To ensure that the iOS app is not suspended by the operating system the Audio background mode needs to be enabled. Within Xcode, select the OpenParentApp target at the top of the project navigator panel, select the Capabilities tab and switch the Background Modes option from Off to On. Once background modes are enabled, enable the checkbox next to Audio and Airplay as outlined in Figure 13-1:
Figure 13-1
With this mode enabled, the background iOS app will not be suspended as long as it continues to play audio.
Designing the iOS App User Interface
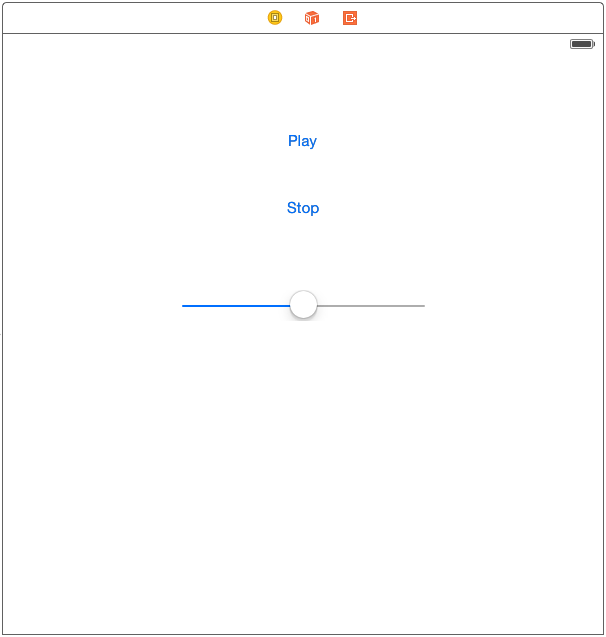
The user interface for the iOS app will consist of a Play button, a Stop button and a slider with which to control the volume level. Locate and select the Main.storyboard file in the Xcode Project Navigator panel and drag and drop two Buttons and one Slider view onto the scene canvas so that they are centered horizontally within the scene. Double click on each button, changing the text to “Play” and “Stop” respectively, and stretch the slider so that it is slightly wider than the default width. On completion of these steps the layout should resemble that of Figure 13-2:
Figure 13-2
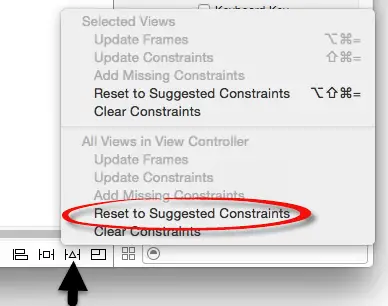
Using the Resolve Auto Layout Issues menu (indicated in Figure 13-3) select the Reset to Suggested Constraints option to configure appropriate layout behavior for the three views in the scene:
Figure 13-3
Establishing Outlets and Actions
With the Main.storyboard file still loaded into Interface Builder, display the Assistant Editor panel and verify that it is displaying the content of the ViewController.swift file. Ctrl-click on the Slider object in the storyboard scene and drag the resulting line to a position immediately beneath the class declaration line in the Assistant Editor panel. On releasing the line, establish an outlet named volumeControl in the connection panel. Repeat these steps on both of the Button views, this time establishing action connections to methods named playAudio and stopAudio respectively.
Finally, establish an action connection for the Slider view to a method named sliderMoved based on the Value Changed event. On completion of these steps the ViewController.swift file should read as follows:
import UIKit

class ViewController: UIViewController {

    @IBOutlet weak var volumeControl: UISlider!

    override func viewDidLoad() {
        super.viewDidLoad()
        // Do any additional setup after loading the view, typically from a nib.
    }

    @IBAction func playAudio(sender: AnyObject) {
    }

    @IBAction func stopAudio(sender: AnyObject) {
    }

    @IBAction func sliderMoved(sender: AnyObject) {
    }

    override func didReceiveMemoryWarning() {
        super.didReceiveMemoryWarning()
        // Dispose of any resources that can be recreated.
    }
}
Initializing Audio Playback
Before sounds can be played within the iOS app a number of steps need to be taken. First, an audio file needs to be added to the project. The music to be played in this tutorial is contained in a file named vivaldi.mp3 located in the audio_files folder of the following download:
http://www.ebookfrenzy.com/watchkit/audio_files.zip
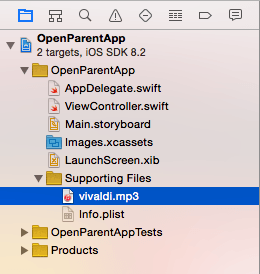
Locate the file in a Finder window and drag and drop it onto the Supporting Files entry of the OpenParentApp folder in the Project Explorer panel as shown in Figure 13-4, clicking on the Finish button in the options panel:
Figure 13-4
With the audio file added to the project, code now needs to be added to the viewDidLoad method of the ViewController.swift file to initialize an AVAudioPlayer instance so that playback is ready to start when the user taps the Play button. Select the ViewController.swift file and modify it to import the AVFoundation framework, declare AVAudioSession and AVAudioPlayer instance variables and to initialize the player:
override func viewDidLoad() {
    super.viewDidLoad()

    var error: NSError?

    let success = audioSession.setCategory(
		AVAudioSessionCategoryPlayback, error: &error)

    if success {
        let url = NSURL.fileURLWithPath(
            NSBundle.mainBundle().pathForResource("vivaldi",
                ofType: "mp3")!)

        audioPlayer = AVAudioPlayer(contentsOfURL: url, error: &error)

        if let err = error {
            println("audioPlayer error \(err.localizedDescription)")
        } else {
            audioPlayer?.prepareToPlay()
            audioPlayer?.volume = 0.1
        }
    }
}
The code configures the audio session to allow audio playback to be initiated from the background even when the device is locked and the ring switch on the side of the device is set to silent mode. The audio player instance is then configured with the mp3 file containing the audio to played and an initial volume level set.
Implementing the Audio Control Methods
With the audio player configured and initialized, the next step is to add some methods to control the playback of the music. Remaining within the ViewController.swift file, implement these three methods as follows:
func stopPlay() {
    audioPlayer?.stop()
}

func startPlay() {
    audioPlayer?.play()
}

func adjustVolume(level: Float)
{
    audioPlayer?.volume = level
}
Each of these methods will need to be called by the corresponding action methods as follows:
@IBAction func playAudio(sender: AnyObject) {
    startPlay()
}

@IBAction func stopAudio(sender: AnyObject) {
    stopPlay()
}

@IBAction func sliderMoved(sender: AnyObject) {
    adjustVolume(volumeControl.value)
}
Compile and run the iOS app and test that the user interface controls allow playback to be started and stopped via the two buttons and that the slider provides control over the volume level. With the iOS app now functioning, it is time to focus on creating the matching WatchKit app.
Adding the WatchKit App Target
Within Xcode, select the File -> New -> Target… menu option. In the target template dialog, select the Apple Watch option listed beneath the iOS heading. In the main panel, select the WatchKit App icon and click on Next. On the subsequent screen, turn off the Include Glance Scene and Include Notification Scene options before clicking on the Finish button.
As soon as the extension target has been created, a new panel will appear requesting permission to activate the new scheme for the extension target. Activate this scheme now by clicking on the Activate button in the request panel.
Designing the WatchKit App Scene
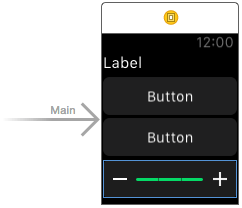
Select the Interface.storyboard file located under OpenParentApp WatchKit App so that the storyboard loads into Interface Builder. Drag and drop a Label, two Buttons and a Slider from the Object Library onto the scene canvas so that the layout matches that shown in Figure 13-5:
Figure 13-5
| Purchase the fully updated watchOS 2/Swift 2 edition of this book in eBook ($12.99) or Print ($27.99) format watchOS 2 App Development Essentials Print and eBook (ePub/PDF/Kindle) editions contain 35 chapters. |
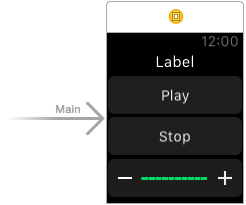
Double click on the uppermost of the two buttons and change the text to “Play”. Repeat this step for the second button, this time changing the text so that it reads “Stop”.
Select the Slider object and, in the Attributes Inspector panel, change both the Maximum and Steps properties to 10.
On completion of the above steps, the scene layout should resemble Figure 13-6:
Figure 13-6
Display the Assistant Editor and verify that it is showing the contents of the InterfaceController.swift file. Using the Assistant Editor, establish an outlet connection from the Label object in the user interface named statusLabel. Next, create action connections from the two buttons named startPlay and stopPlay respectively and an action connection from the slider named volumeChange. With these connections established, the top section of the InterfaceController.swift file should read as follows:
import WatchKit
import Foundation

class InterfaceController: WKInterfaceController {

    @IBOutlet weak var statusLabel: WKInterfaceLabel!

    override func awakeWithContext(context: AnyObject?) {
        super.awakeWithContext(context)

        // Configure interface objects here.
    }

    @IBAction func startPlay() {
    }

    @IBAction func stopPlay() {
    }

    @IBAction func volumeChange(value: Float) {
    }
.
.
}
Opening the Parent Application
Now that the WatchKit app user interface is wired up to methods in the interface controller class, the next step is to implement the calls to the openParentApplication method in those action methods.
Each openParentApplication method call will include a dictionary consisting of a key named “command” and a value of either “play”, “stop” or “volume”. In the case of the volume command, an additional key-value pair will be provided within the dictionary with the value set to the current value of the slider. The openParentApplication method calls will also declare and pass through a reply closure. This is essentially a block of code that will be called and passed data by the parent application once the request has been handled.
Within the InterfaceController.swift file, implement this code within the action methods so that they read as follows:
@IBAction func startPlay() {
    let parentValues = [
        "command" : "start"
    ]

    WKInterfaceController.openParentApplication(parentValues,
		reply: { (replyValues, error) -> Void in
        self.statusLabel.setText(replyValues["status"] as? String)
    })
}

@IBAction func stopPlay() {
    let parentValues = [
        "command" : "stop"
    ]

    WKInterfaceController.openParentApplication(parentValues,
		reply: { (replyValues, error) -> Void in
        self.statusLabel.setText(replyValues["status"] as? String)
    })
}

@IBAction func volumeChange(value: Float) {
    let parentValues = [
        "command" : "volume",
        "level" : value/10
    ]

    WKInterfaceController.openParentApplication(parentValues
					as [NSObject : AnyObject],
		reply: { (replyValues, error) -> Void in
        self.statusLabel.setText(replyValues["status"] as? String)
    })
}
Note that the slider will contain a value between 0 and 10. Since the AVAudioPlayer class has a range of 0.0 to 1.0 for the volume level, the slider value is divided by 10 before being passed to the parent application.
In the above code, the reply closure code in each method call reads as follows:
(replyValues, error) -> Void in
        self.statusLabel.setText(replyValues["status"] as? String)
The closure expects as parameters a dictionary and an error object. In the case of this example, the closure code simply extracts the string value for the “status” key from the reply dictionary and displays it on the status Label object in the main WatchKit app scene.
Handling the WatchKit Extension Request
When the openParentApplication method is called, the parent iOS application will be notified via a call to the handleWatchKitExtensionRequest method within the application delegate class. The next step in this tutorial is to implement this method.
Locate and select the AppDelegate.swift file in the Project Navigator panel so that it loads into the editor. Once loaded, add an implementation of the handleWatchKitExtensionRequest method as follows:
func application(application: UIApplication, handleWatchKitExtensionRequest userInfo: [NSObject : AnyObject]?, reply: (([NSObject : AnyObject]!) -> Void)!) {

    var replyValues = Dictionary<String, AnyObject>()

    var viewController = self.window!.rootViewController
					as! ViewController

    switch userInfo!["command"] as! String {
    	case "start" :
        	viewController.startPlay()
        	replyValues["status"] = "Playing"
    	case "stop" :
        	viewController.stopPlay()
        	replyValues["status"] = "Stopped"
    	case "volume" :
        	var level = userInfo!["level"] as! Float
        	viewController.adjustVolume(level)
        	replyValues["status"] = "Vol = \(level)"
    	default:
        	break
    }
    reply(replyValues)
}
The code begins by creating and initializing a Dictionary instance in which to store the data to be returned to the WatchKit Extension. Next, a reference to the root view controller instance of the iOS app is obtained so that the playback methods in that class can be called later in the method.
One of the arguments passed through to the handleWatchKitExtensionRequest method is a dictionary named userInfo. This is the dictionary that was passed through when the openParentApplication method was called from the WatchKit app extension (in other words the parentValues dictionary declared in the extension action methods). The method uses a switch statement to identify which command has been passed through within this dictionary. Based on the command detected, the corresponding method within the view controller is called. For example, if the “command” key in the userInfo dictionary has the string value “play” then the startPlay method of the view controller is called to begin audio playback. The value for the “status” key in the replyValues dictionary is then configured with the text to be displayed via the status label in the WatchKit app scene.
Also passed through as an argument to the handleWatchKitExtensionRequest method is a reference to the reply closure declared as part of the openParentApplication method call. The last task performed by the handleWatchKitExtensionRequest method is to call this closure, passing through the replyValues dictionary. As previously described, the reply closure code will then display the status text to the user via the previously declared statusLabel outlet.
Testing the Application
In the Xcode toolbar, make sure that the run target menu is set to OpenParentApp WatchKit App before clicking on the run button. Once the WatchKit app appears, click on the Play button in the scene. The status label should update to display “Playing” and the music should begin to play within the iOS app. Test that the slider changes the volume and that the Stop button stops the playback. In each case, the response from the parent iOS app should be displayed by the status label.
Summary
This chapter has created an example project intended to demonstrate the use of the openParentApplication method to launch and communicate with the iOS parent application of a WatchKit app. The example has shown how to call the openParentApplication method and implement the handleWatchKitExtensionRequest method within the app delegate of the parent iOS app.
| Purchase the fully updated watchOS 2/Swift 2 edition of this book in eBook ($12.99) or Print ($27.99) format watchOS 2 App Development Essentials Print and eBook (ePub/PDF/Kindle) editions contain 35 chapters. |
| Previous | Table of Contents | Next |
| WatchKit App and Parent iOS App Communication | Handling User Input in a WatchKit App |
