A WatchKit Animated Image Tutorial
| Previous | Table of Contents | Next |
| Working with Fonts and Attributed Strings in WatchKit |
| Purchase the fully updated watchOS 2/Swift 2 edition of this book in eBook ($12.99) or Print ($27.99) format watchOS 2 App Development Essentials Print and eBook (ePub/PDF/Kindle) editions contain 35 chapters. |
The previous chapter touched briefly on the subject of animated images within the context of a WatchKit app. This chapter will expand on this knowledge through the implementation of an example application that creates and displays an animated image within a WatchKit app scene.
Creating the Animation Example Project
Start Xcode and create a new iOS project. On the template screen choose the Application option located under iOS in the left hand panel and select Single View Application. Click Next, set the product name to AnimationApp, enter your organization identifier and make sure that the Devices menu is set to Universal. Before clicking Next, change the Language menu to Swift. On the final screen, choose a location in which to store the project files and click on Create to proceed to the main Xcode project window.
Adding the WatchKit App Target
Within Xcode, select the File -> New -> Target… menu option. In the target template dialog, select the Apple Watch option listed beneath the iOS heading. In the main panel, select the WatchKit App icon and click on Next. On the subsequent screen turn off the Include Glance Scene and Include Notification Scene options before clicking on the Finish button.
As soon as the extension target has been created, a new panel will appear requesting permission to activate the new scheme for the extension target. Activate this scheme now by clicking on the Activate button in the request panel.
Designing the Main Scene Layout
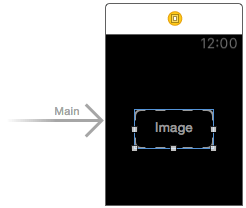
The only interface object required within the main WatchKit app scene is an Image object. Within the Xcode project navigator panel, locate and select the Interface.storyboard file so that it loads into the Interface Builder environment. Once loaded, locate the Image object in the Object Library panel and drag and drop it onto the main storyboard scene. With the newly added image object selected, display the Attributes Inspector and change both the Horizontal and Vertical position properties to Center so that the scene layout matches Figure 22-1:
Figure 22-1
Display the Assistant Editor panel and establish an outlet connection from the Image object in the scene named imageObject.
Adding the Animation Sequence Images
The animation sequence in this example consists of 40 PNG image files, which combine to make up an animation of the planet Earth rotating. These files can be found in the animation_images folder of the sample code archive, available for download from the following link:
http://www.ebookfrenzy.com/watchkit/animation_images.zip
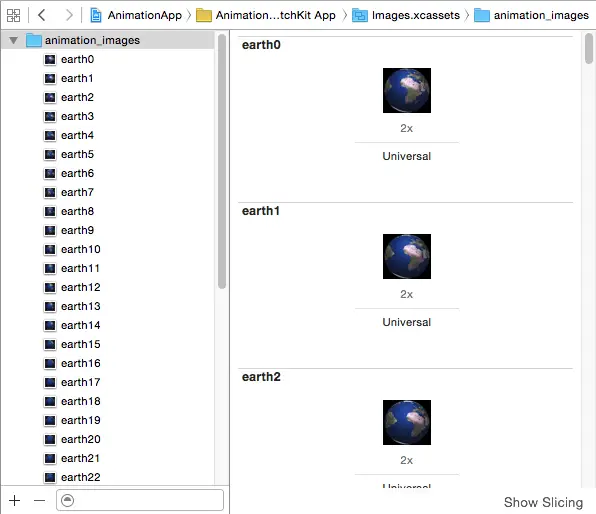
Locate and select the Images.xcassets entry listed under the AnimationApp WatchKit App folder within the Xcode Project Navigator panel. Ctrl-click in the left hand panel of the asset catalog and select the Import… option from the resulting menu. Within the file selection dialog, navigate to and select the animation_images folder and click on Open.
Once the images have been imported into the asset catalog a new image set will be created named animation_images containing all of the animation sequence images:
Figure 22-2
With the images added to the asset catalog, all that remains is to add some code in the interface controller class to create and initiate the animation.
| Purchase the fully updated watchOS 2/Swift 2 edition of this book in eBook ($12.99) or Print ($27.99) format watchOS 2 App Development Essentials Print and eBook (ePub/PDF/Kindle) editions contain 35 chapters. |
Creating and Starting the Animated Image
Locate and edit the InterfaceController.swift file and modify the awakeWithContext method to create and display the animation image:
override func awakeWithContext(context: AnyObject?) {
    super.awakeWithContext(context)

    imageObject.setImageNamed("earth")
}
Compile and run the WatchKit app and note that image 0 appears but that the image object does not animate through the remaining frames. Modify the code further to start the animation sequence:
override func awakeWithContext(context: AnyObject?) {
    super.awakeWithContext(context)

    imageObject.setImageNamed("animation")
    imageObject.startAnimating()
}
When the app is re-launched the image object will now cycle rapidly and repeatedly through the animation frames showing the Earth rotating. To slow the animation down, the startAnimating method can be replaced with a call to the startAnimatingWithImagesInRange method specifying a duration, repeat count and a range that encompasses all of the images in the animation:
 override func awakeWithContext(context: AnyObject?) {
    super.awakeWithContext(context)

    imageObject.setImageNamed("animation")
    imageObject.startAnimatingWithImagesInRange(NSRange(location: 0,
           length: 40), duration: 7, repeatCount: 2)
}
When the app is now run, the animation frames will be run more slowly so that the entire sequence takes 7 seconds to complete. The animation should also now stop after 2 repetitions. To configure the animation loop to repeat indefinitely simply change the repeatCount value to 0.
Figure 22-3
Summary
This chapter created a sample project that demonstrates the implementation of animated images within a WatchKit app. The tutorial covered the steps required to add animation sequence images to a WatchKit app target in Xcode and outlined the code required within the interface controller to convert those images to an animated image and display that animation to the user. The chapter also explored the different ways in which the animation may be customized in terms of duration, repetition and frame range.
| Purchase the fully updated watchOS 2/Swift 2 edition of this book in eBook ($12.99) or Print ($27.99) format watchOS 2 App Development Essentials Print and eBook (ePub/PDF/Kindle) editions contain 35 chapters. |
| Previous | Table of Contents | Next |
| Working with Fonts and Attributed Strings in WatchKit |


