A WatchKit WKInterfacePicker Coordinated Animation Example
The WKInterfacePicker object is capable of displaying sequences of images, the animation of which the user controls using the Apple Watch Digital Crown control. As outlined in the chapter entitled An Introduction to the watchOS 2 WatchKit WKInterfacePicker Object, the picker object may also be used to coordinate the animation of multiple image sequences by associating a WKInterfacePicker object with WKInterfaceGroup or WKInterfaceImage objects within a storyboard scene. The purpose of this chapter is to demonstrate both how the image sequence style of the picker object is implemented within a WatchKit app, and also the steps involved in creating coordinated image animation tied to the Digital Crown.
About the Coordinate Image Picker Project
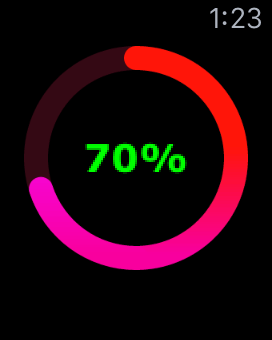
When completed, the main scene in the WatchKit app will consist of a sequence of images displaying a percentage value. The percentage value will be surrounded by a progress circle which is animated in coordination with the picker sequence as shown in Figure 27-1:
Figure 27-1
When the project is completed and the user turns the Digital Crown both the percentage value and the circle will update accordingly. In practice, the percentage value will be represented by a picker object in image sequence mode and the circle will be an animated image assigned to the background property of a WKInterfaceGroup object in which the picker object is contained.
Generating Radial Animations
A common use for the picker object in image sequence mode is to display radial progress animations as shown in Figure 27-1. A particularly useful tool for generating radial animations (and the one used to generate the radial image sequence in this example) is Hitesh Maidasani’s Radial Bar Generator for Apple Watch which is accessible online at:
http://hmaidasani.github.io/RadialChartImageGenerator/
Creating the Example Project
Start Xcode and create a new iOS project. On the template screen choose the Application option located under watchOS in the left hand panel and select iOS App with WatchKit App. Click Next, set the product name to PickerImagesApp, enter your organization identifier and make sure that the Devices menu is set to Universal. Before clicking Next, change the Language menu to Swift and switch off all of the Include options. On the final screen, choose a location in which to store the project files and click on Create to proceed to the main Xcode project window.
Designing the WatchKit App user Interface
Locate and select the Interface.storyboard file listed under PickerImagesApp WatchKit App in the Project Navigator panel. Once loaded into Interface Builder, drag and drop a Group object from the Object Library panel onto the main storyboard scene. Display the Assistant Editor and establish an outlet connection from the Group object named myGroup.
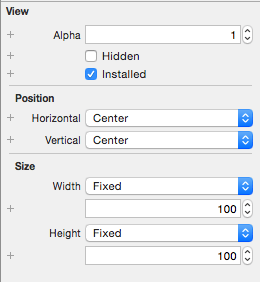
Display the Attributes Inspector panel and change both the Horizontal and Vertical position settings to Center. With the Group object still selected, change the Height and Width Size properties on the Group object to be Fixed at 100:
Figure 27-2
Locate the Picker object in the Object Library panel and drag and drop an instance onto the Group object within the storyboard scene. Once again using the Assistant Editor panel, establish an outlet connection from the Picker object named myPicker.
With the Picker object still selected in the storyboard scene, change the Style property in the Attributes Inspector panel to Sequence and both the Horizontal and Vertical Position properties to Center.
Finally, change both the Height and Width Size properties for the Picker object to be Fixed, setting the Width property to 65 and the Height property to 32.
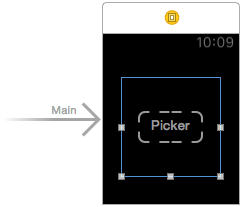
On completion of these steps, the layout for the main scene should match that of Figure 27-3:
Figure 27-3
Adding the Picker Image Sequences to the Project
The animation will require two sets of animation sequences, one representing the percentage text and the other the progress circle. The images for the picker object can be downloaded from the following URL:
http://www.ebookfrenzy.com/watchos2/picker_images.zip
Within the Project Navigator panel, select the Assets.xcassets entry listed under PickerImagesApp WatchKit App so that the asset catalog loads into the main Xcode panel. Ctrl-click in the center panel beneath the AppIcon entry and, from the resulting menu, select the Import… menu option.
In the file selection dialog, navigate to and select the picker_images folder in the downloaded archive folder and click on the Open button. All of the images needed for the percentage animation sequence will now be added to the asset catalog of the WatchKit app bundle:
[[Image:|Animation sequence images added to WatchKit app bundle]]
Figure 27-4
Adding the Group Background Image Sequences to the Project
The images for the Group object background are contained within the group_images folder of the pciker_images.zip download and must be added to the asset catalog of the WatchKit app extension.
Within the Project Navigator panel, select the Assets.xcassets entry listed under PickerImagesApp WatchKit Extension so that the asset catalog loads into the main Xcode panel. Ctrl-click in the center panel and, from the resulting menu, select the Import… menu option.
In the file selection dialog, navigate to and select the group_images folder in the sample code folder and click on the Open button. All of the images needed for the radial animation sequence will now be added to the asset catalog of the WatchKit extension.
Implementing the Picker Animation Sequence
With the scene layout designed and both sets of animation images added to the project the next step is to initialize the Picker object with the sequence of images. The images for the picker object are named percent<n>.png where n is numbered from 0 to 10. The code for the interface controller needs to create an array of WKPickerItems to be passed to the picker object. Each WKPickerItem object needs to have assigned to the contentImage property a WKImage object initialized with one of the sequence image files. Once the array of items has been created it then needs to be assigned to the picker object.
The code to achieve this can now be added to the awakeWithContext method located in the InterfaceController.swift file as follows:
override func awakeWithContext(context: AnyObject?) {
    super.awakeWithContext(context)

    var pickerItems = [WKPickerItem]()

    for index in 0...10 {
        let pickerItem = WKPickerItem()
        pickerItem.contentImage = WKImage(imageName: "percent\(index)")
        pickerItems.append(pickerItem)
    }
    myPicker.setItems(pickerItems)
}
With the code added to the method, compile and run the app and verify that the first image displayed shows 0% and that turning the Digital Crown (or mouse scroll wheel if using the Simulator) animates through the full sequence of images up to 100%.
Configuring the Group Background Animation
The next step is to create an animated image using the circle image sequence and assign it to the background of the Group object. Once created and assigned to the group object, the animation needs to be coordinated with the picker object via a call to the object’s setCoordinatedAnimations method. The code to achieve these steps should also be added to the awakeWithContext method of the InterfaceController.swift file as follows:
override func awakeWithContext(context: AnyObject?) {
    super.awakeWithContext(context)

    var pickerItems = [WKPickerItem]()

    for index in 0...10 {
        let pickerItem = WKPickerItem()
        pickerItem.contentImage = WKImage(imageName: "percent\(index)")
        pickerItems.append(pickerItem)
    }
    myPicker.setItems(pickerItems)

    var imageArray = [UIImage]()

    for index in 0...10 {
        let image = UIImage(named: "progressarc\(index)")
        imageArray.append(image!)
    }

    let progressImages = UIImage.animatedImageWithImages(imageArray,
		duration: 0.0)
    myGroup.setBackgroundImage(progressImages)
    myPicker.setCoordinatedAnimations([myGroup])
}
Testing the App
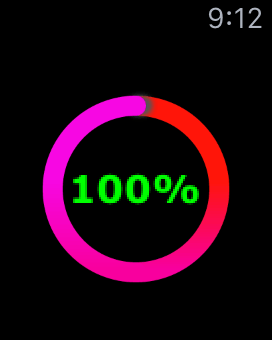
Compile and run the WatchKit app once again and test that turning the Digital Crown results in the coordinated animation of both image sequences:
Figure 27-5
Summary
In addition to allowing the Digital Crown to control the animation sequence assigned to a single picker object, combining the picker with one or more group or image objects allows multiple animations to be synchronized. This chapter has demonstrated the use of this technique to coordinate the animations of a picker image sequence with the background animation assigned to a group object.


