A WatchKit Table Navigation Tutorial
| Previous | Table of Contents | Next |
| A WatchKit Table Tutorial | WatchKit Page-based User Interfaces and Modal Interface Controllers |
<google>BUY_WATCHKIT</google>
The previous chapter introduced the concept of tables within WatchKit app scenes. An area of WatchKit tables that has been mentioned but not yet explored in detail involves the use of tables to implement navigation between storyboard scenes. This chapter will provide an overview of table based navigation (also referred to as hierarchical navigation) within WatchKit apps. Once the basics have been covered, the TableDemoApp project from the previous chapter will be extended to add navigation support.
Table based navigation, also referred to as hierarchical navigation, allows an app to transition from one scene to another scene when a row within a table is selected by the user. When a table row is selected, the didSelectRow method of the interface controller associated with the current scene is called and passed a reference to the table object in which the selection took place together with an integer value representing the index value of the selected row. It is then the responsibility of this method to perform the steps necessary to transition to the next scene.
Performing a Scene Transition
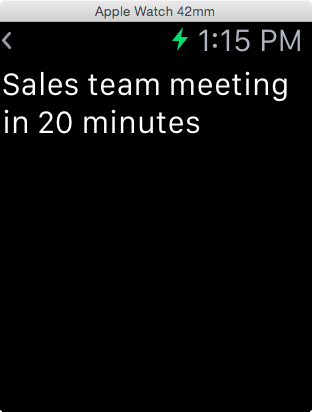
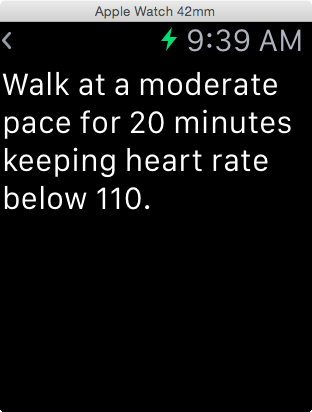
When implementing navigation-based behavior in a WatchKit app, each scene still has a corresponding interface controller. As the user navigates through scenes, the app framework maintains an internal navigation stack of the interface controllers. When a new scene is displayed it is pushed onto the navigation stack and becomes the currently active controller. The framework also places a left pointing chevron in the upper left hand corner (Figure 8-1) of the newly displayed scene which, when tapped, returns to the previous scene. When this happens, the current interface controller is popped off the stack and the interface controller beneath it moved to the top becoming the currently active and visible controller. In addition to the user tapping the chevron, a return to the previous scene may also be achieved programmatically via a call to the popController method of the current interface controller instance.
Figure 8-1
The interface controller for the first scene to be pushed onto the navigation stack is referred to as the root interface controller.
This stack based approach enables multiple levels of navigation to be implemented allowing the user to navigate back and forth through many scene levels. In this scenario it is also possible to trigger navigation back to the root interface controller, skipping all intermediate scenes in the navigation stack, via a call to the popToRootController method of the current interface controller instance.
The transition from one scene to another is initiated via a call to the pushControllerWithName method. This method takes as parameters the identifier name of the destination interface controller and an optional context object. The context object can be an object of any type and is intended to provide the destination interface controller with any data necessary to configure the new scene appropriate to the context of the selected row.
The pushControllerWithName method will initialize the destination interface controller and pass the context object through as a parameter to the controller’s awakeWithContext lifecycle method.
Extending the TableDemoApp Project
In the remainder of this chapter, the TableDemoApp project will be extended so that when rows are selected within the table the app will transition to a second scene in which additional information about the selected item will be displayed. The first step in this tutorial is to add an additional scene and interface controller to the project to act as the detail scene.
Adding the Detail Scene to the Storyboard
Begin by launching Xcode and opening the TableDemoApp project created in the previous chapter. Once loaded, select the Interface.storyboard file so that it appears within the Interface Builder tool. The storyboard should currently consist of a single scene containing the table implementation. Add a second scene to the storyboard by locating the Interface Controller object in the Object Library panel and dragging and dropping it so that it is positioned to the right of the existing scene.
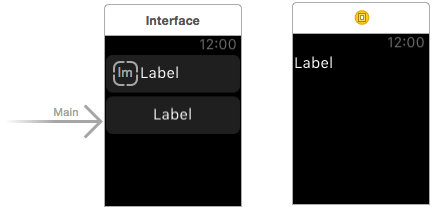
The detailed information about the selected workout step will be displayed on the second scene using a Label object so drag and drop a Label object from the Object Library onto the second scene. Once these steps have been performed the storyboard should resemble Figure 8-2:
Figure 8-2
With the new scene added to the storyboard and selected so it is highlighted in blue, display the Attributes Inspector and enter “DetailInterfaceController” into the Identifier field.
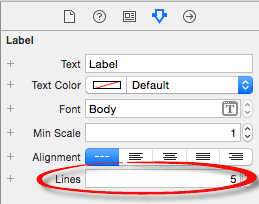
By default, labels are configured to display a single line of text which will be clipped if the text exceeds the width of the watch display. To avoid this problem, configure the label to wrap the text over multiple lines by selecting the label in the second scene, displaying the Attributes Inspector and increasing the Lines attribute to 5.
Figure 8-3
The design of the second scene is now complete. The next step is to add an interface controller to go with it.
Adding the Detail Interface Controller
Add the interface controller for the detail scene by locating the TableDemoApp WatchKit Extension entry in the Xcode Project Navigator panel, Ctrl-clicking on it and selecting New File… from the menu. In the template panel select the options to create an iOS Cocoa Touch Class source file and click Next. Name the new class DetailInterfaceController and configure it to be a subclass of WKInterfaceController. Click Next, make sure that the file is to be generated into the extension folder then click Create.
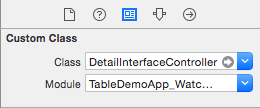
Load the Interface.storyboard file into Interface Builder. Select the second scene so that it highlights in blue, display the Identity Inspector panel and change the Class menu setting to the new DetailInterfaceController class as illustrated in Figure 8-4:
Figure 8-4
Select the Label object in the detail scene in the storyboard and display the Assistant Editor panel. Make sure that the Assistant Editor is displaying the DetailInterfaceController.swift file and then control click and drag from the Label object to a position just beneath the class declaration line in the Assistant Editor panel. Release the line and configure an outlet for the label named detailLabel. The outlet should now be declared within the class file as follows:
import WatchKit
import Foundation

class DetailInterfaceController: WKInterfaceController {

    @IBOutlet weak var detailLabel: WKInterfaceLabel!

    override func awakeWithContext(context: AnyObject?) {
        super.awakeWithContext(context)

        // Configure interface objects here.
    }
.
.
}
Adding the Detail Data Array
When the user selects a row in the table the detail scene will appear on the display. The label within this scene is intended to provide a more detailed explanation of the exercise to be performed. The text displayed will depend on which row was selected by the user. In other words, when the user selects the “Warm-up” row, the detail scene will provide details on how the user should perform the warm-up routine. For the purposes of this example, the array containing the detailed descriptions will be placed in the interface controller of the first scene. The appropriate text will then be extracted from the array based on the row chosen by the user and passed through to the detail view controller as the context object.
Select the InterfaceController.swift file and modify it to add the detailData array as follows:
import WatchKit
import Foundation

class InterfaceController: WKInterfaceController {

    @IBOutlet weak var myTable: WKInterfaceTable!


    let stringData = ["Warm-up", "Cardio", "Weightlifting", "Core", "Bike", "Cooldown"]

    let imageData = ["walking", "treadmill", "weights", "core", "bikeriding", "cooldown"]

    let detailData = ["Walk at a moderate pace for 20 minutes keeping heart rate below 110.",
        "Run for 30 minutes keeping heart rate between 130 and 140.",
        "Perform 3 sets of 10 repetitions increasing weight by 5lb on each set.",
        "Perform 2 sets of 20 crunches.",
        "Ride bike at moderate pace for 20 minutes.",
        "Walk for 10 minutes then stretch for 5 minutes."]

    override init() {
        super.init()
        loadTable()
    }
.
.
.
}
Implementing the didSelectRow Method
As previously discussed, the selection of a row within a table (assuming that the row has been configured as being selectable) results in a call to the didSelectRow method within the corresponding interface controller instance. This method now needs to be added to the InterfaceController.swift file as follows:
override func table(table: WKInterfaceTable, didSelectRowAtIndex rowIndex: Int) {
    pushControllerWithName("DetailInterfaceController",
         context: detailData[rowIndex-1])
}
The code within this method simply calls the pushControllerWithName method passing through as a parameter the Identifier of the interface controller to be displayed (in this case our DetailInterfaceController scene). The code also extracts the string from the detailData array based on the number of the row selected by the user. The first element in the array is at index position zero while the first selectable row in the table is row 1 due to the presence of the title row. Consequently, the rowIndex value is decremented by one to compensate.
Run the application and test that selecting a row transitions to the detail scene. The next step is to add some code to display the detail text on the label of the detail scene.
Modifying the awakeWithContext Method
The awakeWithContext method is one of the lifecycle methods called on an interface controller during the app initialization process. The parameter passed to the method when it is called is the context object referenced in the pushControllerWithName method call. Code now needs to be added to the awakeWithContext method within the DetailInterfaceController class file to display the context string via the detailText outlet. Select the DetailInterfaceController.swift file, locate the awakeWithContext method and modify it so it reads as follows:
override func awakeWithContext(context: AnyObject?) {
    super.awakeWithContext(context)
    detailLabel.setText(context as? String)
}
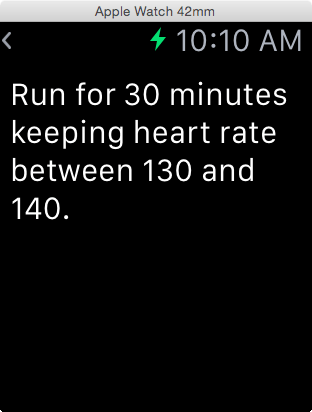
Compile and run the app once again and verify that selecting a row transitions to the detail scene and that the label displays the text that corresponds to the chosen row:
Figure 8-5
Adjusting the Interface Controller Insets
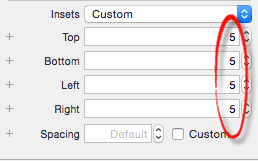
Although the text is displayed on the Label object in the detail scene, it appears a little too close to the outer edges of the display. The scene would probably be more visually appealing with a margin of some sort around the label content. This can be achieved by increasing the inset values on the interface controller. Modify these attributes by selecting the DetailInterfaceController object in the storyboard scene. This object can be selected by clicking on the black background of the scene, or via the Document Outline panel. Once selected, display the Attributes Inspector panel and change the Insets menu from Default to Custom to display the range of inset settings options. Set all four inset options to 5 as shown in Figure 8-6:
Figure 8-6
Re-run the app once again and verify that the label is now indented within the detail scene:
Figure 8-7
Summary
The WatchKit table provides an ideal starting point for providing a range of scene navigation options to the user. This chapter has extended the TableDemoApp project to implement navigation from the main scene to a detail scene. This example demonstrated the addition of new scenes to a storyboard and the passing of context data from one interface controller to another during a scene transition. The chapter also explored the use of insets to place a margin around the content of a scene.
<google>BUY_WATCHKIT</google>
| Previous | Table of Contents | Next |
| A WatchKit Table Tutorial | WatchKit Page-based User Interfaces and Modal Interface Controllers |
