Basic Ubuntu Linux Firewall Configuration
A firewall is a vital component in protecting a computer system, or network of computers from external attack (typically from an internet connection). Any computer connected directly to an internet connection must run a firewall to protect against malicious activity. Similarly, any internal network must have some form of firewall between it and an external internet connection.
Ubuntu Linux is supplied with powerful firewall technology known as iptables built-in. Entire books can, and indeed have, been written about configuring iptables. Fortunately Ubuntu Linux also provides some tools which make firewall configuration for the average user easy. This chapter will cover the steps necessary to configure an Ubuntu Linux firewall using those tools.
Ubuntu Linux Firewall Options
Ubuntu Linux provides two firewall configuration options. The first is a basic yet effective and easy to use firewall configuration system called lokkit. Another, more advanced, option is called GuardDog.
In this chapter we will explore lokkit and in the next chapter (Installing and Configuring a GaurdDog Firweall on Ubuntu) we will look at the GaurdDog firewall in more detail.
Configuring a Basic Ubuntu Linux Firewall
The lokkit tool is not installed by default on Ubuntu Linux, so before we can begin to configure a firewall we first need to install the appropriate package. There are two ways to do this, either using the Linux command-line, or using the Synaptic Package Manager. We will begin by looking at the Synaptic Package Manager method.
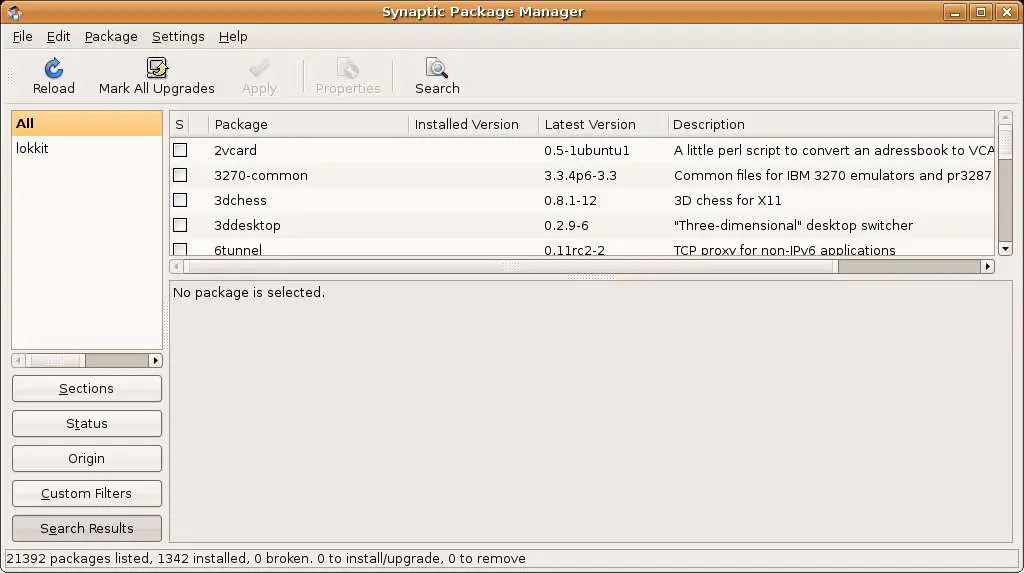
To launch the Synaptic Package Manager click on the System menu on the desktop and select "Synaptic Package Manager from the Administration sub-menu. Enter your password when prompted to do so. The Synaptic Package Manager will appear as follows:
Once the package manager has loaded the next step is to locate the package we need to install. Click on the Search button the the Synaptic toolbar, enter lokkit in the Search dialog and press Search. The search should return two results, lokkit and gnome-lokkit. lokkit is a text based version of the tool and gnome-lokkit is a graphical version. gnome-lokkit requires that lokkit also be installed so click on the check both next to gnome-lokkit and select Mark for installation from the drop down menu. A dialog appears stating that lokkit also needs to be installed. Click on the Mark button to also install lokkit.
Now that we have defined what we want to install we now need to installed it. Do do so simply click on the Apply button located in the Synaptic toolbar and click Apply in the Summary dialog. The package manager will now download and install the tweo packages. Close the completion dialog and exit Synaptic once the installation is finished.
Alternatively the lokkit and gnome-lokkit packages can be installed from the Ubuntu Linux command-line using the apt-get tool. The first step is to launch a termial window to gain access to the command-line. To do this click on the desktop Applications menu and select Konsole from from System Tools menu. The resulting dialog provides a Linux command-line prompt. Type the following at the prompt:
sudo apt-get install gnome-lokkit
Enter your password when prompted. apt-get will then install the two packages.
Running the lokkit Firewall Tools
Unfortunately the last few releases of Ubuntu Linux contain a bug which prevent gnome-lokkit from running. If gnone-lokkit fails for you you will need to use lokkit. Fortunately, there is nothing in gnome-lokkit that cannot be achieved using lokkit. To launch lokkit start a Linux console to access the command prompt (lick on the desktop Applications menu and select Konsole from from System Tools menu) and type the following at the command-line prompt:
sudo lokkit
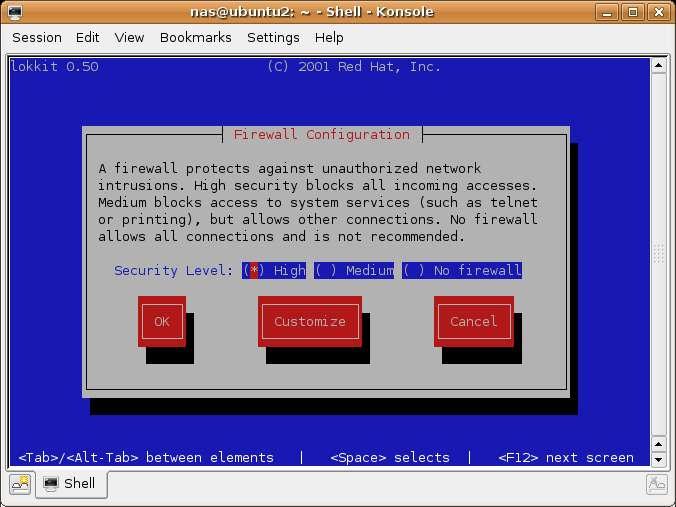
Enter your password when prompted. Once loaded, lokkit should appear as follows:
Notice that Ubuntu Linux defaults the highest level of security. This follows the general rule of security that a system should start with everything locked down and then lifted gradually to provide only the functionality needed, and nothing more.
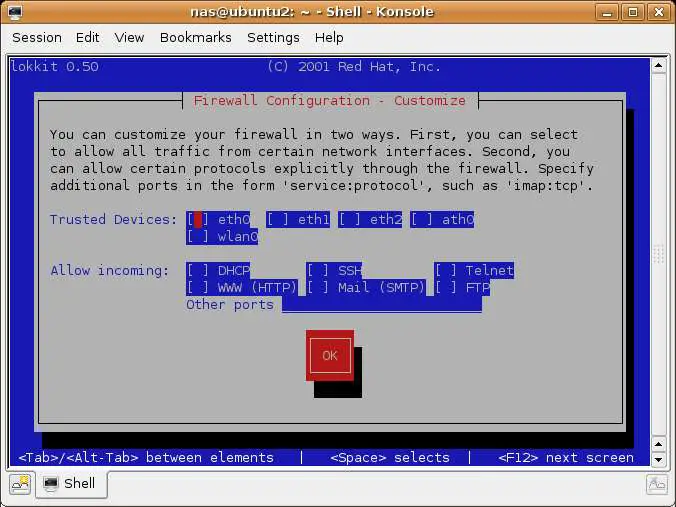
The most useful lokkit screen the the customization screen. TO access this screen use the Tab key to navigate to the 'Customize button at the bottom of the screen. Once Customize is highlighted press the Enter or Space key to select it. The Customization screen should appear as follows:
Understanding the lokkit Firewall Customization Screen
The lokkit customization screen needs a little explanation. The first settings list the network devices present in the system and provides the option to set one or more of these as being trusted devices. Essentially data coming via a trusted device is not subject to any rules imposed by the firewall. This is useful if you have asystem where one network device is connected to the outside world via an internet connection and another device is connected to a trusted, internal network. Assuming you truly trust the internal network and all the systems on it, then you can mark that device as being trusted.
The second section of the screen controls access to a number of different services which may or may not be running on your Ubuntu Linux system. Descritions of these are as follows:
DHCP - This refers to the Dynamic Host Configuration Protocol. This is a system by which devices are dynamically provided IP addresses instead of having static IP addresses manually assigned by users or system administrators. If you obtain your address from a DCHP server (such as one built into a wireless router or provided by your company) then you will want to enable DHCP on this page to enable your system to negotiate with the DHCP server to obtain an IP address.
SSH - The secure shell provides an encrypted mechanism for allowing password protected remote access to your system. With SSH you can remotely log into to your system, copy files to and from your system and anotehr system and perform remote execution of programs. If you need remote access to your system you will need to activate this. If you do not need remote access leave this disabled. Note that tyhe ssh server is not instalkled by default on Ubuntu Linux.
Telnet - Telnet provides remote terminal access to your system. It does not use encryption and use is strongly discouraged. Leave this disabled and use SSH instead fopr remote access.
WWW (HTTP) - If you are hosting a web serv eron your Ubuntu Linux System you will need to enable HTTP traffic through the firewall to enable web page requests to reach the http server. If you do not plan to host a web server leave this disabled. Note that the Apache web server is not installed by default on Ubuntu Linux.
mail (SMTP) - Specified whether the firewall block Simple Mail Transfer Protocol traffic. This is only necessary if you are hosting a mail server on your Ubuntu Linux system. If you only use a mail client to download email from a POP3 or IMAP server you can safely leave this disabled. Note that the SMTP server is not installed by default on Ubuntu Linux.
FTP - Controls whether File Transfer Protocol traffic is permitted through the firewall. Unless you plan to set up an ftp server (unlikely for typical users) leave this option disabled. Note that the FTP server is not installed by default on Ubuntu Linux.
To activate or deactivate a option use the Tab key to navigate to the required option and press the space bar to toggle the selection. Activated options are marked with an asterisk (*).


