Printing with the Android Printing Framework
With the introduction of the Android 4.4 KitKat release, it is now possible to print content from within Android applications. Whilst subsequent chapters will explore in more detail the options for adding printing support to your own applications, this chapter will focus on the various printing options now available in Android and the steps involved in enabling those options. Having covered these initial topics, the chapter will then provide an overview of the various printing features that are available to Android developers in terms of building printing support into applications.
The Android Printing Architecture
Printing in Android 4.4 and later is provided by the Printing framework. In basic terms, this framework consists of a Print Manager and a number of print service plugins. It is the responsibility of the Print Manager to handle the print requests from applications on the device and to interact with the print service plugins that are installed on the device, thereby ensuring that print requests are fulfilled. By default, most Android devices have print service plugins installed to enable printing using the Google Cloud Print and Google Drive services. The HP Print Services Plugin, if not already installed, may also be obtained from the Google Play store. Print service plugins from other printer manufactures will most likely be released in the near future though the Google Cloud Print service plugin can also be used to print from an Android device to just about any printer type and model.
The HP Print Services Plugin
The HP Print Services Plugin is installed by default on most devices running Android 4.4 or later. The purpose of this plugin is to enable applications to print to compatible HP printers that are visible to the Android device via a local area wireless network.
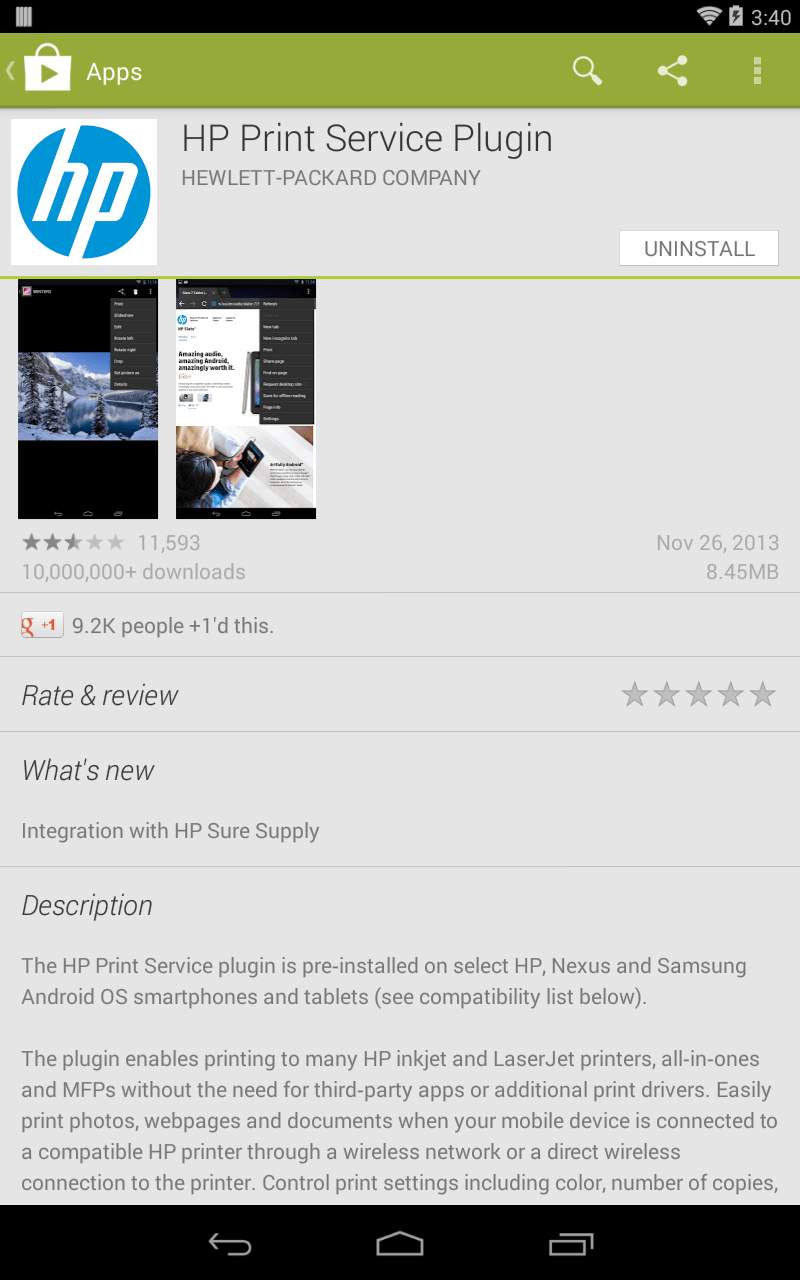
The presence of the HP Print Services Plugin on an Android device can be verified by loading the Google Play app and performing a search for “HP Print Services Plugin”. Once the plugin is listed in the Play Store, and in the event that the plugin is not already installed, it can be installed by selecting the Install button.
Figure 49-1
To check whether your HP printer is supported by the HP Print Services Plugin, visit the following HP web page for a list of supported printer models:
http://h10025.www1.hp.com/ewfrf/wc/document?cc=us&lc=en&docname=c03722645#
The HP Print Services Plugin will automatically detect compatible HP printers on the network to which the Android device is currently connected and list them as options when printing from an application.
Google Cloud Print
Google Cloud Print is a service provided by Google that enables you to print content onto your own printer over the web from anywhere with internet connectivity. Google Cloud Print supports a wide range of devices and printer models in the form of both Cloud Ready and Classic printers. A Cloud Ready printer has technology built-in that enables printing via the web. Manufacturers that provide cloud ready printers include Brother, Canon, Dell, Epson, HP, Kodak and Samsung. To identify if your printer is both cloud ready and supported by Google Cloud Print, review the list of printers at the following URL:
https://www.google.com/cloudprint/learn/printers.html
In the case of classic, non-Cloud Ready printers, Google Cloud Print provides support for cloud printing through the installation of software on the computer system to which the classic printer is connected (either directly or over a home or office network).
To set up Google Cloud Print, visit the following web page and login using the same Google account ID that you use when logging in to your Android devices:
https://www.google.com/cloudprint/learn/index.html
Once printers have been added to your Google Cloud Print account, they will be listed as printer destination options when you print from within Android applications on your devices.
Printing to Google Drive
In addition to supporting physical printers, it is also possible to save printed output to your Google Drive account. When printing from a device, select the Save to Google Drive option in the printing panel. The content to be printed will then be converted to a PDF file and saved to the Google Drive cloud-based storage associated with the currently active Google Account ID on the device.
Save as PDF
The final printing option provided by Android 4.4 allows the printed content to be saved locally as a PDF file on the Android device. Once selected, this option will request a name for the PDF file and a location on the device into which the document is to be saved.
Both the Save as PDF and Google Drive options can be invaluable in terms of saving paper when testing the printing functionality of your own Android applications.
Printing from Android Devices
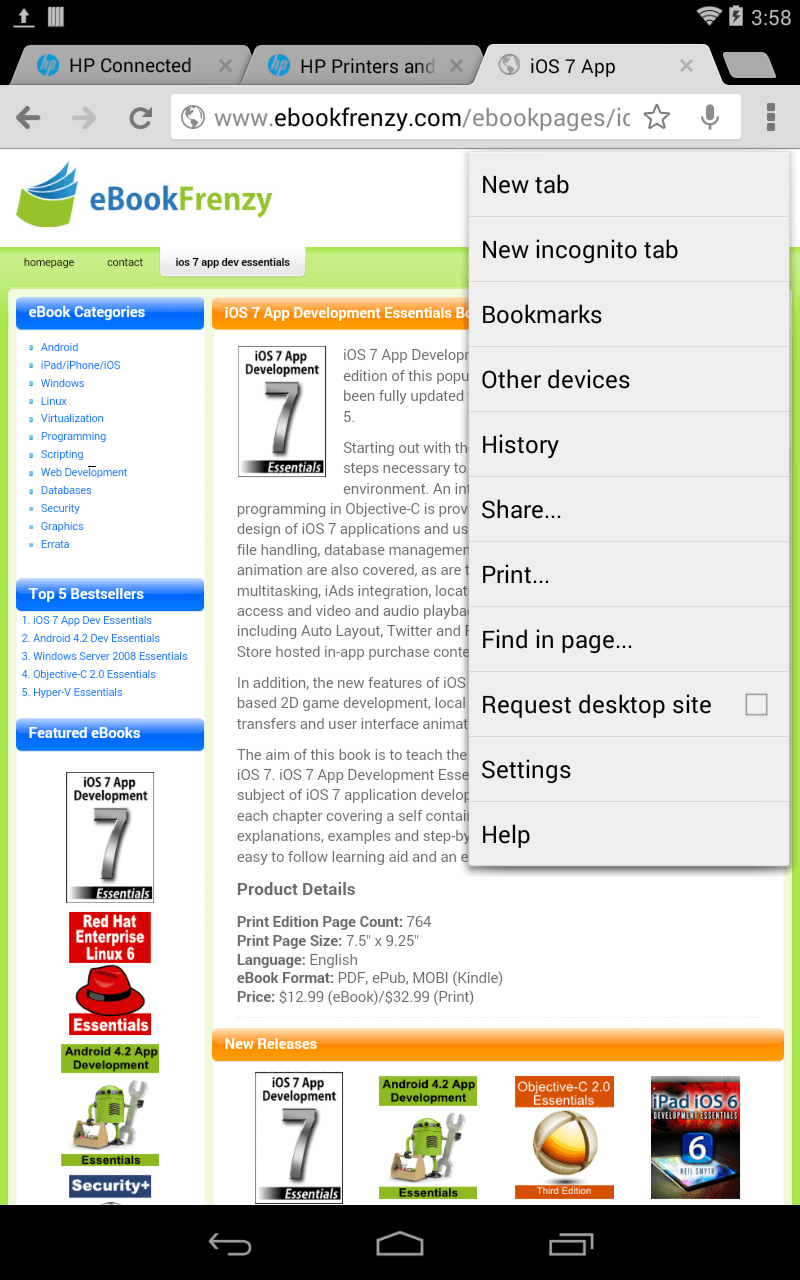
Google recommends that applications which provide the ability to print content do so by placing the print option in the Overflow menu (a topic covered in some detail in the chapter entitled Creating and Managing Overflow Menus on Android). A number of applications bundled with Android now include “Print…” menu options. Figure 49-2, for example, shows the Print option in the Overflow menu of the Chrome browser application:
Figure 49-2
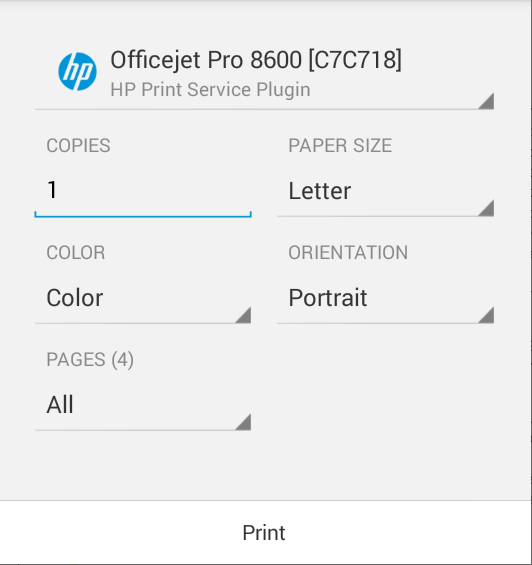
Once the print option has been selected from within an application, the standard Android print panel will appear as illustrated in Figure 49-3:
Figure 49-3
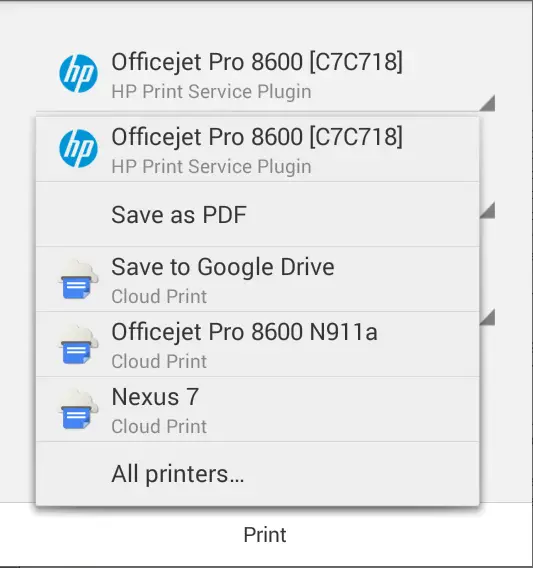
The Android print panel provides the usual printing options such as paper size, color, orientation and number of copies. In the above case, the Print Manager has detected the presence of an HP OfficeJet Pro 8600 printer available to the device for printing via the HP Services Plugin and presented it as the default printing destination. Other print destination options may be accessed by tapping on the current printer selection to reveal a list of alternatives as shown in Figure 49-4:
Figure 49-4
Note that in addition to Save as PDF and Google Drive options, the HP OfficeJet Pro 8600 printer is also available via Google Cloud Print allowing print tasks to be sent to the printer even when the Android device is not connected to the local network on which the printer resides.
Options for Building Print Support into Android Apps
The Printing framework introduced into the Android 4.4 SDK provides a number of options for incorporating print support into Android applications. These options can be categorized as follows:
Image Printing
As the name suggests, this option allows image printing to be incorporated into Android applications. When adding this feature to an application, the first step is to create a new instance of the PrintHelper class:
PrintHelper imagePrinter = new PrintHelper(context);
Next, the scale mode for the printed image may be specified via a call to the setScaleMode() method of the PrintHelper instance. Options are as follows:
- SCALE_MODE_FIT – The image will be scaled to fit within the paper size without any cropping or changes to aspect ratio. This will typically result in white space appearing in one dimension.
- SCALE_MODE_FILL – The image will be scaled to fill the paper size with cropping performed where necessary to avoid the appearance of white space in the printed output.
In the absence of a scale mode setting, the system will default to SCALE_MODE_FILL. The following code, for example, sets scale to fit mode on the previously declared PrintHelper instance:
imagePrinter.setScaleMode(PrintHelper.SCALE_MODE_FIT);
Similarly, the color mode may also be configured to indicate whether the print output is to be in color or black and white. This is achieved by passing one of the following options through to the setColorMode() method of the PrintHelper instance:
- COLOR_MODE_COLOR – Indicates that the image is to be printed in color.
- COLOR_MODE_MONOCHROME – Indicates that the image is to be printed in black and white.
The printing framework will default to color printing unless the monochrome option is specified as follows:
imagePrinter.setColorMode(PrintHelper.COLOR_MODE_MONOCHROME);
All that is required to complete the printing operation is an image to be printed and a call to the printBitmap() method of the PrintHelper instance, passing through a string representing the name to be assigned to the print job and a reference to the image (in the form of either a Bitmap object or a Uri reference to the image):
Bitmap bitmap = BitmapFactory.decodeResource(getResources(),
            R.drawable.oceanscene);
imagePrinter.printBitmap("My Test Print Job", bitmap);
Once the print job has been started, the Printing framework will display the print dialog and handle both the subsequent interaction with the user and the printing of the image on the user selected print destination.
Creating and Printing HTML Content
The Android Printing framework also provides an easy way to print HTML based content from within an application. This content can either be in the form of HTML content referenced by the URL of a page hosted on a web site, or HTML content that is dynamically created within the application.
To enable HTML printing, the WebView class has been extended in Android 4.4 to include support for printing with minimal coding requirements.
When dynamically creating HTML content (as opposed to loading and printing an existing web page) the process involves the creation of a WebView object and associating with it a WebViewClient instance. The web view client is then configured to start a print job when the HTML has finished being loaded into the WebView. With the web view client configured, the HTML is then loaded into the WebView, at which point the print process is triggered.
Consider, for example, the following code:
private WebView myWebView;

public void printContent(View view)
{
	WebView webView = new WebView(this);
	webView.setWebViewClient(new WebViewClient() {

	     public boolean shouldOverrideUrlLoading(WebView view,
                      String url)
	     {
	            return false;
	     }

	     @Override
	         public void onPageFinished(WebView view, String url) {
	                createWebPrintJob(view);
	                myWebView = null;
	            }
	    });

	    String htmlDocument =
                "<html><body><h1>Android Print Test</h1><p>"
	        + "This is some sample content.</p></body></html>";


	    webView.loadDataWithBaseURL(null, htmlDocument,
                     "text/HTML", "UTF-8", null);

	    myWebView = webView;
}
The code in this method begins by declaring a variable named myWebView in which will be stored a reference to the WebView instance created in the method. Within the printContent() method, an instance of the WebView class is created to which a WebViewClient instance is then assigned.
The WebViewClient assigned to the web view object is configured to indicate that loading of the HTML content is to be handled by the WebView instance (by returning false from the shouldOverrideUrlLoading()) method. More importantly, an onPageFinished() handler method is declared and implemented to call a method named createWebPrintJob(). The onPageFinished() callback method will be called automatically when all of the HTML content has been loaded into the web view. This ensures that the print job is not started until the content is ready, thereby ensuring that all of the content is printed.
Next, a string is created containing some HTML to serve as the content. This is then loaded into the web view. Once the HTML is loaded, the onPageFinished() method will trigger. Finally, the method stores a reference to the web view object. Without this vital step, there is a significant risk that the Java runtime system will assume that the application no longer needs the web view object and will discard it to free up memory (a concept referred to in Java terminology as garbage collection) resulting in the print job terminating prior to completion.
All that remains in this example is to implement the createWebPrintJob() method as follows:
private void createWebPrintJob(WebView webView) {

	PrintManager printManager = (PrintManager) this
	            .getSystemService(Context.PRINT_SERVICE);

	PrintDocumentAdapter printAdapter =
                    webView.createPrintDocumentAdapter();
	String jobName = getString(R.string.app_name) + " Document";

	PrintJob printJob = printManager.print(jobName, printAdapter,
	            new PrintAttributes.Builder().build());
}
This method simply obtains a reference to the PrintManager service and instructs the web view instance to create a print adaptor. A new string is created to store the name of the print job (in this case based on the name of the application and the word “Document”).
Finally, the print job is started by calling the print() method of the print manager, passing through the job name, print adaptor and a set of default print attributes. If required, the print attributes could be customized to specify resolution (dots per inch), margin and color options.
Printing a Web Page
The steps involved in printing a web page are similar to those outlined above, with the exception that the web view is passed the URL of the web page to be printed in place of the dynamically created HTML, for example:
webView.loadUrl("http://developer.android.com/google/index.html");
It is also important to note that the WebViewClient configuration is only necessary if a web page is to automatically print as soon as it has loaded. If the printing is to be initiated by the user selecting a menu option after the page has loaded, only the code in the createWebPrintJob() method outlined above need be included in the application code. The next chapter, entitled An Android HTML Content Printing Example, will demonstrate just such a scenario.
Printing a Custom Document
Whilst the HTML and web printing features introduced by the Printing framework provide an easy path to printing content from within an Android application, it is clear that these options will be overly simplistic for more advanced printing requirements. For more complex printing tasks, the Printing framework also provides custom document printing support. This allows content in the form of text and graphics to be drawn onto a canvas and then printed.
Unlike HTML and image printing, which can be implemented with relative ease, custom document printing is a more complex, multi-stage process which will be outlined in the A Guide to Android Custom Document Printing chapter of this book. These steps can be summarized as follows:
- Connect to the Android Print Manager
- Create a Custom Print Adaptor sub-classed from the PrintDocumentAdaptor class
- Create a PdfDocument instance to represent the document pages
- Obtain a reference to the pages of the PdfDocument instance, each of which has associated with it a Canvas instance
- Draw the content on the page canvases
- Notify the print framework that the document is ready to print
The custom print adaptor outlined in the above steps needs to implement a number of methods which will be called upon by the Android system to perform specific tasks during the printing process. The most important of these are the onLayout() method which is responsible for re-arranging the document layout in response to the user changing settings such as paper size or page orientation, and the onWrite() method which is responsible for rendering the pages to be printed. This topic will be covered in detail in the chapter entitled An Android Custom Document Printing Tutorial.
Summary
The Android 4.4 KitKat release introduced the ability to print content from Android devices. Print output can be directed to suitably configured printers, a local PDF file or to the cloud via Google Drive. From the perspective of the Android application developer, these capabilities are available for use in applications by making use of the Printing framework. By far the easiest printing options to implement are those involving content in the form of images and HTML. More advanced printing may, however, be implemented using the custom document printing features of the framework.


