Configuring RemoteApps on Windows Server 2008
| Previous | Table of Contents | Next |
| Installing Applications for Windows Server 2008 Terminal Services | Configuring Windows Server 2008 TS Web Access |
<google>BUY_WINSERV_2008</google>
RemoteApps are a part of the Windows Server 2008 Terminal Services role. Up until this point, Terminal Services have been covered in the context of displaying an entire virtual desktop session on a local client from remote server. Whilst this can be useful in a number of situations it is actually more common that only an application running on a remote server needs to be displayed on a local client, essentially making the application appear as though it is running locally. This functionality is provided by RemoteApps and is the focus of this chapter.
Preparing the Server for RemoteApps
In order to configure RemoteApps on Windows Server 2008 there are a few prerequisites. In the first instance, the Terminal Services role must be installed and configured on the server system. For details on how to achieve this refer to the Windows Server 2008 Terminal Services chapter of this book.
Secondly, any applications which are to be configured as RemoteApps must be installed for Terminal Services so that they support multiple users. The steps to implement this are covered in the chapter entitled Installing Applications for Windows Server 2008 Terminal Services.
Finally, if the applications are to be accessed via a browser using the TS Web Access services role, this will also need to be configured as outlined in the Configuring Windows Server 2008 TS Web Access.
Once the first two, and optionally the third, requirements are met the server is now ready to begin the RemoteApp configuration process.
What are RemoteApps?
RemoteApps are part of the Windows Server 2008 Terminal Services role. The objective behind terminal services is to allow client systems to access desktops and applications running on remote servers. As the description suggests, remote desktop access presents an entire desktop session from the remote server on the screen of the local client. This allows the user to perform a number of desktop based tasks including launching and interacting with applications on the remote host. The RemoteApps feature avoids the necessity to access an entire desktop on the remote system in order to launch an application, instead allowing the user to launch individual applications from their local system. When launched, each RemoteApp appears in its own window on the client's desktop just as any locally running would.
RemoteApps can be launched either by clicking on a link on a TS Web Access web page, or by installing a file on the client which, when clicked, launches the RemoteApp.
Configuring a Application as a RemoteApp
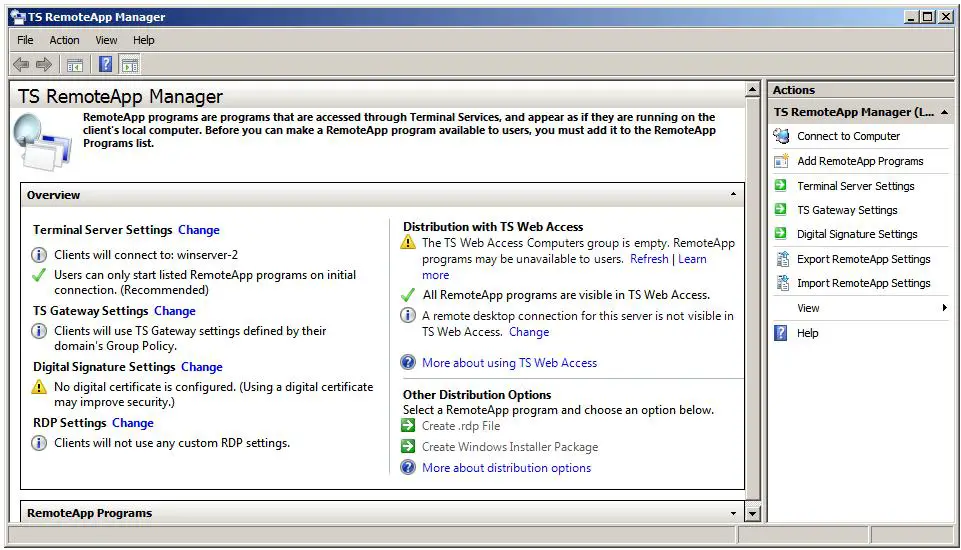
Applications are configured as RemoteApps using the TS RemoteApp Manager tool. This can be accessed either from the Start -> All Programs -> Terminal Services -> TS Remote App Manager or by running remoteprograms.msc in a Run dialog or at a command prompt. Once launched, the manager will appear as follows:
To configure an application as a RemoteApp, begin by clicking on the Add RemoteApp Programs link in the Actions panel located in the top right hand corner of the TS RemoteApp Manager screen. This will display the RemoteApp wizard containing a list of currently installed applications. One or more applications may be selected from the list before pressing the Next button:
<google>ADSDAQBOX_FLOW</google>
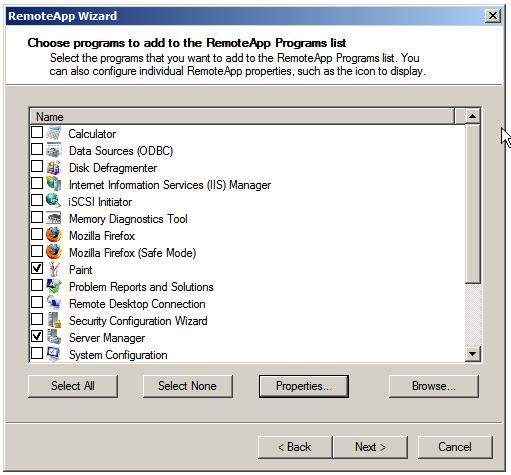
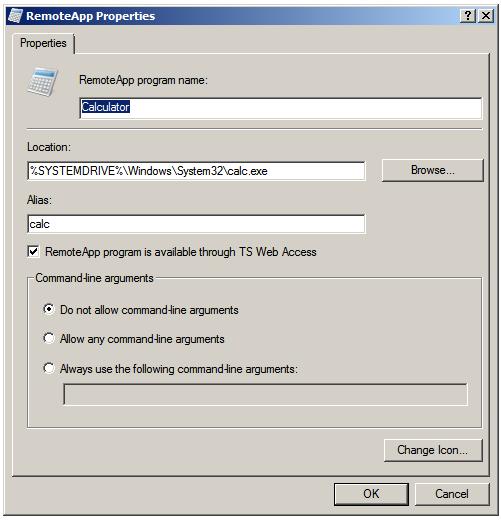
The wizard also provides a number of different properties that may be changed for each of the applications. To change these settings, select an application in the list and click on the Properties button to display the RemoteApps Properties dialog as illustrated below:
This dialog allows the following properties to be configured:
- RemoteApps program name - The name by which the application or program will be presented to the user.
- Location: - The physical path to the executable which launches the application.
- Alias - A unique identifier for the program or application, typically set to the executable name minus the .exe (or other) extension.
- RemoteApp is available through TS Web Access - Controls whether the application is available to be launched via TS Web Access. For details on TS Web Access read the chapter entitled Configuring Windows Server 2008 TS Web Access.
- Command-Line Arguments - Specifies the rules for providing the application with command-line arguments.
- Change Icon - Allows a different icon than the programs default icon to be specified.
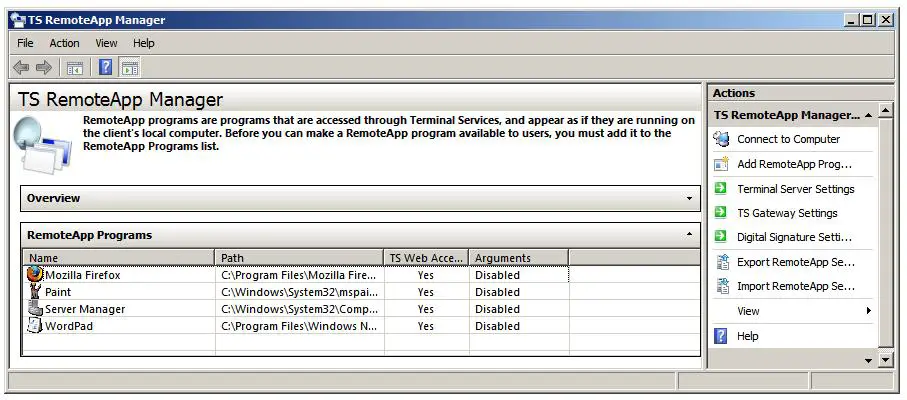
After making any property changes click Ok to close the property dialog and click Next to proceed to the Review Settings screen and Finish to complete the configuration. Upon completion the applications will be listed under RemoteApp Programs as illustrated below:
Once the RemoteApps are configured, they need to be made available to the remote users. This is achieved via TS Web Access, Windows Installer Package or Remote Desktop Protocol (.RDP) file. Each of these approaches will be covered in detail in the remaining sections of this chapter.
Making RemoteApps Available to Users via TS Web Access
By default, RemoteApps are configured to be accessible via TS Web Access (for details on installing and configuring the TS Web Access service role refer read Configuring Windows Server 2008 TS Web Access. As outlined above this setting can be checked during the RemoteApp configuration process by verifying that the RemoteApp is available through TS Web Access box is set in the properties dialog. This setting can be modified at any time by right clicking on the RemoteApp in question on the TS RemoteApp Manager RemoteApp Programs list and selecting Properties.
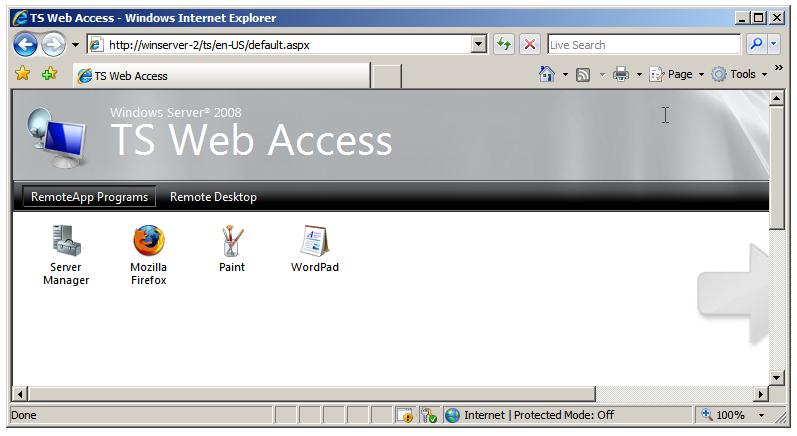
Assuming that the RemoteApps are configured for TS Web Access, simply open a browser window and enter the URL of the TS Web Access page the format of is typically as follows (where server is the name or IP address of the Terminal Server system):
http:server/ts
When a connection has been established the browser will prompt for the user's login and password credentials before displaying the TS Web Access page:
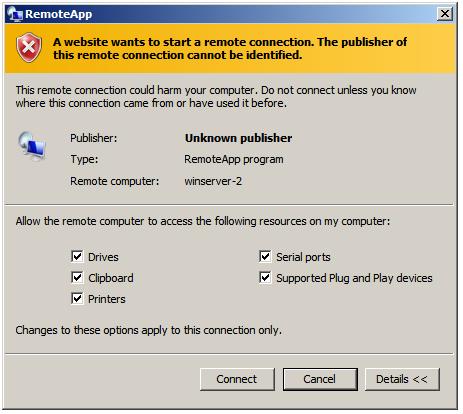
To launch an application the user simply clicks on the icon for the required application. First to appear will be the RemoteApp Starting dialog. This will be followed by a settings dialog which allows the user to decide which resources on the local system (such as drives, devices, keyboard, mouse, printers, ports etc) should be made available to the application running on the remote system. This can be particularly useful, for example, if a user needs to print from the remote application onto a local printer, or save a file onto a local disk or USB drive: <google>WIN28BOX</google>
Once the connection is established the remote application will appear in a window on the local desktop just as a local running application would appear.
Making RemoteApps Available to Users via Windows Installer Packages
One alternative to providing RemoteApp access via TS Web Access is to create a Windows Installer package which can be used to install the RemoteApp launcher on any client systems which need access. To create a Windows Installer for a RemoteApp, right click on the RemoteApp in question on the TS RemoteApp Manager RemoteApp Programs list and select Create Windows Installer Package from the menu. When the RemoteApp Wizard welcome screen appears click on Next to proceed to the package setting screen. On this screen, set the target directory where the RemoteApp launcher is to be installed in the client system. Also on this screen are settings for controlling which server and Remote Desktop Protocol (RDP) port the client system will be directed to in order to launch the RemoteApp. The final setting allows access to the RemoteApp to be protected through the use of certificates.
The Next button proceeds to the Configuration screen where settings such as controlling whether the application is listed in the Start menu and Desktop of the client user's desktop after installation. The final option is related to file extension associations. As examples of file extension associations, a Word document has a .doc file extension and an Excel file a .xls extension. When configured, file extension associations ensure that when a user double clicks, for example, on a .doc file, Word is started with the selected file opened and ready for editing. The Take over file extensions option associates appropriate file extensions with the RemoteApp, such that the RemoteApp is started when a corresponding local file is selected by a user.
Once the settings are complete, proceed to the confirmation screen, review the settings summary and click on Finish to complete the Windows Installer Package creation. Once completed the .msc package can be found in the location specified during the configuration process (by default this is \Program Files\Packaged Programs). This file should be copied to any client systems where access to the RemoteApp is required and executed to install the application. Once installed, the RemoteApp can be found in the Start -> All Programs -> Remote Programs.
As with TS Web Access, the user will be given the option to control which local resources such as devices and printers are to be made accessible to the remote application.
Making RemoteApps Available to Users via .RDP Files
The process for creating an RDP file for a RemoteApp is similar to that for creating a Windows Installer package. To create an RDP file for a RemoteApp, right click on the RemoteApp in question on the TS RemoteApp Manager RemoteApp Programs list and select Create .rdp File from the menu. When the RemoteApp Wizard welcome screen appears click on Next to proceed to the package setting screen. On this screen, set the target directory where the .rdp is to be generated. Also on this screen are settings for controlling which server and Remote Desktop Protocol (RDP) port the client system will be directed to in order to launch the RemoteApp. The final setting allows access to the RemoteApp to be protected through the use of digital signatures.
Once the settings are complete, proceed to the confirmation screen, review the settings summary and click on Finish to complete the .rdp file creation. Once completed the .rdp file can be found in the location specified during the configuration process (by default this is \Program Files\Packaged Programs). This file should be copied to any client systems where access to the RemoteApp is required. When
As with TS Web Access, the user will be given the option to control which local resources such as devices and printers are to be made accessible to the remote application.
<google>BUY_WINSERV_2008_BOTTOM</google>
