A Basic Overview of Threads and AsyncTasks
| Previous | Table of Contents | Next |
| Android Broadcast Intents and Broadcast Receivers | An Overview of Android Started and Bound Services |
The next chapter will be the first in a series of chapters intended to introduce the use of Android Services to perform application tasks in the background. It is impossible, however, to understand the steps involved in implementing services without first gaining a basic understanding of the concept of threading in Android applications. Threads and the AsyncTask class are, therefore, the topic of this chapter.
An Overview of Threads
Threads are the cornerstone of any multitasking operating system and can be thought of as mini-processes running within a main process, the purpose of which is to enable at least the appearance of parallel execution paths within applications.
The Application Main Thread
When an Android application is first started, the runtime system creates a single thread in which all application components will run by default. This thread is generally referred to as the main thread. The primary role of the main thread is to handle the user interface in terms of event handling and interaction with views in the user interface. Any additional components that are started within the application will, by default, also run on the main thread.
Any component within an application that performs a time consuming task using the main thread will cause the entire application to appear to lock up until the task is completed. This will typically result in the operating system displaying an “Application is not responding” warning to the user. Clearly, this is far from the desired behavior for any application. This can be avoided simply by launching the task to be performed in a separate thread, allowing the main thread to continue unhindered with other tasks.
Thread Handlers
Clearly, one of the key rules of Android development is to never perform time-consuming operations on the main thread of an application. The second, equally important, rule is that the code within a separate thread must never, under any circumstances, directly update any aspect of the user interface. Any changes to the user interface must always be performed from within the main thread. The reason for this is that the Android UI toolkit is not thread-safe. Attempts to work with non-thread-safe code from within multiple threads will typically result in intermittent problems and unpredictable application behavior.
If a time consuming task needs to run in a background thread and also update the user interface the best approach is to implement an asynchronous task by subclassing the AsyncTask class.
A Basic AsyncTask Example
The remainder of this chapter will work through some simple examples intended to provide a basic introduction to threads and the use of the AsyncTask class. The first step will be to highlight the importance of performing time-consuming tasks in a separate thread from the main thread. Begin, therefore, by creating a new project in Android Studio, entering AsyncDemo into the Application name field and ebookfrenzy.com as the Company Domain setting before clicking on the Next button.
On the form factors screen, enable the Phone and Tablet option and set the minimum SDK setting to API 26: Android 8.0 (Oreo). Continue through the remaining screens, requesting the creation of an Empty Activity named AsyncDemoActivity, using the default for the layout resource files.
Click Finish to create the new project.
Load the activity_async_demo.xml file for the project into the Layout Editor tool. Select the default TextView component and change the ID for the view to myTextView in the Attributes tool window.
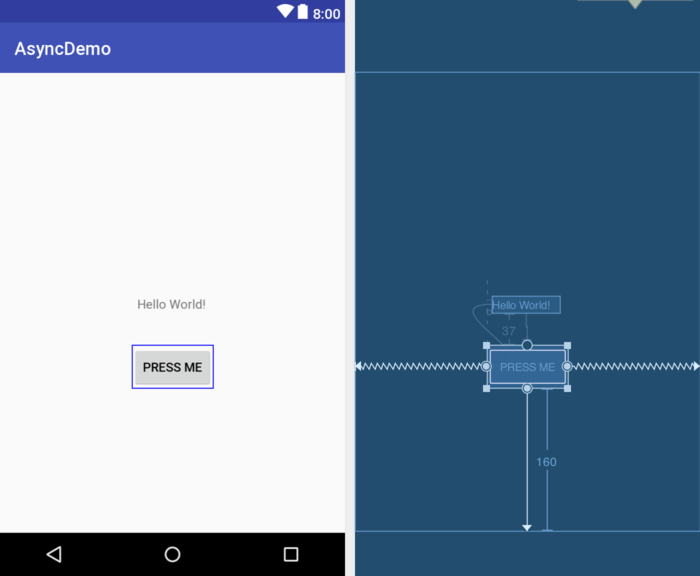
With autoconnect mode disabled, add a Button view to the user interface, positioned directly beneath the existing TextView object as illustrated in Figure 56-1. Once the button has been added, click on the Infer Constraints button in the toolbar to add the missing constraints.
Change the text to “Press Me” and extract the string to a resource named press_me. With the button view still selected in the layout locate the onClick property and enter buttonClick as the method name.
Next, load the AsyncDemoActivity.java file into an editing panel and add code to implement the buttonClick() method which will be called when the Button view is touched by the user. Since the goal here is to demonstrate the problem of performing lengthy tasks on the main thread, the code will simply pause for 20 seconds before displaying different text on the TextView object:
package com.ebookfrenzy.asyncdemo;

import android.support.v7.app.AppCompatActivity;
import android.os.Bundle;
import android.view.View;
import android.widget.TextView;

public class AsyncDemoActivity extends AppCompatActivity {

    private TextView myTextView;

    @Override
    protected void onCreate(Bundle savedInstanceState) {
        super.onCreate(savedInstanceState);
        setContentView(R.layout.activity_thread_example);

        myTextView = findViewById(R.id.myTextView);
    }

    public void buttonClick(View view)
    {
        int i = 0;
        while (i <= 20) {
            try {
                Thread.sleep(1000);
                i++;
            }
            catch (Exception e) {
            }
        }
        myTextView.setText("Button Pressed");
    }
}
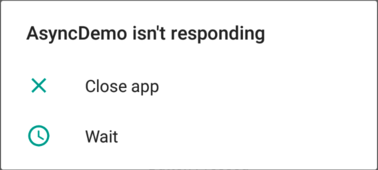
With the code changes complete, run the application on either a physical device or an emulator. Once the application is running, touch the Button, at which point the application will appear to freeze. It will, for example, not be possible to touch the button a second time and in some situations the operating system will, as demonstrated in Figure 56-2, report the application as being unresponsive:
Clearly, anything that is going to take time to complete within the buttonClick() method needs to be performed within a separate thread.
Subclassing AsyncTask
In order to create a new thread, the code to be executed in that thread needs to be performed within an AsyncTask instance. The first step is to subclass AsyncTask in the AsyncDemoActivity.java file as follows:
.
.
import android.os.AsyncTask;
.
.
public class AsyncDemoActivity extends AppCompatActivity {
.
.
    private class MyTask extends AsyncTask<String, Void, String> {

        @Override
        protected void onPreExecute() {
        }

        @Override
        protected String doInBackground(String... params) {
        }

        @Override
        protected void onProgressUpdate(Void... values) {
        }

        @Override
        protected void onPostExecute(String result) {
        }
    }
.
.
}
The AsyncTask class uses three different types which are declared in the class signature line as follows:
private class MyTask extends AsyncTask<Type 1, Type 2, Type 3> {
.
.
These three types correspond to the argument types for the doInBackground(), onProgressUpdate() and onPostExecute() methods respectively. If a method does not expect an argument then Void is used, as is the case for the onProgressUpdate() in the above code. To change the argument type for a method, change the type declaration both in the class declaration and in the method signature. For this example, the onProgressUpdate() method will be passed an Integer, so modify the class declaration as follows:
private class MyTask extends AsyncTask<String, Integer, String> {
.
.
        @Override
        protected void onProgressUpdate(Integer... values) {
        }
.
.
}
The onPreExecute() method is called before the background tasks are initiated and can be used to perform initialization steps. This method runs on the main thread so may be used to update the user interface.
The code to be performed in the background on a different thread from the main thread resides in the doInBackground() method. This method does not have access to the main thread so cannot make user interface changes. The onProgressUpdate() method, however, is called each time a call is made to the publishProgress() method from within the doInBackground() method and can be used to update the user interface with progress information.
The onPostExecute() method is called when the tasks performed within the doInBackground() method complete. This method is passed the value returned by the doInBackground() method and runs within the main thread allowing user interface updates to be made.
Modify the code to move the timer code from the buttonClick() method to the doInBackground() method as follows:
@Override
protected String doInBackground(String... params) {

    int i = 0;
    while (i <= 20) {
        try {
            Thread.sleep(1000);
            i++;
        }
        catch (Exception e) {
            return(e.getLocalizedMessage());
        }
    }
    return "Button Pressed";
}
Next, move the TextView update code to the onPostExecute() method where it will display the text returned by the doInBackground() method:
@Override
protected String doInBackground(String... params) {

    int i = 0;
    while (i <= 20) {
        publishProgress(i);
        try {
            Thread.sleep(1000);
            publishProgress(i);
            i++;
        }
        catch (Exception e) {
            return(e.getLocalizedMessage());
        }
    }
    return "Button Pressed";
}

@Override
protected void onProgressUpdate(Integer... values) {
    myTextView.setText("Counter = " + values[0]);
}
To provide regular updates via the onProgressUpdate() method, modify the class to add a call to the publishProgress() method in the timer loop code (passing through the current loop counter) and to display the current count value in the onProgressUpdate() method:
public void buttonClick(View view)
{
    AsyncTask task = new MyTask().execute();
}
Finally, modify the buttonClicked() method to begin the asynchronous task execution:
public void buttonClick(View view)
{
    AsyncTask task = new MyTask().execute();
}
By default, asynchronous tasks are performed serially. In other words, if an app executes more than one task, only the first task begins execution. The remaining tasks are placed in a queue and executed in sequence as each one finishes. To execute asynchronous tasks in parallel, those tasks must be executed using the AsyncTask thread pool executor as follows:
AsyncTask task = new
        MyTask().executeOnExecutor(AsyncTask.THREAD_POOL_EXECUTOR);
The number of tasks that can be executed in parallel using this approach is limited by the core pool size on the device which, in turn, is dictated by the number of CPU cores available. The number of CPU cores available on a device can be identified from within an app using the following code:
int cpu_cores = Runtime.getRuntime().availableProcessors();
Android uses an algorithm to calculate the default number of pool threads. The minimum number of threads is 2 while the maximum default value is equal to either 4, or the CPU core count minus 1 (whichever is smallest). The maximum possible number of threads available to the pool on any device is calculated by doubling the CPU core count and adding one.
Testing the App
When the application is now run, touching the button causes the delay to be performed in a new thread leaving the main thread to continue handling the user interface, including responding to additional button presses. During the delay, the user interface will be updated every second showing the counter value. On completion of the timeout, the TextView will display the “Button Pressed” message.
Canceling a Task
A running task may be canceled by calling the cancel() method of the task object passing through a Boolean value indicating whether the task can be interrupted before the in-progress task completes:
AsyncTask task = new MyTask().execute();
.
.
task.cancel(true);
Summary
This chapter has provided an overview of threading within Android applications. When an application is first launched in a process, the runtime system creates a main thread in which all subsequently launched application components run by default. The primary role of the main thread is to handle the user interface, so any time consuming tasks performed in that thread will give the appearance that the application has locked up. It is essential, therefore, that tasks likely to take time to complete be started in a separate thread.
Because the Android user interface toolkit is not thread-safe, changes to the user interface should not be made in any thread other than the main thread. Background tasks may be performed in a separate thread by subclassing the AsyncTask class and implementing the class methods to perform the task and update the user interface.
�
| Previous | Table of Contents | Next |
| Android Broadcast Intents and Broadcast Receivers | An Overview of Android Started and Bound Services |


