A Tour of the Android Studio User Interface
While it is tempting to plunge into running the example application created in the previous chapter, doing so involves using aspects of the Android Studio user interface which are best described in advance.
Android Studio is a powerful and feature rich development environment that is, to a large extent, intuitive to use. That being said, taking the time now to gain familiarity with the layout and organization of the Android Studio user interface will considerably shorten the learning curve in later chapters of the book. With this in mind, this chapter will provide an initial overview of the various areas and components that make up the Android Studio environment.
The Welcome Screen
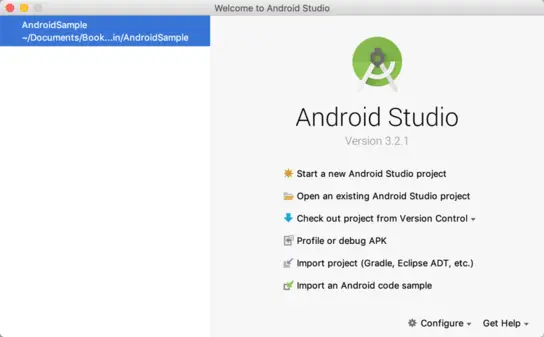
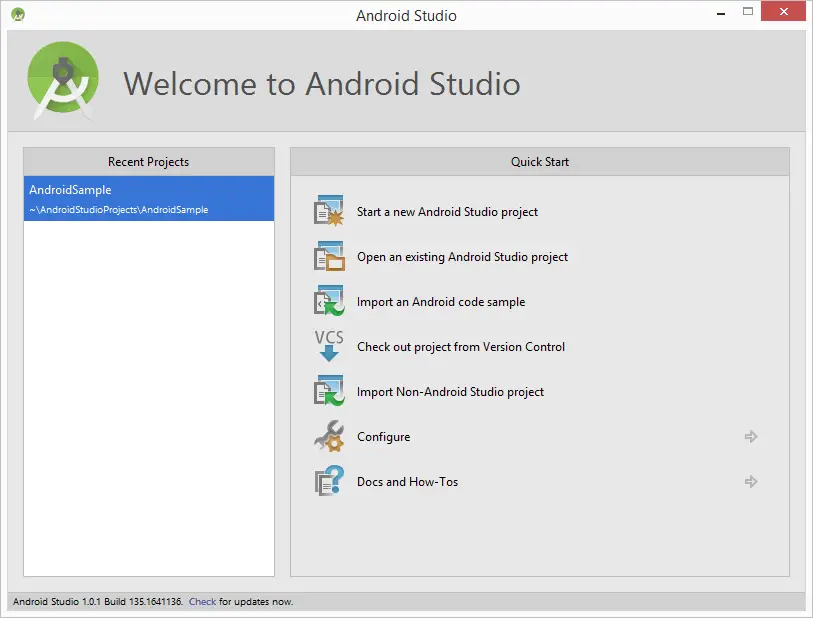
The welcome screen (Figure 6-1) is displayed any time that Android Studio is running with no projects currently open (open projects can be closed at any time by selecting the File -> Close Project menu option). If Android Studio was previously exited while a project was still open, the tool will by-pass the welcome screen next time it is launched, automatically opening the previously active project.
In addition to a list of recent projects, the Quick Start menu provides a range of options for performing tasks such as opening, creating and importing projects along with access to projects currently under version control. In addition, the Configure menu at the bottom of the window provides access to the SDK Manager along with a vast array of settings and configuration options. A review of these options will quickly reveal that there is almost no aspect of Android Studio that cannot be configured and tailored to your specific needs.
The Configure menu also includes an option to check if updates to Android Studio are available for download.
The Main Window
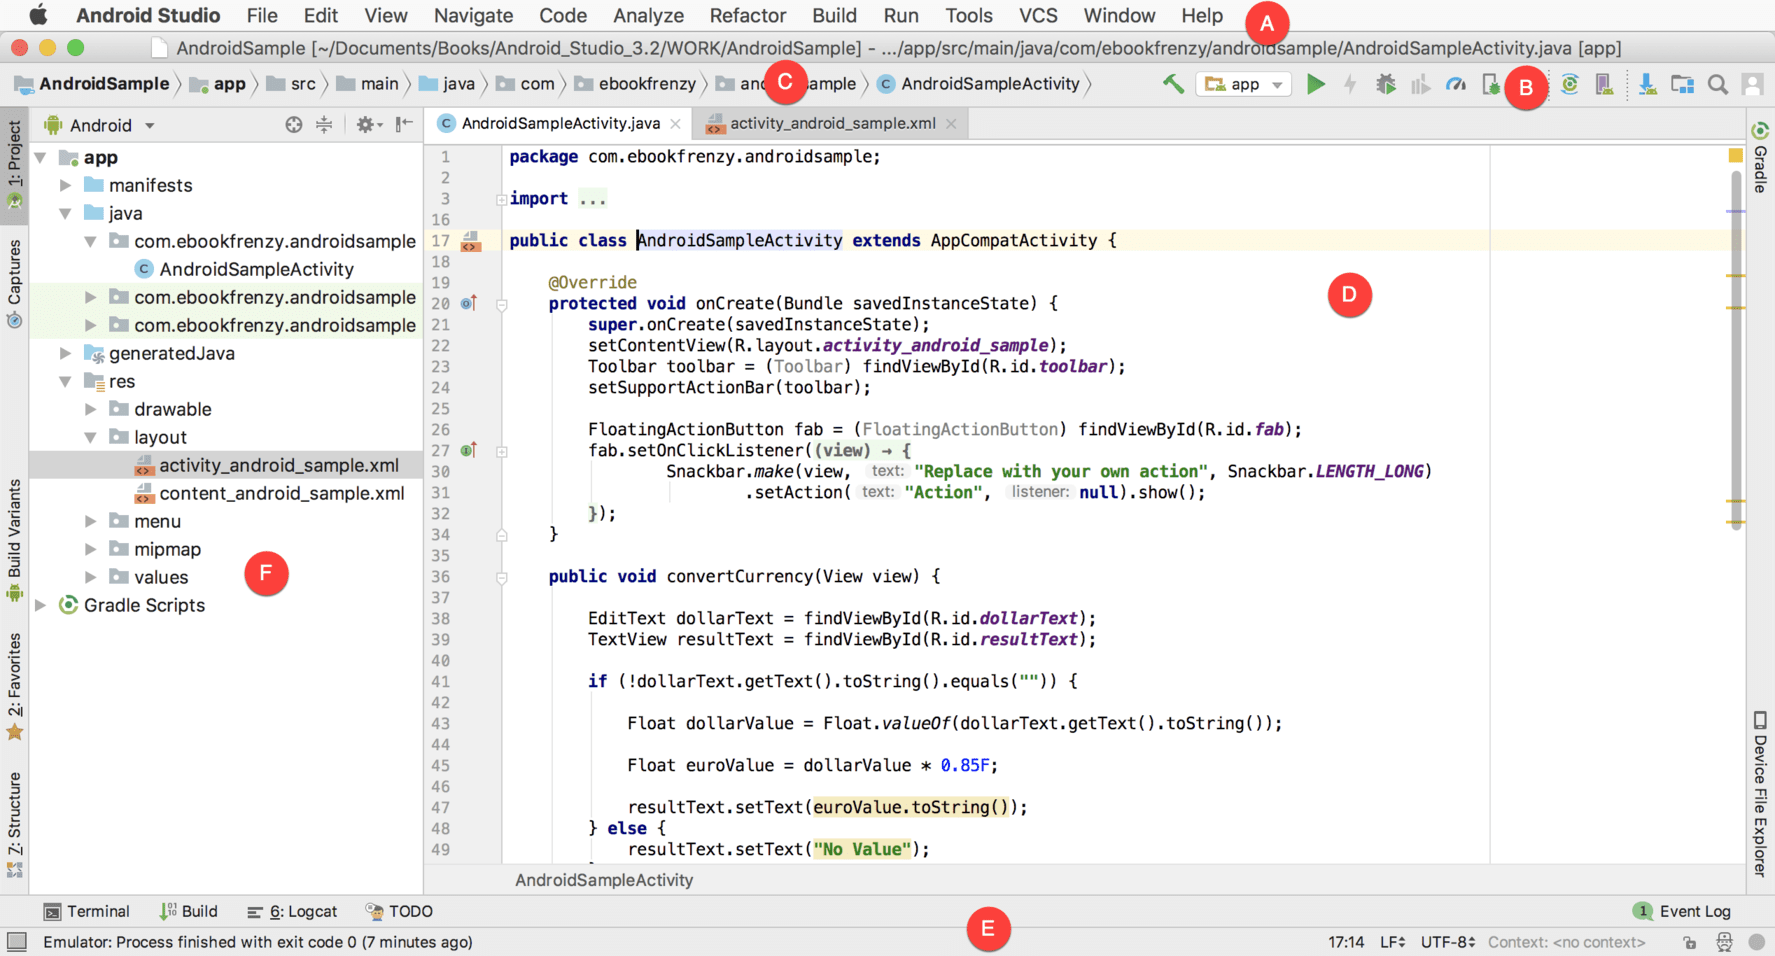
When a new project is created, or an existing one opened, the Android Studio main window will appear. When multiple projects are open simultaneously, each will be assigned its own main window. The precise configuration of the window will vary depending on which tools and panels were displayed the last time the project was open, but will typically resemble that of Figure 6-2.
The various elements of the main window can be summarized as follows:
A – Menu Bar– Contains a range of menus for performing tasks within the Android Studio environment.
B – Toolbar – A selection of shortcuts to frequently performed actions. The toolbar buttons provide quicker access to a select group of menu bar actions. The toolbar can be customized by right-clicking on the bar and selecting the Customize Menus and Toolbars… menu option.
C – Navigation Bar – The navigation bar provides a convenient way to move around the files and folders that make up the project. Clicking on an element in the navigation bar will drop down a menu listing the subfolders and files at that location ready for selection. This provides an alternative to the Project tool window.
D – Editor Window – The editor window displays the content of the file on which the developer is currently working. What gets displayed in this location, however, is subject to context. When editing code, for example, the code editor will appear. When working on a user interface layout file, on the other hand, the user interface Layout Editor tool will appear. When multiple files are open, each file is represented by a tab located along the top edge of the editor as shown in Figure 6-3.
E – Status Bar – The status bar displays informational messages about the project and the activities of Android Studio together with the tools menu button located in the far left corner. Hovering over items in the status bar will provide a description of that field. Many fields are interactive, allowing the user to click to perform tasks or obtain more detailed status information.
F – Project Tool Window – The project tool window provides a hierarchical overview of the project file structure allowing navigation to specific files and folders to be performed. The toolbar can be used to display the project in a number of different ways. The default setting is the Android view which is the mode primarily used in the remainder of this book.
The project tool window is just one of a number of tool windows available within the Android Studio environment.
The Tool Windows
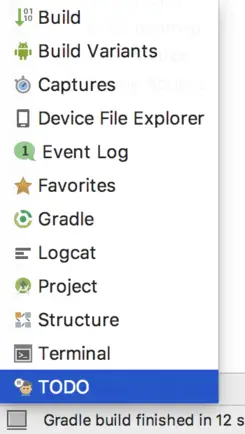
In addition to the project view tool window, Android Studio also includes a number of other windows which, when enabled, are displayed along the bottom and sides of the main window. The tool window quick access menu can be accessed by hovering the mouse pointer over the button located in the far left-hand corner of the status bar (Figure 6-4) without clicking the mouse button.
Selecting an item from the quick access menu will cause the corresponding tool window to appear within the main window.
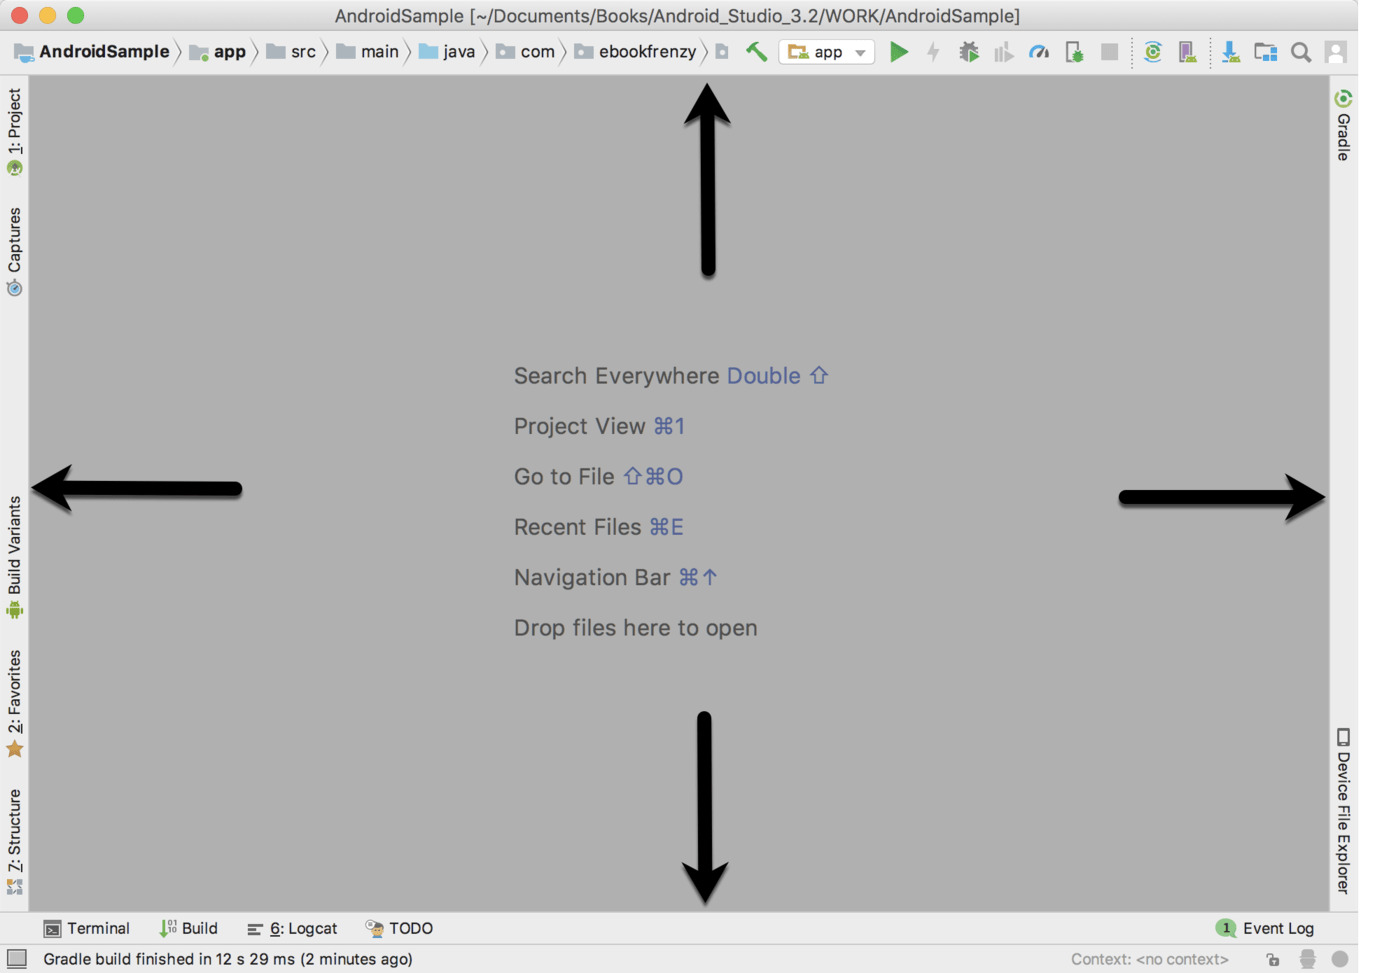
Alternatively, a set of tool window bars can be displayed by clicking on the quick access menu icon in the status bar. These bars appear along the left, right and bottom edges of the main window (as indicated by the arrows in Figure 6-5) and contain buttons for showing and hiding each of the tool windows. When the tool window bars are displayed, a second click on the button in the status bar will hide them.
Clicking on a button will display the corresponding tool window while a second click will hide the window. Buttons prefixed with a number (for example 1: Project) indicate that the tool window may also be displayed by pressing the Alt key on the keyboard (or the Command key for macOS) together with the corresponding number.
The location of a button in a tool window bar indicates the side of the window against which the window will appear when displayed. These positions can be changed by clicking and dragging the buttons to different locations in other window tool bars.
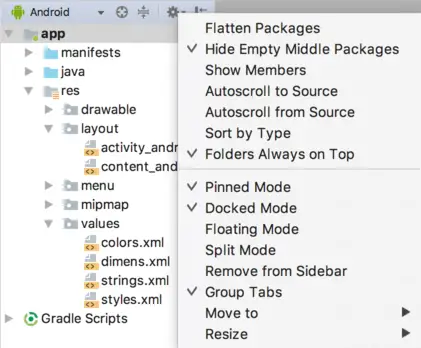
Each tool window has its own toolbar along the top edge. The buttons within these toolbars vary from one tool to the next, though all tool windows contain a settings option, represented by the cog icon, which allows various aspects of the window to be changed. Figure 6-6 shows the settings menu for the project view tool window. Options are available, for example, to undock a window and to allow it to float outside of the boundaries of the Android Studio main window and to move and resize the tool panel.
All of the windows also include a far right button on the toolbar providing an additional way to hide the tool window from view. A search of the items within a tool window can be performed simply by giving that window focus by clicking in it and then typing the search term (for example the name of a file in the Project tool window). A search box will appear in the window’s tool bar and items matching the search highlighted.
Android Studio offers a wide range of tool windows, the most commonly used of which are as follows:
- Project – The project view provides an overview of the file structure that makes up the project allowing for quick navigation between files. Generally, double-clicking on a file in the project view will cause that file to be loaded into the appropriate editing tool.
- Structure – The structure tool provides a high level view of the structure of the source file currently displayed in the editor. This information includes a list of items such as classes, methods and variables in the file. Selecting an item from the structure list will take you to that location in the source file in the editor window.
- Captures – The captures tool window provides access to performance data files that have been generated by the monitoring tools contained within Android Studio.
- Favorites – A variety of project items can be added to the favorites list. Right-clicking on a file in the project view, for example, provides access to an Add to Favorites menu option. Similarly, a method in a source file can be added as a favorite by right-clicking on it in the Structure tool window. Anything added to a Favorites list can be accessed through this Favorites tool window.
- Build Variants– The build variants tool window provides a quick way to configure different build targets for the current application project (for example different builds for debugging and release versions of the application, or multiple builds to target different device categories).
- TODO– As the name suggests, this tool provides a place to review items that have yet to be completed on the project. Android Studio compiles this list by scanning the source files that make up the project to look for comments that match specified TODO patterns. These patterns can be reviewed and changed by selecting the File -> Settings… menu option (Android Studio -> Preferences… on macOS) and navigating to the TODO page listed under Editor.
- Messages – The messages tool window records output from the Gradle build system (Gradle is the underlying system used by Android Studio for building the various parts of projects into runnable applications) and can be useful for identifying the causes of build problems when compiling application projects.
- Logcat– The Logcat tool window provides access to the monitoring log output from a running application in addition to options for taking screenshots and videos of the application and stopping and restarting a process.
- Terminal– Provides access to a terminal window on the system on which Android Studio is running. On Windows systems this is the Command Prompt interface, while on Linux and macOS systems this takes the form of a Terminal prompt.
- Build - The build tool windows displays information about the build process while a project is being compiled and packaged and displays details of any errors encountered.
- Run – The run tool window becomes available when an application is currently running and provides a view of the results of the run together with options to stop or restart a running process. If an application is failing to install and run on a device or emulator, this window will typically provide diagnostic information relating to the problem.
- Logcat - The Logcat tool window provides access to the monitoring log output from a running application in addition to options for taking screenshots and videos of the application and stopping and restarting a process.
- Event Log – The event log window displays messages relating to events and activities performed within Android Studio. The successful build of a project, for example, or the fact that an application is now running will be reported within this tool window.
- Gradle – The Gradle tool window provides a view onto the Gradle tasks that make up the project build configuration. The window lists the tasks that are involved in compiling the various elements of the project into an executable application. Right-click on a top level Gradle task and select the Open Gradle Config menu option to load the Gradle build file for the current project into the editor. Gradle will be covered in greater detail later in this book.
- Android Profiler – The Android Profiler tool window provides realtime monitoring and analysis tools for identifying performance issues within running apps, including CPU, memory and network usage. This option becomes available when an app is currently running.
- Device File Explorer – The Device File Explorer tool window provides direct access to the filesystem of the currently connected Android device or emulator allowing the filesystem to be browsed and files copied to the local filesystem.
Android Studio Keyboard Shortcuts
Android Studio includes an abundance of keyboard shortcuts designed to save time when performing common tasks. A full keyboard shortcut keymap listing can be viewed and printed from within the Android Studio project window by selecting the Help -> Keymap Reference menu option.
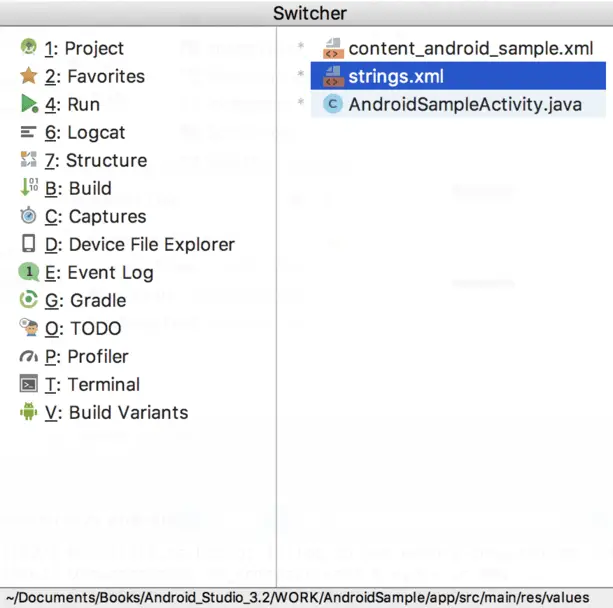
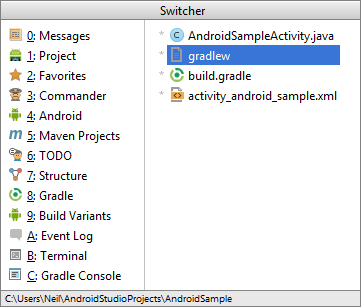
Another useful mechanism for navigating within the Android Studio main window involves the use of the Switcher. Accessed via the Ctrl-Tab keyboard shortcut, the switcher appears as a panel listing both the tool windows and currently open files (Figure 6-7).
Once displayed, the switcher will remain visible for as long as the Ctrl key remains depressed. Repeatedly tapping the Tab key while holding down the Ctrl key will cycle through the various selection options, while releasing the Ctrl key causes the currently highlighted item to be selected and displayed within the main window.
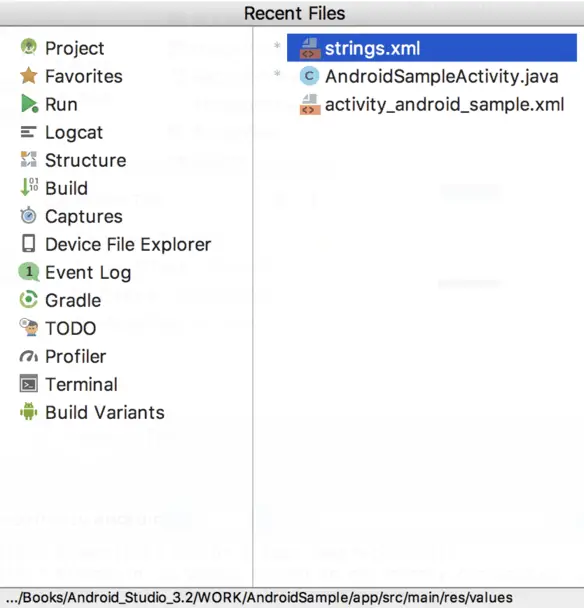
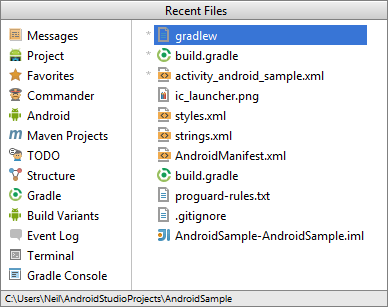
In addition to the switcher, navigation to recently opened files is provided by the Recent Files panel (Figure 6-8). This can be accessed using the Ctrl-E keyboard shortcut (Cmd-E on macOS). Once displayed, either the mouse pointer can be used to select an option or, alternatively, the keyboard arrow keys used to scroll through the file name and tool window options. Pressing the Enter key will select the currently highlighted item.
Changing the Android Studio Theme
The overall theme of the Android Studio environment may be changed either from the welcome screen using the Configure -> Settings option, or via the File -> Settings… menu option (Android Studio -> Preferences… on macOS) of the main window.
Once the settings dialog is displayed, select the Appearance option in the left-hand panel and then change the setting of the Theme menu before clicking on the Apply button. The themes available will depend on the platform but usually include options such as Light, IntelliJ, Windows, Default and Darcula. Figure 6-9 shows an example of the main window with the Darcula theme selected:
Summary
The primary elements of the Android Studio environment consist of the welcome screen and main window. Each open project is assigned its own main window which, in turn, consists of a menu bar, toolbar, editing and design area, status bar and a collection of tool windows. Tool windows appear on the sides and bottom edges of the main window and can be accessed either using the quick access menu located in the status bar, or via the optional tool window bars.
There are very few actions within Android Studio which cannot be triggered via a keyboard shortcut. A keymap of default keyboard shortcuts can be accessed at any time from within the Android Studio main window.
| Previous | Table of Contents | Next |
| Creating an Example Android App in Android Studio | Creating an Android Virtual Device (AVD) in Android Studio |
Whilst it is tempting to plunge into running the example application created in the previous chapter, doing so involves using aspects of the Android Studio user interface which are best described in advance.
Android Studio is a powerful and feature rich development environment that is, to a large extent, intuitive to use. That being said, taking the time now to gain familiarity with the layout and organization of the Android Studio user interface will considerably shorten the learning curve in later chapters of the book. With this in mind, this chapter will provide an initial overview of the various areas and components that make up the Android Studio environment.
The Welcome Screen
The welcome screen (Figure 4-1) is displayed any time that Android Studio is running with no projects currently open (open projects can be closed at any time by selecting the File -> Close Project menu option). If Android Studio was previously exited while a project was still open, the tool will by-pass the welcome screen next time it is launched, automatically opening the previously active project.
Figure 4-1
In addition to a list of recent projects, the Quick Start menu provides a range of options for performing tasks such as opening, creating and importing projects along with access to projects currently under version control. In addition, the Configure option provides access to the SDK Manager along with a vast array of settings and configuration options. A review of these options will quickly reveal that there is almost no aspect of Android Studio that cannot be configured and tailored to your specific needs.
Finally, the status bar along the bottom edge of the window provides information about the version of Android Studio currently running, along with a link to check if updates are available for download.
The Main Window
When a new project is created, or an existing one opened, the Android Studio main window will appear. When multiple projects are open simultaneously, each will be assigned its own main window. The precise configuration of the window will vary depending on which tools and panels were displayed the last time the project was open, but will typically resemble that of Figure 4-2.
The main components of the Android Studio main window
Figure 4-2
The various elements of the main window can be summarized as follows:
- A – Menu Bar – Contains a range of menus for performing tasks within the Android Studio environment.
- B – Toolbar – A selection of shortcuts to frequently performed actions. The toolbar buttons provide quicker access to a select group of menu bar actions. The toolbar can be customized by right-clicking on the bar and selecting the Customize Menus and Toolbars… menu option.
- C – Navigation Bar – The navigation bar provides a convenient way to move around the files and folders that make up the project. Clicking on an element in the navigation bar will drop down a menu listing the subfolders and files at that location ready for selection. This provides an alternative to the Project tool window.
- D – Editor Window – The editor window displays the content of the file on which the developer is currently working. What gets displayed in this location, however, is subject to context. When editing code, for example, the code editor will appear. When working on a user interface layout file, on the other hand, the user interface Designer tool will appear. When multiple files are open, each file is represented by a tab located along the top edge of the editor as shown in Figure 4-3.
Android Studio Editor window tabs
Figure 4-3
- E – Status Bar – The status bar displays informational messages about the project and the activities of Android Studio together with the tools menu button located in the far left corner. Hovering over items in the status bar will provide a description of that field. Many fields are interactive, allowing the user to click to perform tasks or obtain more detailed status information.
- F – Project Tool Window – The project tool window provides a hierarchical overview of the project file structure allowing navigation to specific files and folders to be performed. The drop-down menu in the toolbar can be used to display the project in a number of different ways. The default setting is the Android view which is the mode primarily used in the remainder of this book.
The project tool window is just one of a number of tool windows available within the Android Studio environment.
The Tool Windows
In addition to the project view tool window, Android Studio also includes a number of other windows which, when enabled, are displayed along the bottom and sides of the main window. The tool window quick access menu can be accessed by hovering the mouse pointer over the button located in the far left hand corner of the status bar (Figure 4-4) without clicking the mouse button.
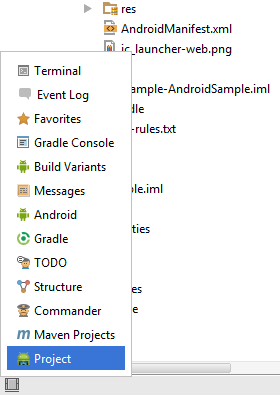
Figure 4-4
Selecting an item from the quick access menu will cause the corresponding tool window to appear within the main window.
Alternatively, a set of tool window bars can be displayed by clicking on the quick access menu icon in the status bar. These bars appear along the left, right and bottom edges of the main window (as indicated by the arrows in Figure 4-5) and contain buttons for showing and hiding each of the tool windows. When the tool window bars are displayed, a second click on the button in the status bar will hide them.
Android Studio tool window bars
Figure 4-5
Clicking on a button will display the corresponding tool window whilst a second click will hide the window. Buttons prefixed with a number (for example 1: Project) indicate that the tool window may also be displayed by pressing the Alt key on the keyboard (or the Command key for Mac OS X) together with the corresponding number.
The location of a button in a tool window bar indicates the side of the window against which the window will appear when displayed. These positions can be changed by clicking and dragging the buttons to different locations in other window tool bars.
Each tool window has its own toolbar along the top edge. The buttons within these toolbars vary from one tool to the next, though all tool windows contain a settings option, represented by the cog icon, which allows various aspects of the window to be changed. Figure 4-6 shows the settings menu for the project view tool window. Options are available, for example, to undock a window and to allow it to float outside of the boundaries of the Android Studio main window.
The Android Studio Tool Window Settings Menu
Figure 4-6
All of the windows also include a far right button on the toolbar providing an additional way to hide the tool window from view.
Android Studio offers a wide range of window tool windows, the most commonly used of which are as follows:
- Project – The project view provides an overview of the file structure that makes up the project allowing for quick navigation between files. Generally, double clicking on a file in the project view will cause that file to be loaded into the appropriate editing tool.
- Structure – The structure tool provides a high level view of the structure of the source file currently displayed in the editor. This information includes a list of items such as classes, methods and variables in the file. Selecting an item from the structure list will take you to that location in the source file in the editor window.
- Favorites – A variety of project items can be added to the favorites list. Right clicking on a file in the project view, for example, provides access to an Add to Favorites menu option. Similarly, a method in a source file can be added as a favorite by right clicking on it in the Structure tool window. Anything added to a Favorites list can be accessed through this Favorites tool window.
- Build Variants – The build variants tool window provides a quick way to configure different build targets for the current application project (for example different builds for debugging and release versions of the application, or multiple builds to target different device categories).
- TODO – As the name suggests, this tool provides a place to review items that have yet to be completed on the project. Android Studio compiles this list by scanning the source files that make up the project to look for comments that match specified TODO patterns. These patterns can be reviewed and changed by selecting the File -> Settings… menu option and navigating to the TODO page listed under IDE Settings.
- Messages – The messages tool window records output from the Gradle build system (Gradle is the underlying system used by Android Studio for building the various parts of projects into a runnable applications) and can be useful for identifying the causes of build problems when compiling application projects.
- Android – The Android tool window provides access to the Android debugging system. Within this window tasks such as monitoring log output from a running application, taking screenshots and videos of the application, stopping a process and performing basic debugging tasks can be performed.
- Terminal – Provides access to a terminal window on the system on which Android Studio is running. On Windows systems this is the Command Prompt interface, whilst on Linux and Mac OS X systems this takes the form of a Terminal prompt.
- Run – The run tool window becomes available when an application is currently running and provides a view of the results of the run together with options to stop or restart a running process. If an application is failing to install and run on a device or emulator, this window will typically provide diagnostic information relating to the problem.
- Event Log – The event log window displays messages relating to events and activities performed within Android Studio. The successful build of a project, for example, or the fact that an application is now running will be reported within this window tool.
- Gradle Console – The Gradle console is used to display all output from the Gradle system as projects are built from within Android Studio. This will include information about the success or otherwise of the build process together with details of any errors or warnings.
- Maven Projects – Maven is a project management and build system designed to ease the development of complex Java based projects and overlaps in many areas with the functionality provided by Gradle. Google has chosen Gradle as the underlying build system for Android development, so unless you are already familiar with Maven or have existing Maven projects to import, your time will be better spent learning and adopting Gradle for your projects. The Maven projects tool window can be used to add, manage and import Maven based projects within Android Studio.
- Gradle – The Gradle tool window provides a view onto the Gradle tasks that make up the project build configuration. The window lists the tasks that are involved in compiling the various elements of the project into an executable application. Right-click on a top level Gradle task and select the Open Gradle Config menu option to load the Gradle build file for the current project into the editor. Gradle will be covered in greater detail later in this book.
- Commander – The Commander window tool can best be described as a combination of the Project and Structure tool windows, allowing the file hierarchy of the project to be traversed and for the various elements that make up classes to be inspected and loaded into the editor or designer windows.
- Memory Monitor – Connects to running Android applications and monitors memory usage statistics in the form of a real-time graph.
- Designer – Available when the UI Designer is active, this tool window provides access to the designer’s Component Tree and Properties panels.
Android Studio Keyboard Shortcuts
Android Studio includes an abundance of keyboard shortcuts designed to save time when performing common tasks. A full keyboard shortcut keymap listing can be viewed and printed from within the Android Studio project window by selecting the Help -> Default Keymap Reference menu option.
Another useful mechanism for navigating within the Android Studio main window involves the use of the Switcher. Accessed via the Ctrl-Tab keyboard shortcut, the switcher appears as a panel listing both the tool windows and currently open files (Figure 4-7).
Figure 4-7
Once displayed, the switcher will remain visible for as long as the Ctrl key remains depressed. Repeatedly tapping the Tab key whilst holding down the Ctrl key will cycle through the various selection options, whilst releasing the Ctrl key causes the currently highlighted item to be selected and displayed within the main window.
In addition to the switcher, navigation to recently opened files is provided by the Recent Files panel (Figure 4-8). This can be accessed using the Ctrl-E keyboard shortcut (Cmd-E on Mac OS X). Once displayed, either the mouse pointer can be used to select an option or, alternatively, the keyboard arrow keys can be used to scroll through the file name and tool window options. Pressing the Enter key will select the currently highlighted item.
Figure 4-8
Changing the Android Studio Theme
The overall theme of the Android Studio environment may be changed either from the welcome screen using the Configure -> Settings option, or via the File -> Settings… menu option of the main window. Once the settings dialog is displayed, select the Appearance option in the left hand panel and then change the setting of the Theme menu before clicking on the Apply button. The themes currently available consist of IntelliJ, Windows and Darcula. Figure 4-9 shows an example of the main window with the Darcula theme selected:
Android Studio running with the Darcula theme
Figure 4-9
Summary
The primary elements of the Android Studio environment consist of the welcome screen and main window. Each open project is assigned its own main window which, in turn, consists of a menu bar, toolbar, editing and design area, status bar and a collection of tool windows. Tool windows appear on the sides and bottom edges of the main window and can be accessed either using the quick access menu located in the status bar, or via the optional tool window bars.
There are very few actions within Android Studio which cannot be triggered via a keyboard shortcut. A keymap of default keyboard shortcuts can be accessed at any time from within the Android Studio main window.
| Previous | Table of Contents | Next |
| Creating an Example Android App in Android Studio | Creating an Android Virtual Device (AVD) in Android Studio |
