Configuring Windows Server 2008 DHCP Servers
| Previous | Table of Contents | Next |
| Building a Windows Server 2008 Network Load Balancing Cluster | Managing a Windows Server 2008 DHCP Server from the Command Line |
| Purchase and download the full PDF and ePub versions of this eBook only $9.99 |
Dynamic Host Configuration Protocol (DHCP) is an extremely powerful and popular mechanism by which IP addresses and other related network information are dynamically assigned to network clients when they are attached to a network. This provides significant reductions in terms of network management overheads, particularly on large networks, by avoiding the necessity to manually assign settings to each client.
This chapter is designed to provide details on how to install, configure and manage a DHCP server on a Windows Server 2008 system using the graphical DHCP console tool. For details on performing similar tasks at the command prompt refer to the next chapter, entitled Managing a Windows Server 2008 DHCP Server from the Command Line.
Installing the DHCP Server Role
The first step in setting up a DHCP server on a Windows Server 2008 system is to install the DHCP Server feature on any servers which are required to provide the service. Before performing even this initial task, it is highly recommended that any systems designated to act as DHCP servers are assigned a static IP address. If the server is currently obtaining a dynamic IP address from another DHCP server, begin the installation process by assigning the system a static IP address. This can be achieved by launching the Server Manager and clicking View Network Connections. Right click on the network adapter on which the DHCP service is to be run and select Properties where either, or both the IPv4 or IPv6 address may be changed from automatically obtaining an IP address to specifying a static address. Once configured, exit from the properties dialog and network connections window leaving the Server Manager running.
DHCP can be used not just to provide clients with an IP address, but also additional information such as the name of the parent domain (for example techotopia.com) and the IP addresses of both preferred and alternate DNS servers. If the DHCP server is required to provide these details for IPv4 clients, enter them into the Specify IPv4 DNS Server Settings page and click Next.
On the IPv4 WIN Server Settings page, enter addresses of the Preferred and Alternate WINS servers if required. Otherwise, leave the WINS is not required for applications on this network option selected and proceed to the next configuration page.
The next page allows initial DHCP scopes to be configured. A DHCP scope defines one or more ranges of IP addresses from which an IP address may assigned to a client and the duration of the IP address lease (6 days for wired clients and 8 hours for wireless clients). This may either be configured now, or at a later point in the configuration process. The topic of defining DHCP scopes is covered in the Defining DHCP Scopes section of this chapter.
With the initial DHCP IPv4 configuration steps completed, the wizard subsequently moves on to the IPv6 settings. This is where a little background information is useful. Windows Server 2008 supports two modes of IPv6 DHCP operation, known as stateless and stateful. In stateful mode, clients obtain both an IP address and other information (such as DNS addresses) through the DHCPv6 server. In stateless mode, the clients receive only the non-IP address information from the DHCPv6 server. In this case, the IP address must be provided using some other mechanism, either by configuring of static IP addresses or through the implementation of IPv6 auto-configuration.
On the Configure DHCPv6 Stateless Mode screen, select either stateful or stateless mode in accordance with your specific enterprise requirements. If stateless mode is selected the next screen will prompt for the IPv6 DNS information to be provided to clients. Enter the information and click on Next. If the DHCP is part of an Active Directory domain, the Authorize DHCP Server page will appear. Enter the credentials (either your own as shown, or alternate credentials via the Alternate Credentials button) necessary to authorize the new DHCP server. Alternatively, the authorization may be performed later by skipping this step by clicking on Next.
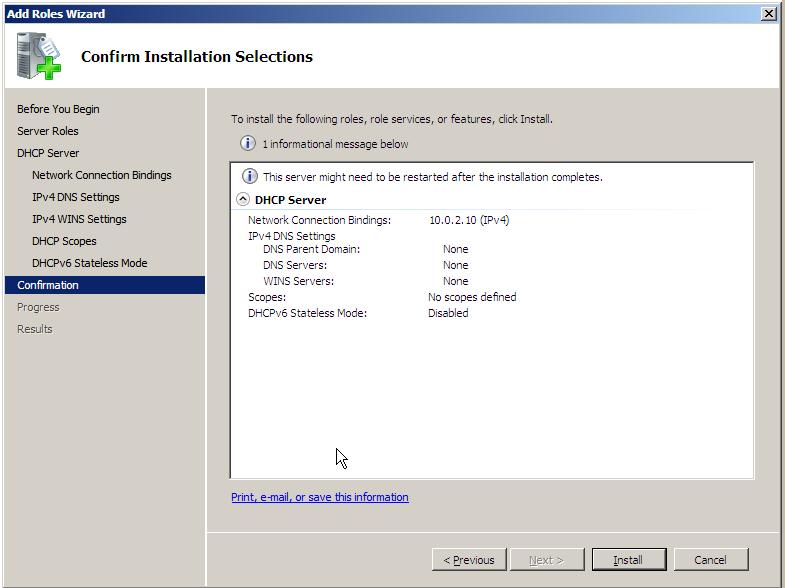
Upon completion of the DHCP server configuration the summary screen will displayed similar to the one illustrated below:
Assuming that the summarized configuration is correct, click on Install to
complete the installation process. The wizard will display the progress of the
DHCP Server Role installation before displaying a results screen confirming
the successful installation. Once installation is complete, the DHCP Server
may be managed locally or remotely using the DHCP console (Start -> All
Programs -> Administrative Tools -> DHCP).
Authorizing DHCP Servers in Active Directory
If a DHCP server is to operate within an Active Directory domain (and is not running on a domain controller) it must first be authorized. This can be achieved either as part of the DHCP Server role installation, or subsequently using either DHCP console or at the command prompt using the netsh tool.
If the DHCP server was not authorized during installation, invoke the DHCP console (Start -> All Programs -> Administrative Tools -> DHCP), right click on the DHCP to be authorized and select Authorize. To achieve the same result from the command prompt, enter the following command:
netsh dhcp server serverID initiate auth
In the above command syntax, serverID is replaced by the IP address or full UNC name of system on which the DHCP server is installed.
Understanding DHCP Scope Types
DHCP scopes are used to define ranges of addresses from which a DHCP server can assign IP addresses to clients. Scopes fall into Normal, Multicast and Superscope categories as follows:
Normal Scope - Allows A, B and C Class IP address ranges to be specified including subnet masks, exclusions and reservations. Each normal scope defined must exist within its own subnet.
Multicast Scope - Used to assign IP address ranges for Class D networks. Multicast scopes do not have subnet masks, reservation or other TCP/IP options. Multicast scope address ranges require that a Time To Live (TTL) value be specified (essentially the number of routers a packet can pass through on the way to its destination).
Superscope - Essentially a collection of scopes grouped together such that they can be enabled and disabled as a single entity.
Configuring IPv4 Scopes Using the DHCP Console
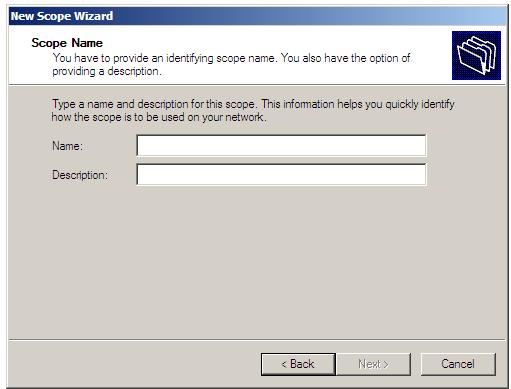
<google>WIN28BOX</google> New scopes on Windows Server 2008 can either be configured from the graphical DHCP console, or from the command prompt using the netsh utility. To create a new scope in the DHCP console (launched from Start -> All Programs -> Administrative Tools -> DHCP) click on the server name in left hand panel so that IPv4 and IPv6 categories are listed in the main panel. Right click on the required IP version and select New scope from the menu top invoke the New Scope Wizard. Click on Next to skip the welcome screen so that the Scope Name dialog is displayed:
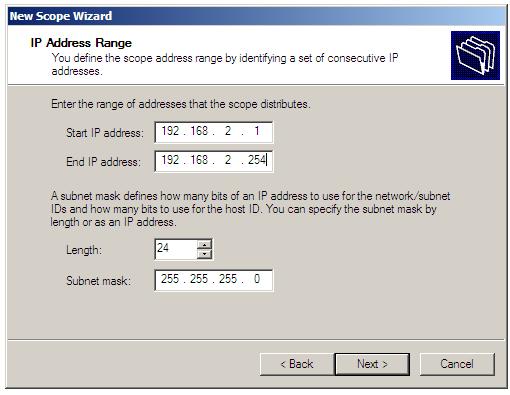
Enter a suitable name and description for the scope and press Next to
proceed to the IP Address Range screen. In this screen, enter the start
and end addresses of the IP address scope followed by the subnet mask, either
in terms of bit length or in IP format (for example 255.255.255.0 or 24 bits).
Note that when the start and end addresses are entered the subnet mask fields
are filled in automatically, but may be changed manually if required:
If the address range specified encompasses multiple subnets (for example
192.168.2.1 through to 192.168.3.254) the wizard will warn that the designated
range is too large for a single scope and provide the option to create a
superscope made up of a number of different scopes depending on how many
subnets are contained within the range.
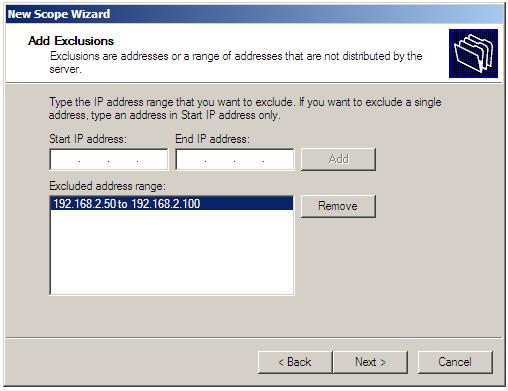
Assuming that all addresses in the scope range are on the same subnet, the wizard will provide the option to specify exclusions within the scope. Exclusions are essentially ranges of one or more IP addresses within the defined scope which are not available for assignment to clients. Multiple exclusion ranges may be defined within a single scope by using the Add button to add new ranges:
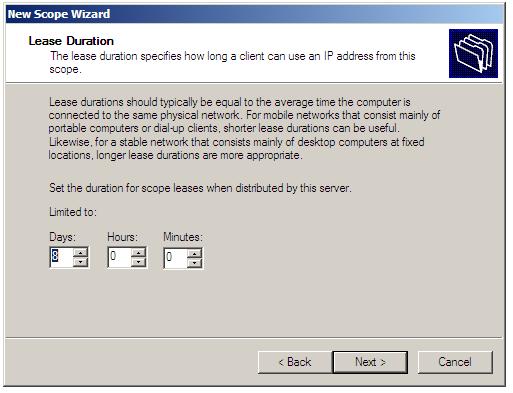
The next screen of the New DHCP Scope wizard relates to the topic of Lease
Duration for the IP addresses in the current scope. Lease duration refers to
the amount of time an IP address is assigned to a particular client computer
or device. If the subnet on which the DHCP server operates has a high turnover
of clients then a short lease is recommended (since the server will end up
holding IP addresses for clients which are no longer connected, potentially
exhausting the pool of IP addresses). For subnets where the connected clients
are fairly stable, longer leases might be more appropriate. To define a lease
duration use the spin boxes provided, specifying the duration in units of
days, hours and even minutes (the default is 8 days):
The next screen provides the option to configure DHCP options (such as default
gateway, DNS and WINS servers) which will be provided to clients along with
the dynamic IP address. If the yes option is selected, the wizard will
present a series of screens where these options may be specified if required.
On each screen enter the appropriate information, or leave the page blank if
the option is required (for example not all configurations require a WINS
server). If "no" is selected the wizard will skip to the Activate Scope
screen where, as the name suggests, the new scope may be activated. Once
activated the wizard may be closed. The new scope is now defined and active.
Configuring DHCP Reservations
DHCP reservations provide a mechanism by which IP addresses may be permanently assigned to a specific client based on the MAC address of that client.
The MAC address of a Windows client can be found running the ipconfig /all command. For Linux systems the corresponding command is ifconfig -a. Once the MAC address has been identified, the reservation may be configured using either the DHCP console or at the command prompt using the netsh tool. One important point to note is that ifconfig displays the MAC address delimited by colons (:), for example 06:EC:E6:11:47:BD. When entering the MAC address into the New Reservations dialog on Windows the colons will need to be replaced with dashes (-), for example 06-EC-E6-11-47-BD. Failure to do this will result in a warning dialog stating that the Unique identifier you have entered may not be correct.
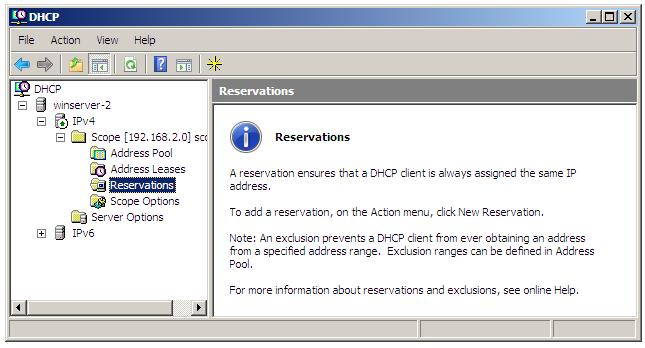
To configure reservation using the DHCP console, select Start -> All Programs -> Administration Tools -> DHCP and select the DHCP server and unfold the appropriate scope from the tree in the left panel. Within the scope sub-list, select Reservations as illustrated below:
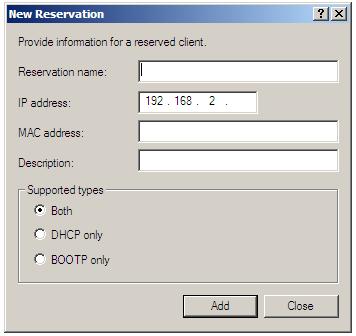
Right click on Reservations and choose New Reservation... from the
menu to launch the New Reservation dialog:
Begin by entering a name for the reservation followed by the IP address from
the currently selected scope which is to be reserved for the client together
with the MAC address of the client (or more specifically the network adapter
of the client). Finally specify whether the reservation is to be made for
BOOTP or DHCP clients, or both. Once the information has been entered click
the Add button. When all reservations have been entered click Cancel
to close the dialog.
To add a reservation using netsh the following syntax is used:
netsh dhcp server \\servername scope subnetID add reservedip IPaddress MacAddress ReservationName Comment
For example the following command reserves an IP address for a specific MAC address (note that the MAC address must be entered without any delimiters):
C:\Users\Administrator>netsh dhcp server \\winserver-2 scope 192.168.2.0 add reservedip
 192.168.2.12 0013720B1457 "CEO Printer" "Printer in Exec Suite"

Changed the current scope context to 192.168.2.0 scope.

Command completed successfully.
To list the current reserved IP addresses for a particular scope the following netsh command may be used:
C:\Users\Administrator>netsh dhcp server \\winserver-2 scope 192.168.2.0 show
reservedip

Changed the current scope context to 192.168.2.0 scope.

===============================================================
  Reservation Address -    Unique ID
===============================================================

    192.168.2.10      -    00-0b-db-18-a0-db-
    192.168.2.11      -    06-ec-e6-11-47-bd-
    192.168.2.12      -    00-13-72-0b-14-57-


No of ReservedIPs : 3 in the Scope : 192.168.2.0.

Command completed successfully.
| Purchase and download the full PDF and ePub versions of this eBook only $9.99 |


