RHEL 8 Remote Desktop Access with VNC
| Previous | Table of Contents | Next |
| Configuring SSH Key-based Authentication on RHEL 8 | Displaying RHEL 8 Applications Remotely (X11 Forwarding) |
|
You are reading a sample chapter from the Red Hat Enterprise Linux 8 (RHEL 8) Essentials book. Purchase a full copy of Red Hat Enterprise Linux 8 (RHEL 8) Essentials in eBook ($9.99) or Print ($36.99) format Red Hat Enterprise Linux 8 Essentials Print and eBook (ePub/PDF/Kindle) editions contain 31 chapters and over 250 pages |
RHEL 8 can be configured to provide remote access to the graphical desktop environment over a network or internet connection. Although not enabled by default, it is relatively straightforward to display and access a RHEL 8 desktop from a system anywhere else on a network or the internet. This can be achieved regardless of whether that system is running Linux, Windows or macOS. In fact, there are even apps available for Android and iOS that will allow you to access your RHEL 8 desktop from just about anywhere that a data signal is available.
Remote desktop access can be useful in a number of scenarios. It enables you or another person, for example, to view and interact with your RHEL 8 desktop environment from another computer system either on the same network or over the internet. This is useful if you need to work on your computer when you are away from your desk such as while traveling. It is also useful in situations where a co-worker or IT support technician needs access to your desktop to resolve a problem.
In situations where the RHEL 8 system is running on a cloud-based server, it also allows access to the desktop environment as an alternative to performing administrative tasks using the command-line prompt or Cockpit web console.
The RHEL 8 remote desktop functionality is based on technology known as Virtual Network Computing (VNC) and in this chapter we will cover the key aspects of configuring and using remote desktops within RHEL 8.
Secure and Insecure Remote Desktop Access
In this chapter we will cover both secure and insecure remote desktop access methods. Assuming that you are accessing one system from another within the context of a secure internal network then it is generally safe to use the insecure access method. If, on the other hand, you plan to access your desktop remotely over any kind of public network you must use the secure method of access to avoid your system and data being compromised.
Installing the GNOME Desktop Environment
It is, of course, only possible to access the desktop environment if the desktop itself has been installed. If, for example, the system was initially configured as a server it is unlikely that the desktop packages were installed. The easiest way to install the packages necessary to run the GNOME desktop is to perform a group install. The key to installing groups of packages to enable a specific feature is knowing the name of the group. At the time of writing, the group for installing the desktop environment on RHEL 8 is named “Workstation”. As the group names have a tendency to change from one RHEL release to another, it is useful to know that the list of groups that are either installed or available to be installed can be obtained using the dnf utility as follows:
# dnf grouplist
Updating Subscription Management repositories.

Available Environment Groups:
   Workstation
   Minimal Install
   Custom Operating System
Installed Environment Groups:
   Server with GUI
Installed Groups:
   Container Management
Available Groups:
   .NET Core Development
   RPM Development Tools
   Smart Card Support
   Scientific Support
   Security Tools
   Development Tools
   System Tools
   Headless Management
   Network Servers
   Legacy UNIX Compatibility
   Graphical Administration Tools
In the above example, the Workstation environment group is listed as being available (and therefore not already installed). To find out more information about the contents of a group prior to installation, use the following command:
# dnf groupinfo workstation

Updating Subscription Management repositories.
Environment Group: Workstation
 Description: Workstation is a user friendly desktop system for laptops and PCs.
 Mandatory Groups:
   Common NetworkManager submodules
   Core
   Fonts
   GNOME
   Guest Desktop Agents
   Internet Browser
   Multimedia
   Standard
   Workstation product core
   base-x
Having confirmed that this is the correct group, it can be installed as follows:
# dnf groupinstall workstation
Once installed, and assuming that the system has a display added, the desktop can be launched using the following command:
$ startx
If, on the other hand, the system is a server with no directly connected display, the only way to run and access the desktop will be to configure VNC support on the system.
Installing VNC on RHEL 8
Access to a remote desktop requires a VNC server installed on the remote system, a VNC viewer on the system from which access is being established and, optionally, a secure SSH connection. While a number of VNC server and viewer implementations are available, Red Hat has standardized on TigerVNC which provides both server and viewer components for Linux-based operating systems. VNC viewer clients for non-Linux platforms include TightVNC.
To install the TigerVNC server package on RHEL 8, simply run the following command:
# dnf install tigervnc-server
If required, the TigerVNC viewer may also be installed as follows:
# dnf install tigervnc
Once the server has been installed the system will need to be configured to run one or more VNC services and to open the appropriate ports on the firewall. While this can be achieved manually by following a sequence of steps, a better and less error prone option is to configure the system automatically using a script generated by the Red Hat VNC Configurator.
Configuring the VNC Service using the Configurator
The VNC Configurator is an online tool that asks a sequence of questions about the required VNC server configuration and then generates a shell script that can be downloaded onto the server system and run to automatically configure and enable VNC server support. To access the configurator, open a browser window and navigate to the following URL:
https://access.redhat.com/labs/vncconfig/
Note that access to the configurator requires a Red Hat account which can be created for free by clicking on the Register button on the above page.
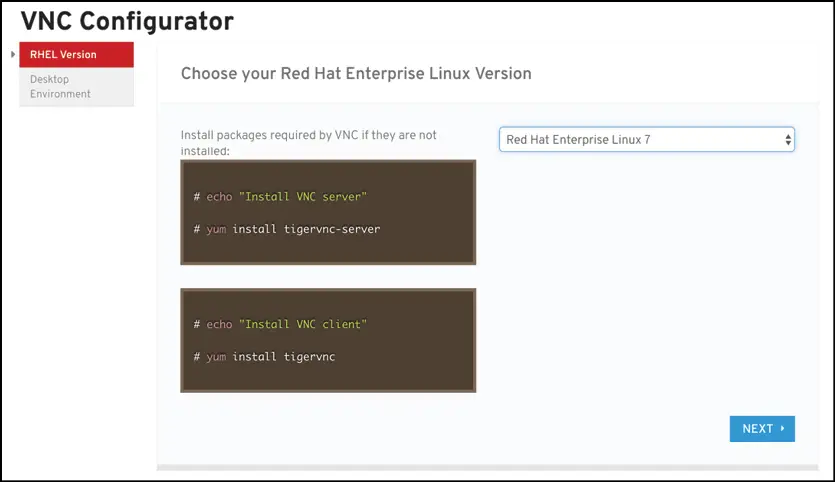
Within the first page of the configurator, select the appropriate version of RHEL and click on Next. Note that at time of writing the most recent version of RHEL available for selection was RHEL 7, though this also works for RHEL 8:
Figure 15-1
Work through the remaining screens (skipping the step to install the desktop environment), specifying the GNOME desktop, the user name for which VNC access is being configured, the desired screen resolution for the displayed desktop and details about the firewall on the server. Once the settings have been entered, click on the Generate button to create and download the script. The script will be downloaded as a file named vncconfig.sh which will need to be placed on the server and executed with root privileges as follows:
# sh ./vncconfig.sh
The script will locate the next available port for VNC to use for communication, request a password to be used when accessing the desktop remotely and then configure the services and firewall settings necessary for the VNC server to function. Once setup is complete, the script will output a message similar to the following:
Display number for user <username> is 1
How the VNC Configurator Script Works
Having used the configurator script, it is worth taking the time to review the steps in this section to gain an understanding of what happens behind the scenes when the script is executed. This will help in addressing any configuration changes or problems that may arise later.
The assumption is made in this section that the VNC service has been configured for display 1 which corresponds to port 5901.
The script begins by executing the following command to specify a VNC password for the user which will be used when connecting to the desktop session:
$ su - <username> -c vncpasswd
Once the password has been defined, a folder named .vnc is created in the user’s home folder:
$ mkdir ~/.vnc
Next, a new file named xstartup is created containing the following:
#!/bin/sh
[ -x /etc/vnc/xstartup ] && exec /etc/vnc/xstartup
[ -r $HOME/.Xresources ] && xrdb $HOME/.Xresources
vncconfig -iconic &
dbus-launch --exit-with-session gnome-session &
The VNC server will use this script file to launch the GNOME desktop so that it can be accessed remotely.
A VNC server configuration file named vncserver@:1.service is created in the /etc/systemd/system directory. Note that :1 is included in the file name to indicate that this is the service configuration file for VNC server display number 1. The content of this file reads as follows, where all instances of <USER> are replaced with the username specified when the script was generated:
[Unit]
Description=Remote desktop service (VNC)
After=syslog.target network.target

[Service]
Type=forking
WorkingDirectory=/home/<USER>
User=<USER>
Group=<USER>

PIDFile=/home/<USER>/.vnc/%H%i.pid

ExecStartPre=/bin/sh -c ‘/usr/bin/vncserver -kill %i > /dev/null 2>&1 || :’
ExecStart=/usr/bin/vncserver -autokill %i
ExecStop=/usr/bin/vncserver -kill %i

Restart=on-success
RestartSec=15

[Install]
WantedBy=multi-user.target
Next, the firewall is configured to provide external access to the VNC server for remote VNC viewer instances, for example:
# firewall-cmd --permanent --zone=public --add-port=5901/tcp
# firewall-cmd --reload
|
You are reading a sample chapter from the Red Hat Enterprise Linux 8 (RHEL 8) Essentials book. Purchase a full copy of Red Hat Enterprise Linux 8 (RHEL 8) Essentials in eBook ($9.99) or Print ($36.99) format Red Hat Enterprise Linux 8 Essentials Print and eBook (ePub/PDF/Kindle) editions contain 31 chapters and over 250 pages |
# systemctl daemon-reload
# systemctl enable vncserver@:$1.service
# systemctl start vncserver@:1.service
Connecting to a VNC Server
VNC viewer implementations are available for a wide range of operating systems and a quick internet search will likely provide numerous links providing details on how to obtain and install this tool on your chosen platform.
From the desktop of a Linux system on which a VNC viewer such as TigerVNC is installed, a remote desktop connection can be established as follows from a Terminal window:
$ vncviewer <hostname>:<display number>
In the above example, <hostname> is either the hostname or IP address of the remote system and <display number> is the display number of the VNC server desktop, for example:
$ vncviewer 192.168.1.115:1
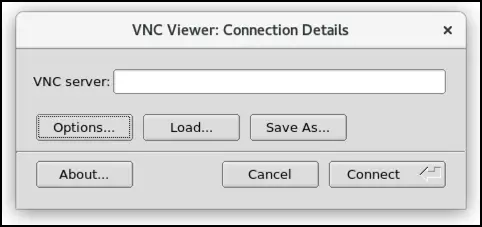
Alternatively, run the command without any options to be prompted for the details of the remote server:
Figure 15-2
Enter the hostname or IP address followed by the display number (for example 192.168.1.115:1) into the VNC server field and click on the Connect button. The viewer will prompt for the user’s VNC password to complete the connection, at which point a new window containing the remote desktop will appear.
This section assumed that the remote desktop was being accessed from a Linux or UNIX system, the same steps apply for most other operating systems.
Connecting to a remote VNC server using the steps in this section results in an insecure, unencrypted connection between the client and server. This means that the data transmitted during the remote session is vulnerable to interception. To establish a secure and encrypted connection a few extra steps are necessary.
Establishing a Secure Remote Desktop Session
The remote desktop configurations we have explored so far in this chapter are considered to be insecure because no encryption is used. This is acceptable when the remote connection does not extend outside of an internal network protected by a firewall. When a remote session is required over an internet connection, however, a more secure option is needed. This is achieved by tunneling the remote desktop through a secure shell (SSH) connection. This section will cover how to do this on Linux, UNIX and macOS client systems.
The SSH server is typically installed and activated by default on RHEL 8 systems. If this is not the case on your system, refer to the chapter entitled Configuring SSH Key-based Authentication on RHEL 8.
Assuming the SSH server is installed and active it is time to move to the other system. At the other system, log in to the remote system using the following command, which will establish the secure tunnel between the two systems:
$ ssh -l <username> -L 5901:localhost:5901 <remotehost>
In the above example, <username> references the user account on the remote system for which VNC access has been configured, and <remotehost> is either the host name or IP address of the remote system, for example:
$ ssh -l neilsmyth -L 5901:localhost:5901 192.168.1.115
When prompted, log in using the account password. With the secure connection established it is time to launch vncviewer so that it uses the secure tunnel. Leaving the SSH session running in the other terminal window, launch another terminal and enter the following command:
$ vncviewer localhost:5901
The vncviewer session will prompt for a password if one is required, and then launch the VNC viewer providing secure access to your desktop environment.
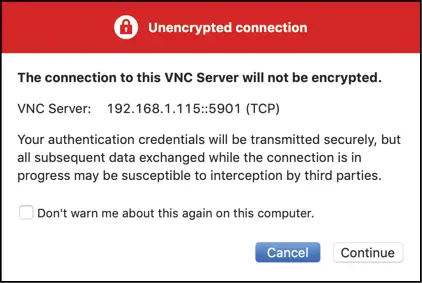
Although the connection is now secure and encrypted, the VNC viewer will most likely still report that the connection is insecure. Figure 15-3, for example, shows the warning dialog displayed by the RealVNC viewer running on a macOS system:
Figure 15-3
Unfortunately, although the connection is now secure, the VNC viewer software has no way of knowing this and consequently continues to issue warnings. Rest assured that as long as the SSH tunnel is being used, the connection is indeed secure.
In the above example we left the SSH tunnel session running in a terminal window. If you would prefer to run the session in the background, this can be achieved by using the –f and –N flags when initiating the connection:
$ ssh -l <username> -f -N -L 5901:localhost:5901 <remotehost>
The above command will prompt for a password for the remote server and then establish the connection in the background, leaving the terminal window available for other tasks.
If you are connecting to the remote desktop from outside the firewall keep in mind that the IP address for the SSH connection will be the external IP address provided by your ISP or cloud hosting provider, not the LAN IP address of the remote system (since this IP address is not visible to those outside the firewall). You will also need to configure your firewall to forward port 22 (for the SSH connection) to the IP address of the system running the desktop. It is not necessary to forward port 5900. Steps to perform port forwarding differ between firewalls, so refer to the documentation for your firewall, router or wireless base station for details specific to your configuration.
Establishing a Secure Tunnel on Windows using PuTTY
A similar approach is taken to establishing a secure desktop session from a Windows system to a RHEL 8 server. Assuming that you already have a VNC client such as TightVNC installed, the one remaining requirement is a Windows SSH client (in this case PuTTY).
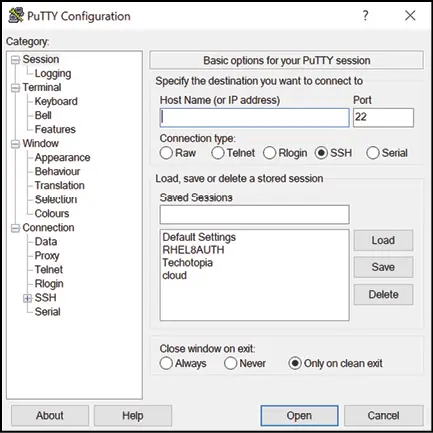
Once PuTTY is downloaded and installed, the first step is to establish a secure connection between the Windows system and the remote RHEL 8 system with appropriate tunneling configured. When launched, PuTTY displays the following screen:
Figure 15-4
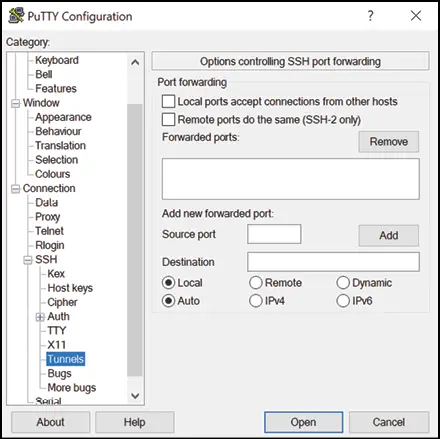
Enter the IP address or host name of the remote host (or the external IP address of the gateway if you are connecting from outside the firewall). The next step is to set up the tunnel. Click on the + next to SSH in the Category tree on the left-hand side of the dialog and click on Tunnels. The screen should subsequently appear as follows:
Figure 15-5
Enter 5901 as the Source port and localhost:5901 as the Destination and click on the Add button. Finally return to the main screen by clicking on the Session category. Enter a name for the session in the Saved Sessions text field and press Save. Click on Open to establish the connection. A terminal window will appear with the login prompt from the remote system. Enter the appropriate user login and password credentials.
|
You are reading a sample chapter from the Red Hat Enterprise Linux 8 (RHEL 8) Essentials book. Purchase a full copy of Red Hat Enterprise Linux 8 (RHEL 8) Essentials in eBook ($9.99) or Print ($36.99) format Red Hat Enterprise Linux 8 Essentials Print and eBook (ePub/PDF/Kindle) editions contain 31 chapters and over 250 pages |
Shutting Down a Desktop Session
In order to shut down a VNC Server hosted desktop session, use the –kill command-line option together with the number of the desktop to be terminated. For example, to kill desktop :1:
# vncserver –kill :1
Troubleshooting a VNC Connection
With so much happening in the background, VNC can sometimes seem opaque, particularly when problems arise and the server either fails to start, or attempts to connect remotely result in error messages. There are, however, a number of techniques for tracking down and resolving VNC problems:
If the VNC service fails to start, check the systemctl status of the service and check for error messages:
# systemctl status vncserver@:1.service
For more detailed information, check the systemd journal by running the following command:
# journalctl -xe
Additional information may be available in the log file located at:
/home/<username>/.vnc/<hostname>.<domain>:<display number>.log
For example:
/home/neilsmyth/.vnc/rhelserver01.localdomain:1.log
If the systemd VNC service is still unable to start the VNC server, try starting it manually using the following command:
# vncserver :<display number>
For example:
# vncserver :1
Check the output and log file for any errors that may help identify the problem. If the server starts successfully, try connecting again with a VNC viewer.
One area of weakness in the vncconfig.sh script is that it can, particularly when the server is running in a virtual machine, sometimes incorrectly identify the firewall zone for which the appropriate port needs to be opened. If the VNC server appears to be running but attempts to connect from a viewer fail, it may be worth checking that the correct firewall ports are open. Begin by identifying the default zone as follows:
# firewall-cmd --get-default-zone
public
Having obtained the default zone, check that the necessary ports are open:
# firewall-cmd --permanent --zone=public --list-ports
5901/tcp 5900/tcp
If a port used by VNC is not open, add the port as follows:
# firewall-cmd --permanent --zone=public --add-port=<port number>/tcp
Summary
Remote access to the GNOME desktop environment of a RHEL 8 system can be enabled by making use of Virtual Network Computing (VNC). Comprising the VNC server running on the remote server and a corresponding client on the local host, VNC allows remote access to multiple desktop instances running on the server. Although the VNC server can be configured manually, a much easier and less error prone approach is to download and run the Red Hat VNC Configurator script.
When the VNC connection is being used over a public connection, the use of SSH tunneling is recommended to ensure that the communication between client and server is encrypted and secure.
|
You are reading a sample chapter from the Red Hat Enterprise Linux 8 (RHEL 8) Essentials book. Purchase a full copy of Red Hat Enterprise Linux 8 (RHEL 8) Essentials in eBook ($9.99) or Print ($36.99) format Red Hat Enterprise Linux 8 Essentials Print and eBook (ePub/PDF/Kindle) editions contain 31 chapters and over 250 pages |
| Previous | Table of Contents | Next |
| Configuring SSH Key-based Authentication on RHEL 8 | Displaying RHEL 8 Applications Remotely (X11 Forwarding) |


