Installing RHEL 6 on a Clean Disk Drive
| Previous | Table of Contents | Next |
| A Brief History of Red Hat Linux | Performing an RHEL 6 Network Installation |
|
You are reading a sample chapter from the RHEL 6 Edition book. Purchase the fully updated Red Hat Enterprise Linux 8 (RHEL 8) Edition of this publication in eBook ($9.99) or Print ($36.99) format Red Hat Enterprise Linux 8 Essentials Print and eBook (ePub/PDF/Kindle) editions contain 31 chapters and over 250 pages |
The first step on the path to learning about Red Hat Enterprise Linux 6 involves installing the operating system. RHEL can be installed either in a clean disk environment (where an entire disk is cleared of any existing partitions and dedicated entirely to RHEL) or in a dual boot environment where RHEL co-exists with another operating system on the disk (typically a member of the Microsoft Windows family of operating systems).
In this chapter we will be covering the clean disk approach to installation. Dual boot installation will be covered in Installing RHEL 6 with Windows in Dual Boot Environment.
Obtaining the Red Hat Enterprise Linux Installation Media
Although RHEL is an open source operating system, and as such, the source code is freely downloadable, the binary installation images are only available as part of a paid Red Hat Enterprise Linux subscription. In addition to access to the installation images for RHEL, this subscription also provides technical support for the operating system. If you already have a paid subscription, log into your Red Hat account to download the operating system. If you would like to try out RHEL before purchasing, Red Hat provides a 30-day trial. To register for a trial, visit the Red Hat website at http://www.redhat.com/rhel/details/eval/ and complete the registration process. For qualifying software developers and partners, RHEL 6 subscriptions for testing purposes are available through the Red Hat partner program.
The installation distribution can be downloaded as a single DVD image. This DVD image is named using the following convention:
rhel-<variant>-<version>-<architecture>-dvd.iso
For example, the RHEL 6.0 server DVD image for 64-bit systems is named as follows:
>pre> rhel-server-6.0-x86_64-dvd.iso </pre>
Having downloaded the DVD image, either burn it to disk, configure your virtualization environment to treat it as a DVD drives or use the steps outlined in Performing an RHEL 6 Network Installation to access the installation image over a network.
Installing Red Hat Enterprise Linux 6
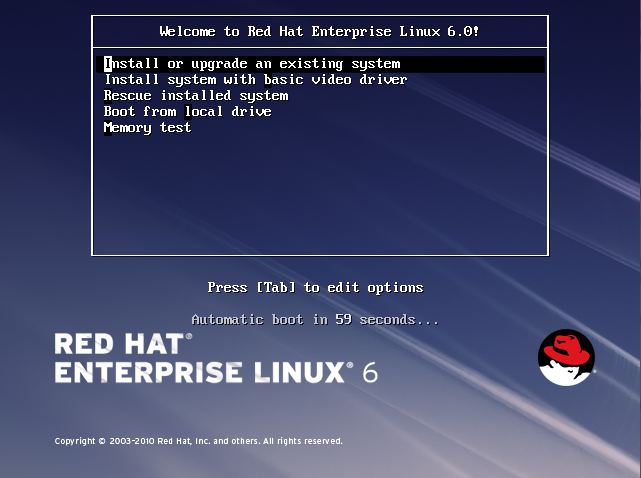
Insert the RHEL 6 DVD into the appropriate drive and power on the system. If the system tries to boot from the hard disk drive you will need to enter the BIOS set up for your computer and change the boot order so that it boots from the DVD drive first. Once the system has booted you will be presented with the following screen:
To install using the graphical installer, simply select the first installation option and press the <Enter> key. If you encounter problems with the display when the graphical installer begins, reboot and try again with the basic video driver option. Note also that if the host system has insufficient memory or a graphics card is not detected, the installer will run in text mode.
Options are also available to boot from the current operating system on the local drive (if one is installed), test the system memory, or rescue an installed RHEL 6 system. The last option alone is reason enough to keep the installation DVD in a safe place in case you need to perform a rescue at some future date.
The RHEL installer will then provide the option to test the installation media for errors. Use the arrow keys to navigate between the options and make a selection with the <Enter> key. After a short delay the first screen of the graphical installer will appear. Navigate through the next few pages to configure your preferred language, keyboard type and storage devices (unless you plan to use a Storage Area Network device, the Basic option is recommended). If the installer detects that the target disk needs to be initialized a dialog will appear seeking confirmation.
Timezone and the Root Password
Subsequent screens will request information about Timezone and the root password of the system.
On the Timezone screen, make a selection corresponding to your geographical location. The option is also provided to use UTC which automatically adjusts the time to account for daylight savings time. If the computer on which RHEL is being installed also runs another operating system which already uses UTC (such as Windows), leave this option unselected.
On the next screen, enter a password for the root account on the system. The root, or super-user account is a special user that has administrative privileges on the system. Whilst you will generally use your own account to log into the system, you will need to gain root privileges in order to configure the system and to perform other administrative tasks.
The installer will subsequently move on to the disk partitioning screen.
Partitioning a Disk for RHEL 6
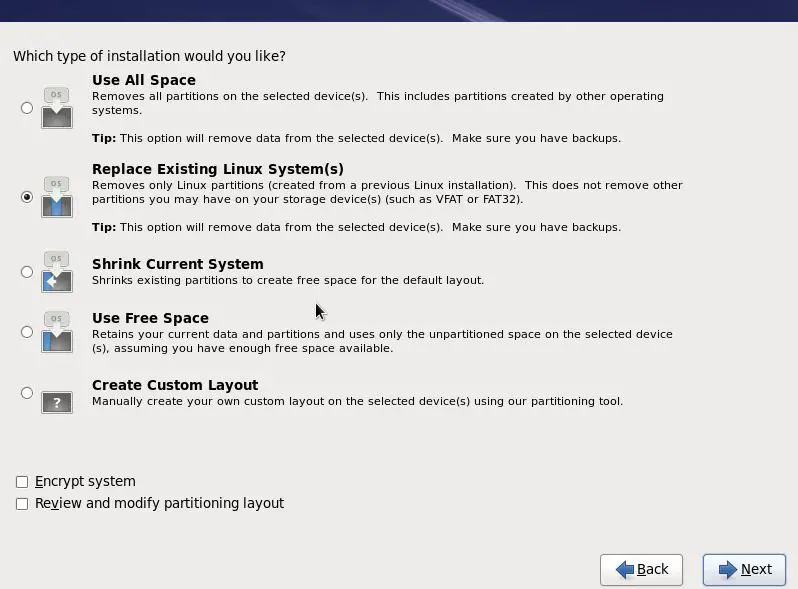
When you reach the disk partitioning phase of the installation, the installer will present a screen similar to the one illustrated in the following figure:
A number of options are provided for allocating space for the installation of Fedora:
- Use All Space - The entire disk drive will be assigned to the RHEL 6 operating system installation. Any pre-existing partitions, together with any existing operating systems and associated data files contained therein will be deleted to make room for RHEL. This option should only be used if you are absolutely sure you no longer need anything that is currently stored on that disk, or have already backed up all user files.
- Replace existing Linux System(s) - If the drive was previously configured to support a Windows/Linux dual boot environment or was devoted entirely to another Linux installation, this option may be selected to instruct the installer to delete the pre-existing Linux partition and replace it with RHEL 6. Once again, it is important to backup any user data that may still be needed.
- Shrink Current system - Allows an existing partition to be reduced in size to make room on the drive for the RHEL 6 installation. More details on this option are provided in a later chapter entitled Installing RHEL 6 with Windows in Dual Boot Environment.
- Use Free Space - If the current partitions on the drive do not take up the entire disk space available, any unallocated space may be assigned to the RHEL installation using this option.
- Create Custom Layout - When selected, this option displays the disk partitioning tool allowing each partition on the disk to be manually configured. Unless you have experience with low level disk partitioning this option is not recommended.
On this screen, make a selection based on your requirements. If, for example, the entire disk is to be used for RHEL 6, select the Use All Space option. In order to implement a dual boot configuration, refer to Installing RHEL 6 with Windows in Dual Boot Environment.
For the purposes of this chapter we are assuming the entire disk is available to accommodate the RHEL 6 installation so select the Use All Space option.
Beneath the partition menu is the option to encrypt the system. The choice of whether to use encryption will depend on the purpose for which the system is being used, its physical location and type of data it is going to store. Keep in mind that as with any form of encryption there are performance overheads associated with selecting this option.
Having made the partitioning selection click Next to begin the partitioning process.
Package Selection
Linux is a modular operating system in that it provides a basic operating system kernel and infrastructure upon which a range of different packages may be installed depending on your specific requirements for the system. If, for example, you plan on using the system as a web server you would need to install the Apache web server package.
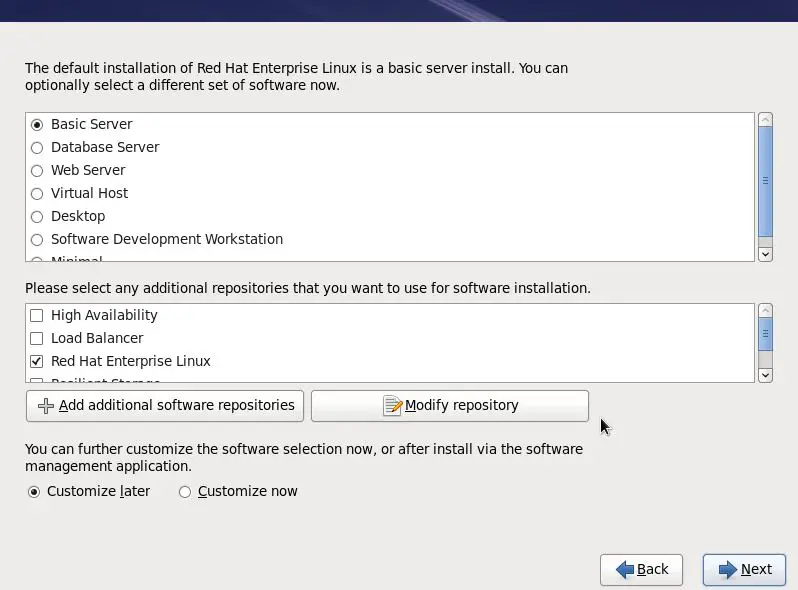
At this point in the installation the installer needs us to decide which packages should be installed along with the base operating system and displays the screen shown in the following figure:
This screen allows you to make general choices about the type of functions you need the system to perform. Ideally, you should select the option that most closely resembles the intended purpose of the system.
To view or modify the specific package selections, make sure that the Customize Now option is selected before proceeding. You will then be provided a complete overview of which packages are selected for installation and which are not together with the ability to make changes to these selections. Don’t worry too much about getting this exactly right at this stage. Packages can be added and removed at any time after the installation is complete by selecting the desktop System -> Administration -> Add/Remove Software menu option.
The Physical Installation
Having made the appropriate package selections, clicking Next will initiate the installation process. During the installation process, the installer will provide a running commentary of the selected packages as they are installed and a progress bar. If you are using the DVD the installation will complete without further interaction. Once the installation process is complete a screen will appear containing a button to reboot the system. Remove the installation media and click the button.
Final Configuration Steps
After the system has started for the first time, the RHEL 6 Setup Agent will appear with a welcome message. Click on the Forward button to display licensing terms and conditions and select the option to accept the terms of the agreement (assuming of course that you do agree to them).
On the Setup Software Updates screen, register the system with the Red Hat Network (RHN). This enables additional packages to be installed from the RHN repositories and also allows the system to receive software updates. In order to register the system, enter your RHN user login and password when prompted. If you would prefer to register the system at a later time, do so simply by running the rhn_register command from a terminal window or selecting the System -> Administration -> RHN Registration menu option.
Choose whether or not to enable Kdump support and then work through the remaining screens to create a user account for yourself and verify the date and time. If you would like the date and time of your RHEL system to be synchronized with an external Network Time Protocol server, select the Synchronize date and time over network option before proceeding.
Having worked through all the set up pages, click Finish to exit the setup agent and log in using your newly created account credentials.
|
You are reading a sample chapter from the RHEL 6 Edition book. Purchase the fully updated Red Hat Enterprise Linux 8 (RHEL 8) Edition of this publication in eBook ($9.99) or Print ($36.99) format Red Hat Enterprise Linux 8 Essentials Print and eBook (ePub/PDF/Kindle) editions contain 31 chapters and over 250 pages |
| Previous | Table of Contents | Next |
| A Brief History of Red Hat Linux | Performing an RHEL 6 Network Installation |


